Static Grass Applicator
thingiverse
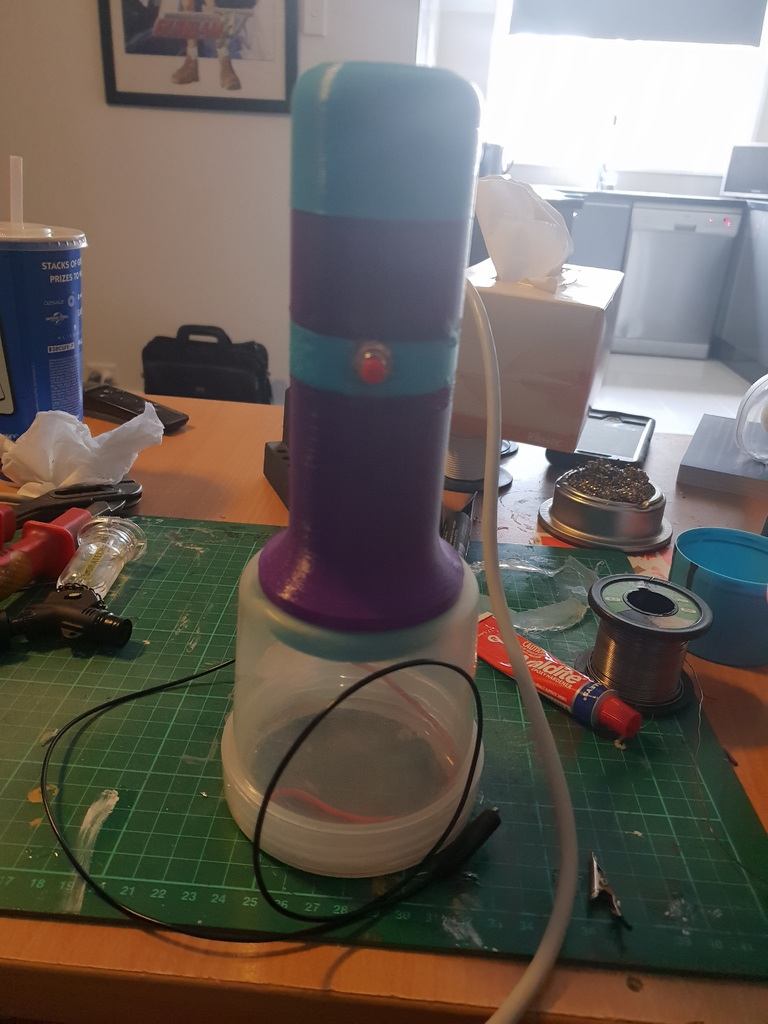
I needed a grass applicator for a diorama project, but I didn't want to spend top dollar at the local shop. I'd seen cheap ones that seemed to zap people before, and my friend had fallen victim to one of those devices. To make the project more affordable, I decided to get creative with some tools I already had on hand. Here's a list of what I used: Tools: • Soldering iron • Heat gun • Wire cutter • Wire strippers • Hot glue gun Consumables: • Negative Ion Generator (I found one online) • Metal alligator clip • Heat-shrink tubing (5mm diameter) • Epoxy glue • Sieve wire mesh • Plastic container (a common household item) • 9-volt battery • 9-volt battery connector • 500mm of wire for the grounding wire • Push button switch (another online find) • Hot glue gun sticks • Solder Here's a step-by-step guide on how to build the grass applicator: 1. Place the Negative Ion Generator into the Grass Applicator Bottom, making sure the negative and positive wires are sticking out the top and the -EHT output wire is sticking through the bottom hole. 2. Apply a small amount of epoxy glue along one edge of the Negative Ion Generator and Grass Applicator Bottom to secure them together. 3. Add a bead of hot glue around the Negative Ion Generator -EHT output wire and the Grass Applicator Bottom to block the hole. 4. Attach the push button switch to the Grass Applicator Middle. 5. Feed the Negative Ion Generator positive and negative wires through the Grass Applicator Middle hole. 6. Epoxy glue the Grass Applicator Middle and Grass Applicator Bottom together. 7. Cut to length, apply heat shrink, and solder the Negative Ion Generator positive wire to the switch. 8. Cut to length, apply heat shrink, and solder the 9-volt positive battery terminal to the switch. 9. Cut to length, apply heat shrink, and solder the Negative Ion Generator negative wire, 9-volt negative battery terminal, and grounding wire together. 10. Shrink all heat shrink if you haven't already done so. 11. Feed the ground wire through the round hole on the bottom of the Grass Applicator Top then out the back. 12. Feed the 9Volt battery out through the rectangular hole on the bottom of the Grass Applicator Top. 13. Epoxy glue the Grass Applicator Top and Grass Applicator Bottom together. 14. Apply packing material to the Grass Applicator Cap to help hold in the battery. 15. Cut a 60mm hole into the centre of the Plastic container. 16. Remove the lid from the plastic container. 17. Screw the Grass Applicator into the plastic container. 18. Screw the Grass Applicator Nut onto the Grass Applicator. 19. Cut a hole in the plastic container lid and hot glue the wire mesh to the lid. 20. Connect the Negative Ion Generator -EHT output wire to the sieve wire mesh.
With this file you will be able to print Static Grass Applicator with your 3D printer. Click on the button and save the file on your computer to work, edit or customize your design. You can also find more 3D designs for printers on Static Grass Applicator.