Steadicam for DC camera
thingiverse
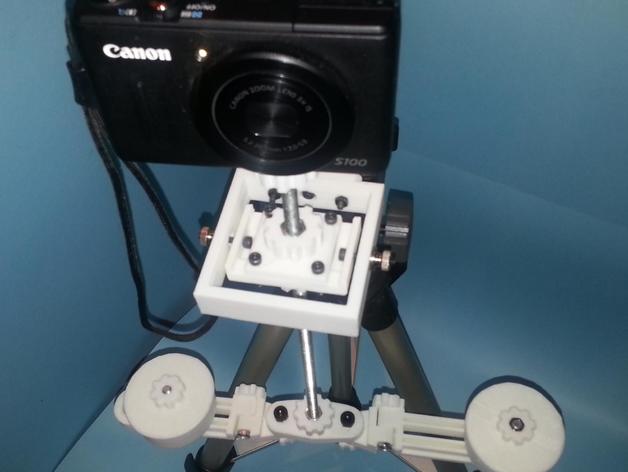
Steadicam for DC camera Instructions The STL size for this is huge, so I upload my source file in 123D beta 0.9, and for your easy edit. My design is inspired by lots of gimbal / steadicam made by others, can't recall and mention all of them. But I re-draw it by myself. The dimensions may sometime seem strange, since my printer has a tolerance of approx. 0.5 mm. Basically, all holes are for the bearings and screws mention below (M3, M5 and 1/4-20) You will need the following parts: 1/4-20 thread rod, this is the shaft of the steadicam and can directly screw into your DC camera. The longer the better for steady motion. 1/4 inner diameter bearing x 1, mine is 6.35 x 15.875 x 4.978 mm 5mm bearing x 1 for the handle (y-axis), mine is 5 x 16 x 5 mm 3mm bearing x 2 (x-axis), mine is 3 x 10 x 4mm M3 and M5 Bots various length (sorry, I am too lazy to count) M3, M5, and 1/4-20 Nuts M3, M5, and 1/4-20 Thumb nuts, you can print it yourself or use readymade A handle, I didn't design one since I have one on hand and readymade is more comfortable Notes on counter-weight: I use steel balls to fill in the container, but this approach is expensive. You can use any weight you can think of. Enhancement: Instead of screw your DC directly onto it, you may use a Marco Rail instead. Then you have more control on the location of your DC to balance it, instead of using the turning mechanism at the bottom. and, sorry for my sluggish Enghlish
With this file you will be able to print Steadicam for DC camera with your 3D printer. Click on the button and save the file on your computer to work, edit or customize your design. You can also find more 3D designs for printers on Steadicam for DC camera.