Stepper driver for Artillery Sidewinder X1 fan
thingiverse
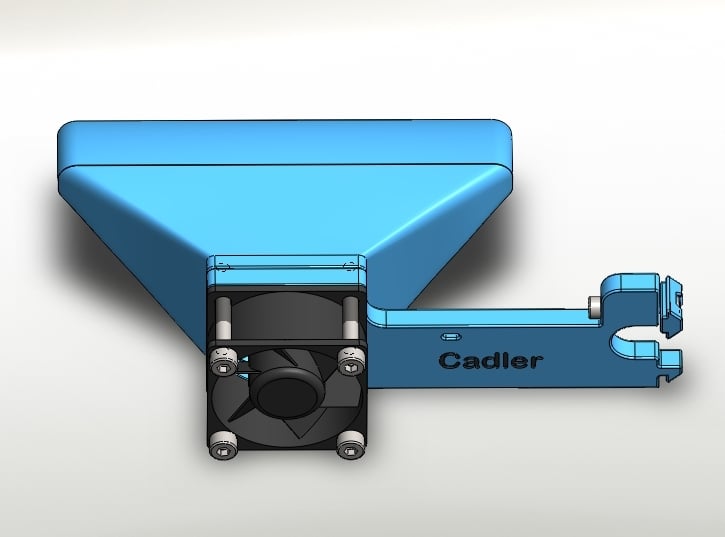
# Stepper driver for Artillery Sidewinder X1 fan To reduce the heating of the stepper drivers in Sidewinder X1 I installed an additional 24Volt 40mm axial fan into the case. For my modification I constructed a cooling funnel with holding arm and slot nut. Additionally I put the printer case on spacers, so there is a better air circulation under the case. I turned the 80mm fan at the case cover by 180 degrees so that the cooling air is blown into the case. The attachment of the cooling funnel is done via the aluminum profile in the case. See my pictures for installation. After the assembly the 24 Volt connection of the 80mm fan is coupled with a Y-connection with the 40mm fan. ## Required parts: 4x cylinder screw M3 x 8 DIN 912 for spacers 1x cylinder screw M3 x 20 DIN 912 for mounting axial fan 4x cylinder screw M4 x 30 DIN 912 for attachment axial fan 1x hexagon nut M3 for slot nut 1x cable tie I installed this fan from ebay: [Lüfter 24V 0,8W 40x40x20mm 13m³/h 21dBA ; Sunon EB40202S2-999](https://www.ebay.de/itm/Lüfter-24V-0-8W-40x40x20mm-13m-h-21dBA-Sunon-EB40202S2-999/310782967511) ## Parts from PLA for printing: 1x Nutenstein_Sidewinder_X1 1x Halterung_Axiallüfter_Sidewinder_X1 1x Lüftertrichter_Lüfter_Steppertreiber_Sidewinder_X1 (cut 4x thread M4 additionally) ## For spacers: 4x Logo_Distanz 4x Distanz_Bodenplatte_mit_Logo (cut 2x thread M3 additionally each) I glued the logo into the distances with UHU Plast special. Have fun with the modification. ------------------------------------- German version: # Artillery Sidewinder X1 Lüfter Steppertreiber Um die Erwärmung der Steppertreiber im Sidewinder X1 zu reduzieren habe ich einen zusätzlichen 24Volt 40mm Axiallüfter in das Gehäuse eingebaut. Für meinen Umbau habe ich ein Kühlungstrichter mit Haltearm und Nutenstein konstruiert. Zusätzlich stelle ich das Druckergehäuse noch auf Distanzen, damit erfolgt eine noch bessere Luftzirkulation unter dem Gehäuse. Den 80mm Lüfter am Gehäusedeckel habe ich um 180Grad gedreht so dass die Kühlluft in das Gehäuse geblasen wird. Der Anbau des Kühlungstrichters erfolgt über das Aluminiumprofil im Gehäuse. Seht hierzu meine Bilder zum Einbau. Nach der Montage wird der 24 Volt Anschluss vom 80mm Lüfter mit einer Ypsilon-Verbindung mit dem 40mm Lüfter gekoppelt. ## Benötigte Teile: 4x Zylinderschraube M3 x 8 DIN 912 für Distanzen 1x Zylinderschraube M3 x 20 DIN 912 für Halterung Axiallüfter 4x Zylinderschraube M4 x 30 DIN 912 für Befestigung Axiallüfter 1x Sechskantmutter M3 für Nutenstein 1x Kabelbinder Ich habe diesen Lüfter von Ebay eingebaut: [Lüfter 24V 0,8W 40x40x20mm 13m³/h 21dBA ; Sunon EB40202S2-999](https://www.ebay.de/itm/Lüfter-24V-0-8W-40x40x20mm-13m-h-21dBA-Sunon-EB40202S2-999/310782967511) ## Teile aus PLA zum Drucken 1x Nutenstein_Sidewinder_X1 1x Halterung_Axiallüfter_Sidewinder_X1 1x Lüftertrichter_Lüfter_Steppertreiber_Sidewinder_X1 (4x Gewinde M4 zusätzlich schneiden) ## Für Distanzen 4x Logo_Distanz 4x Distanz_Bodenplatte_mit_Logo (je 2x Gewinde M3 zusätzlich schneiden) Das Logo habe ich mit UHU Plast special in die Distanzen eingeklebt. Viel Spaß beim Umbau
With this file you will be able to print Stepper driver for Artillery Sidewinder X1 fan with your 3D printer. Click on the button and save the file on your computer to work, edit or customize your design. You can also find more 3D designs for printers on Stepper driver for Artillery Sidewinder X1 fan .