Stepper upgrade for makerbot MK5 extruder
thingiverse
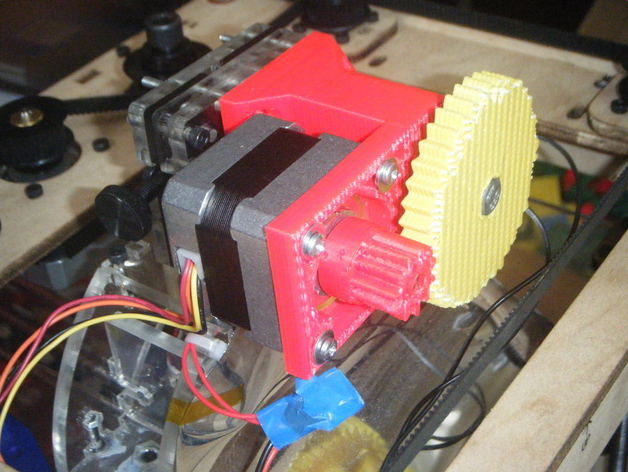
An adapter for the Makerbot Mk5 extruder for a stepper motor Instructions This uses a modified version of Wade's gears derived from Nicolas's http://www.thingiverse.com/thing:4305 Build the adapter part and one each of the gears. Drill out the holes in the adaptor with a 3mm drill, the holes on the wider side are larger and are to accommodate the heads of the bolts if you clear that side of the holes be careful not to drill all the way through. Sand the top surface of the adaptor flat - it will seat on the Mk5 where the existing motor does. The large gear is used upside down from the way that Wade uses it the bolt goes in from the flat side with gear's hub pointing to the thread end. Here we will use a novel tool, it appears one can't just add ones own tools to Thingiverse - I'd like to introduce FIRE, a versatile and old-school tool - it may be obtained variously from Prometheus, MÄtariÅ›van, Coyote, Rabbit, MÄui etc or their proxies, it may also be stolen from the gods directly, though the whole standing in a storm with a kite thing is not recommended - I just use the stove. Rather than moulding a hex hole in the gear the head of the M6 bolt is melted in to the flat surface of the gear as a build step: take the bolt in a pair of vice grips as a heat sink, heat the head on a stove or other flame - when it's just hot enough to melt some scrap ABS quickly drop the bolt through the hole and pull it until it's embedded in the gear, gently spin the bolt and align the gear so that it's true before the bolt cools. Use your fire again in a different form to fit the M3 nut into the square hole at the base of the small gear - if it wont fit, get a soldering iron, heat it and use it to push the nut into the hole until it lines up correctly. Attach the M3x8mm bolt grub screw to the small gear. Take the stepper motor, file one side of the drive shaft flat (use blue tack to keep filings out of the motor bearing). Place the small gear on the drive shaft, don't completely tighten the grub screw, attach the motor to the slots in the adapter using the 4 M3 12mm bolts/M4 washers (gear side down) don't tighten them yet. Place bearings in each end of the adapter - the lower one should be flush, the upper one sits in a 1mm lip and should extend 5mm. Place a washer on the bolt on the gear and drop the bolt through the bearings (you might temporarily put a nut/washers on the end to hold the lower bearing in place. Adjust the position of the motor and tighten the two visible bolts also adjust the position of the small gear and tighten the grub screw (make sure it can turn without binding). Remove the large gear/bolt/washer, tighten the other two motor retaining bolts. Also slide the 4 m3x35mm bolts into their holes. Replace the large gear/bolt/washer. Now start to disassemble the Mk5 - first run the Z stage up as high as you can go, and remove any filament, there's no reason to remove everything from the makerbot - first remove the 4 bolts that hold the motor, remove the motor - leave the 606 bearing in place Remove the Mk5 Drive gear from the old motor, disconnect the motor from extruder controller and put it aside. Slide the Mk5 Drive Gear onto the end of the M6 bolt on the adapter (grubs screw end first just like it was on the motor) put it up close to the bearing, gently tighten the grub screw - at some point the grub screw will seat between 2 threads on the bolt, turn the drive gear so that it screws down the thread as close as it can go to the bearing without binding, tighten the grub screw. Look at the extruder - there are 4 m3 bolts equidistant around the hole the motor came out of - remove all 4, keep the nuts. Now place the adapter into the position where the motor was, the stepper motor should be oriented towards the electronics end of the Makerbot - slide the bolt in through the hole the old motor came from and out the other side through the 606 bearing you left in place - the bearing that protrudes 5mm from the adapter should be sitting in the extruder and the drive gear should be back where it originally came from. You can put a nut/washer on the end of the bolt if you want but it's really not needed, that bearing has been sitting there comfortably by itself for a while now. The 4 35mm bolts should now be extending through the holes you removed the last set of bolts from - use the 4 nuts you saved to tighten them up to hold down the new adapter nice and tight. Hook up the stepper motor - I used a Makerbot stepper - it has 4 wires (their colors may vary for other steppers) - they're connected to a normal stepper board as A/B/C/D we're going to connect them to the extruder board's H-bridge outputs 1A/1B/2A/2B as follows: Color stepper extruder yellow A 1A red B 1B black C 2A orange D 2B Now we're ready to turn things on - directions are from the following: http://wiki.makerbot.com/stepper-driven-extruder Run repg and choose Machine->upload new firmware->extruder controller->v2.3 release 3 w/stepper support. Do the usual extruder firmware upgrade dance. Quit from repg and edit your 'machines.xml' file (lives in ~/.replicatorg on Linux, elsewhere for other systems) find the section that describes your machine and look for the following
With this file you will be able to print Stepper upgrade for makerbot MK5 extruder with your 3D printer. Click on the button and save the file on your computer to work, edit or customize your design. You can also find more 3D designs for printers on Stepper upgrade for makerbot MK5 extruder.