MIST-O-Matic 3000
thingiverse
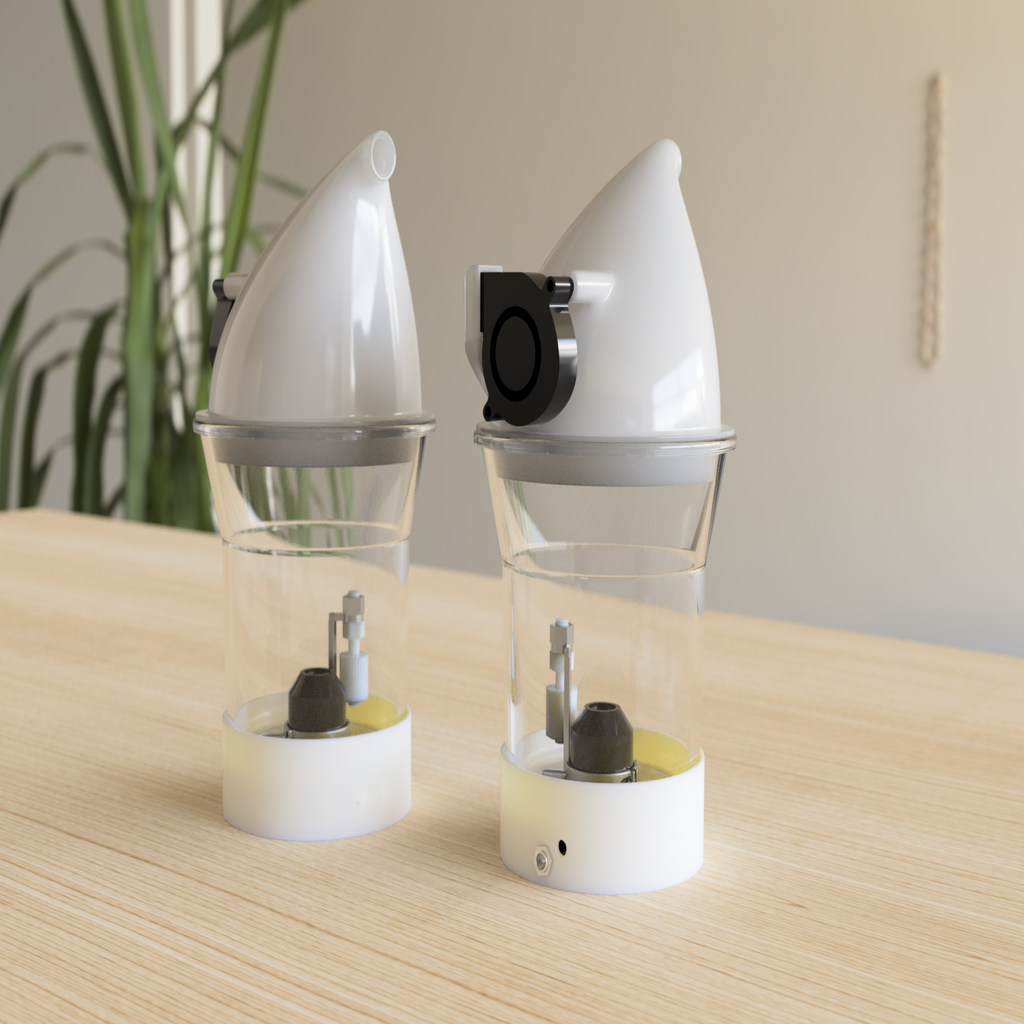
## DON'T PANIC ! This little chat will be quite long, as the story behind this project gets pretty time consuming, but I am really proud of machine that came from it, and I had to say, it is my most engineered and functional design so far. If you are in rush, there is also TL; DR section down below so feel free do as you wish. Few years ago, I ordered cheap and simple humidifier from Aliexpress, with remote controll. Of course, it was working pretty well and for about 20 euros, nice deal. But as you can imagine, I was too lazy to bend for the remote controller under the table to be able to turn this machine on or off. In the history of mankind, we can clearly see, one would invent anything, so that on would not have to think. So, I started to think about re-doing this machine, and add wifi capability to it. Soon I realized that it has some custom controller board which I could not hack with my skills so far. I came with another solution, I ordered ultrasonic mist maker module, and wanted to hook it up to ESP8266, add WS2812b LED strip and change the whole controller to my own. I even came with functional prototype, but to be honest I has few minor principial bugs that made it unusable. Mainly because of ultrasonic module I used, the original one had water intake from top, but the one I bought needed to sink on water surface or feed the water from bottom. I sketched simple funnel, with this disc at the bottom, but soon it started to leak, and it was not able to start making mist at all. Another functionality I wanted was water level measuring. First, I thought about little water level sensor you can buy, it's working by sensing resistance of water (soil originaly) and outputing some analog or digital values. Soon I found out that if you don't switch off power supply to this sensor, it will effectively create electrolysis and there will be a lot of corrosion near the probe itself. In next few sleepless nights, I was scrolling through Aliexpress furiously, and found out better mist ultrasonic module. Due to my bad, and fact there were no documentation about polarity of pinout, I instantly burned that one and had to wait another month for new one to arrive. Remember kids, if there are one green and brown cables, brown is VCC while green is GND. After arrival of spare one, I've got another problem, it was much more powerfull than the old one, the water started to leak because of "wave" it was doing above the water level. This sent my re-do project to oblivion. Then I started to think about another container I could place mist maker into, and I already had the electronics ready. Ikea was smartest move again. I bought this weird shaped glass coninter for very good price and started to design my new humidifier from scratch. I found out the best design workflow for me is to sketch all the parts I am going to use, so I can clearly see how it will fit to the complex parts and overall product. Yes, it is more time consuming for sure, but as the bonus, you can make these bad ass looking animations and rendering you can see in gallery. https://youtu.be/_r0YtPcSlU0 So, after collecting all necessary hardware, I made simple list of functions I wanted to have on this machine. * Water level sensing * Configurable color LEDs * Fire effect (I spent whole one day on this) * 2 buttons to be able to control functions of device * Nice design so WAF (Wife Acceptance Factor) would be high and I can have this in living room * Minimal coding required (thanks to ESPHome) for firmware In my other project of [Smart Aquarium](https://www.thingiverse.com/thing:3921223), I used very reliable floating water level sensor. I know I could use it here too, and It's doing the job just right. For controlling the speed of fan, I use NPN transistor, another one is switching the mist maker. There are 2 simple tactile buttons with these you can controll light and mist itself. The mist maker module is feeded from 24V DC, so I am using DC-DC step down module to power up Neopixel LEDs, and ESP8266 itself. I slightly modified source files after building this first prototype, it should be printable and functional. At the end I added thin rubber gasket to the very bottom of top lid, to prevent mist coming out this way. I really wanted to have this fire effect with addressable LEDs, I even found one guy which converted classic arduino effect code to lambda functions with ESPHome, BUT It was meant for matrix light not ring. So, I found another guy which published nice fire effect code, it was object-oriented code, So I spent few hours thinking how it is working actually and how to write it with lambda functions, and I made it!!! https://youtu.be/zXl-MS1SBCU And that's pretty It. If you made it to here, I want to congratulate you and thank you for your time. ### Enjoy! ## TL; DR Bellow you can find complete parts list (without few small screws I had at home), schematic and whole source code to use with ESPhome so you can add your brand-new humidifier on steroids to HomeAssistant. * [IKEA 365+ Dose](https://www.ikea.com/sk/sk/catalog/products/00393248/) * [5015 Radial fan](https://www.aliexpress.com/item/32817634142.html?spm=a2g0o.productlist.0.0.4f6428ddaGVoPI&algo_pvid=a80b4dba-66ee-418b-8f1b-ac9f9dba974c&algo_expid=a80b4dba-66ee-418b-8f1b-ac9f9dba974c-14&btsid=6eceec6b-1129-40c0-ab5e-8b1ca37098e2&ws_ab_test=searchweb0_0,searchweb201602_6,searchweb201603_52) * [Wemos D1 Mini](https://www.aliexpress.com/item/32688079351.html?spm=a2g0s.9042311.0.0.27424c4dNb6De7) * [Mist maker module atomizer](https://www.aliexpress.com/item/32868526504.html?spm=a2g0s.9042311.0.0.27424c4dcg1iNL) * [DC-DC Step down 5V 3A module](https://www.aliexpress.com/item/32758763577.html?spm=a2g0s.9042311.0.0.27424c4dbZl2vE) * [Floating water level switch](https://www.aliexpress.com/item/32949612847.html?spm=a2g0s.9042311.0.0.27424c4dbohl94) * [Neopixel ring 24 LEDs](https://www.aliexpress.com/item/33006920763.html?spm=a2g0s.9042311.0.0.27424c4dDDdm1n) * [Tactile buttons 6x6x9mm](https://www.aliexpress.com/item/32901668929.html?spm=a2g0o.productlist.0.0.1e364358WLtwNd&algo_pvid=76b6000a-8b29-42ad-ba6f-d359e2ad6352&algo_expid=76b6000a-8b29-42ad-ba6f-d359e2ad6352-0&btsid=e8bfc32a-5135-41d3-a876-12e0855c51d4&ws_ab_test=searchweb0_0,searchweb201602_6,searchweb201603_52) * [10k resistors](https://www.aliexpress.com/item/32847096736.html?spm=a2g0o.productlist.0.0.28ad3b2cHakrv2&algo_pvid=8cda4d30-22c3-4e6b-ab4b-95e04a975dd4&algo_expid=8cda4d30-22c3-4e6b-ab4b-95e04a975dd4-0&btsid=f7b114e0-2495-40de-8765-f3ee8b1f539b&ws_ab_test=searchweb0_0,searchweb201602_6,searchweb201603_52) * [5.5 x 2.5 Power jack pair](https://www.aliexpress.com/item/33022229204.html?spm=a2g0o.productlist.0.0.76732d53569hll&algo_pvid=57e590f1-efb4-4a88-824d-3c4296e5b9c7&algo_expid=57e590f1-efb4-4a88-824d-3c4296e5b9c7-27&btsid=866bf794-cb9a-4ea6-8c76-55a0c45f028f&ws_ab_test=searchweb0_0,searchweb201602_6,searchweb201603_52) * [TIP120 NPN transistors](https://www.aliexpress.com/item/33004348180.html?spm=a2g0o.productlist.0.0.6cac1567sYMVEi&algo_pvid=089a4aad-be67-486f-ba8a-8b8191266cde&algo_expid=089a4aad-be67-486f-ba8a-8b8191266cde-0&btsid=fdeb4f0b-fb1d-49dc-9004-4b05903e5e64&ws_ab_test=searchweb0_0,searchweb201602_6,searchweb201603_52) [24V 2A power supply](https://www.aliexpress.com/item/33014935336.html?spm=a2g0o.productlist.0.0.33f537f046HWcw&algo_pvid=41108537-dd43-4cf3-9755-db1a141727b5&algo_expid=41108537-dd43-4cf3-9755-db1a141727b5-0&btsid=ec785259-25e4-47f2-8c18-886644555324&ws_ab_test=searchweb0_0,searchweb201602_6,searchweb201603_52) ### Source code ```yaml substitutions: devicename: "mist_o_matic_3000" upper_devicename: "MIST-O-Matic3000" esphome: name: $devicename platform: ESP8266 board: d1_mini wifi: ssid: "IoT-WiFi" password: !secret Luc3as_IOT_WIFI_PASS # Enable logging logger: #level: debug # Enable Home Assistant API api: password: !secret esphome_api_pass ota: password: !secret esphome_ota_pass text_sensor: - platform: template name: ${upper_devicename} uptime lambda: |- uint32_t dur = id(uptime_s).state; int dys = 0; int hrs = 0; int mnts = 0; if (dur > 86399) { dys = trunc(dur / 86400); dur = dur - (dys * 86400); } if (dur > 3599) { hrs = trunc(dur / 3600); dur = dur - (hrs * 3600); } if (dur > 59) { mnts = trunc(dur / 60); dur = dur - (mnts * 60); } char buffer[17]; sprintf(buffer, "%ud %02uh %02um %02us", dys, hrs, mnts, dur); return {buffer}; icon: mdi:clock-start update_interval: 30s sensor: - platform: uptime id: uptime_s update_interval: 30s - platform: wifi_signal name: ${upper_devicename} WiFi Signal update_interval: 60s light: - platform: fastled_clockless chipset: WS2812B pin: D8 num_leds: 24 rgb_order: GRB name: ${upper_devicename} light id: humidifierLight effects: - addressable_rainbow: - addressable_rainbow: name: Rainbow Effect With Custom Values speed: 10 width: 24 - addressable_flicker: - addressable_flicker: name: Flicker Effect With Custom Values update_interval: 25ms intensity: 55% - addressable_fireworks: - addressable_fireworks: name: Fireworks Effect With Custom Values update_interval: 32ms spark_probability: 80% use_random_color: false fade_out_rate: 120 - addressable_lambda: name: "Fire" update_interval: 20ms lambda: |- int Cooling = 55; int Sparking = 110; static byte heat[24]; int cooldown; // Step 1. Cool down every cell a little for( int i = 0; i < it.size(); i++) { cooldown = random(0, ((Cooling * 10) / it.size()) + 2); if(cooldown>heat[i]) { heat[i]=0; } else { heat[i]=heat[i]-cooldown; } } // Step 2. Heat from each cell drifts 'up' and diffuses a little for( int k= it.size() - 1; k >= 2; k--) { heat[k] = (heat[k - 1] + heat[k - 2] + heat[k - 2]) / 3; } // Step 3. Randomly ignite new 'sparks' near the bottom if( random(255) < Sparking ) { int y = random(7); heat[y] = heat[y] + random(160,255); } // Step 4. Convert heat to LED colors for( int Pixel = 0; Pixel < it.size(); Pixel++) { // Scale 'heat' down from 0-255 to 0-191 byte t192 = round((heat[Pixel]/255.0)*191); // calculate ramp up from byte heatramp = t192 & 0x3F; // 0..63 heatramp <<= 2; // scale up to 0..252 // figure out which third of the spectrum we're in: //this is where you can reverse the effect by switching the commented out lines in all 3 places. if( t192 > 0x80) { // hottest //it[it.size() - Pixel - 1] = ESPColor(255, 255, heatramp); it[Pixel] = ESPColor(255, 255, heatramp); } else if( t192 > 0x40 ) { // middle //it[it.size() - Pixel - 1] = ESPColor(255, heatramp, 0); it[Pixel] = ESPColor(255, heatramp, 0); } else { // coolest //it[it.size() - Pixel - 1] = ESPColor(heatramp, 0, 0); it[Pixel] = ESPColor(heatramp, 0, 0); } } - addressable_lambda: name: "Fire Ring" update_interval: 5ms lambda: |- for( int Pixel = 0; Pixel <= it.size(); Pixel++) { it[Pixel] = ESPColor(155, 83, 27); ESPColor color1; uint8_t r1,g1,b1; uint8_t r2,g2,b2; uint8_t r3,g3,b3; int16_t r,g,b; color1 = it[Pixel].get(); //int color2[] = {80,35,0}; int color2[] = {179, 121, 7}; //ESP_LOGD("main", "Color1 :(%d,%d,%d)", color1[0],color1[1],color1[2]); r1 = (color1[0] ), g1 = (color1[1] ), b1 = (color1[2] ); r2 = (color2[0] ), g2 = (color2[1] ), b2 = (color2[2] ); // Add Color it[Pixel] = ESPColor(constrain(r1+r2, 0, 255), constrain(g1+g2, 0, 255), constrain(b1+b2, 0, 255)); int rc = random(120); // subtract color2[0] = rc; color2[1] = rc/2; color2[2] = rc/2; r1 = (color1[0] ), g1 = (color1[1] ), b1 = (color1[2] ); r2 = (color2[0] ), g2 = (color2[1] ), b2 = (color2[2] ); r=(int16_t)r1-(int16_t)r2; g=(int16_t)g1-(int16_t)g2; b=(int16_t)b1-(int16_t)b2; if(r<0) r=0; if(g<0) g=0; if(b<0) b=0; //ESP_LOGD("main", "Color1 :(%d,%d,%d)", r,g,b); // Substract Color it[Pixel] = ESPColor(r, g, b); } delay(random(10,120)); - addressable_lambda: name: "Blue fire" update_interval: 5ms lambda: |- for( int Pixel = 0; Pixel <= it.size(); Pixel++) { it[Pixel] = ESPColor(22, 24, 130); ESPColor color1; uint8_t r1,g1,b1; uint8_t r2,g2,b2; uint8_t r3,g3,b3; int16_t r,g,b; color1 = it[Pixel].get(); //int color2[] = {80,35,0}; int color2[] = {70, 185, 242}; //ESP_LOGD("main", "Color1 :(%d,%d,%d)", color1[0],color1[1],color1[2]); r1 = (color1[0] ), g1 = (color1[1] ), b1 = (color1[2] ); r2 = (color2[0] ), g2 = (color2[1] ), b2 = (color2[2] ); // Add Color it[Pixel] = ESPColor(constrain(r1+r2, 0, 255), constrain(g1+g2, 0, 255), constrain(b1+b2, 0, 255)); int rc = random(160); // subtract color2[0] = rc/4; color2[1] = rc/4; color2[2] = rc; r1 = (color1[0] ), g1 = (color1[1] ), b1 = (color1[2] ); r2 = (color2[0] ), g2 = (color2[1] ), b2 = (color2[2] ); r=(int16_t)r1-(int16_t)r2; g=(int16_t)g1-(int16_t)g2; b=(int16_t)b1-(int16_t)b2; if(r<0) r=0; if(g<0) g=0; if(b<0) b=0; //ESP_LOGD("main", "Color1 :(%d,%d,%d)", r,g,b); // Substract Color it[Pixel] = ESPColor(r, g, b); } delay(random(10,120)); switch: - platform: restart name: ${upper_devicename} restart - platform: gpio id: humidifierHeater pin: number: D1 restore_mode: ALWAYS_OFF - platform: template # MIN fan speed id: humidifierFanTemplateMin name: ${upper_devicename} min icon: "mdi:spray" turn_on_action: - if: condition: binary_sensor.is_on: humidifierMoisture then: # we have water, turn ON - switch.template.publish: id: humidifierFanTemplateMedium state: OFF - switch.template.publish: id: humidifierFanTemplateHigh state: OFF - switch.template.publish: id: humidifierFanTemplateMin state: ON - switch.turn_on: humidifierHeater # turn on Heater - fan.turn_on: id: humidifierFan speed: low else: # we are out of water, turn OFF - switch.turn_off: humidifierHeater # turn off Heater - switch.template.publish: id: humidifierFanTemplateMin state: OFF - switch.template.publish: id: humidifierFanTemplateMedium state: OFF - switch.template.publish: id: humidifierFanTemplateHigh state: OFF - fan.turn_off: humidifierFan - script.execute: blink_red_light turn_off_action: - switch.turn_off: humidifierHeater # turn off Heater - switch.template.publish: id: humidifierFanTemplateMin state: OFF - switch.template.publish: id: humidifierFanTemplateMedium state: OFF - switch.template.publish: id: humidifierFanTemplateHigh state: OFF - fan.turn_off: humidifierFan - platform: template # MEDIUM fan speed id: humidifierFanTemplateMedium name: ${upper_devicename} medium icon: "mdi:spray" turn_on_action: - if: condition: binary_sensor.is_on: humidifierMoisture then: # we have water, turn ON - switch.template.publish: id: humidifierFanTemplateMin state: OFF - switch.template.publish: id: humidifierFanTemplateHigh state: OFF - switch.template.publish: id: humidifierFanTemplateMedium state: ON - switch.turn_on: humidifierHeater # turn on Heater - fan.turn_on: id: humidifierFan speed: medium else: # we are out of water, turn OFF - switch.turn_off: humidifierHeater # turn off Heater - switch.template.publish: id: humidifierFanTemplateMin state: OFF - switch.template.publish: id: humidifierFanTemplateMedium state: OFF - switch.template.publish: id: humidifierFanTemplateHigh state: OFF - fan.turn_off: humidifierFan - script.execute: blink_red_light turn_off_action: - switch.turn_off: humidifierHeater # turn off Heater - switch.template.publish: id: humidifierFanTemplateMin state: OFF - switch.template.publish: id: humidifierFanTemplateMedium state: OFF - switch.template.publish: id: humidifierFanTemplateHigh state: OFF - fan.turn_off: humidifierFan - platform: template # HIGH fan speed id: humidifierFanTemplateHigh name: ${upper_devicename} high icon: "mdi:spray" turn_on_action: - if: condition: binary_sensor.is_on: humidifierMoisture then: # we have water, turn ON - switch.template.publish: id: humidifierFanTemplateMedium state: OFF - switch.template.publish: id: humidifierFanTemplateMin state: OFF - switch.template.publish: id: humidifierFanTemplateHigh state: ON - switch.turn_on: humidifierHeater # turn on Heater - fan.turn_on: id: humidifierFan speed: high else: # we are out of water, turn OFF - switch.turn_off: humidifierHeater # turn off Heater - switch.template.publish: id: humidifierFanTemplateMin state: OFF - switch.template.publish: id: humidifierFanTemplateMedium state: OFF - switch.template.publish: id: humidifierFanTemplateHigh state: OFF - fan.turn_off: humidifierFan - script.execute: blink_red_light turn_off_action: - switch.turn_off: humidifierHeater # turn off Heater - switch.template.publish: id: humidifierFanTemplateMin state: OFF - switch.template.publish: id: humidifierFanTemplateMedium state: OFF - switch.template.publish: id: humidifierFanTemplateHigh state: OFF - fan.turn_off: humidifierFan binary_sensor: - platform: gpio pin: number: D5 inverted: yes name: Nádrž ${upper_devicename} filters: - delayed_on: 500ms - delayed_off: 2000ms device_class: moisture id: humidifierMoisture on_release: then: - switch.turn_off: humidifierFanTemplateMin - switch.turn_off: humidifierFanTemplateMedium - switch.turn_off: humidifierFanTemplateHigh - script.execute: blink_red_light on_press: then: - script.execute: blink_blue_light - platform: gpio pin: number: D6 mode: INPUT_PULLUP inverted: True filters: - delayed_on: 10ms - delayed_off: 10ms id: humidifierLightButton on_press: then: - light.toggle: humidifierLight - platform: gpio pin: number: D7 mode: INPUT_PULLUP inverted: True filters: - delayed_on: 10ms - delayed_off: 10ms id: humidifierPWRButton on_press: then: - if: condition: binary_sensor.is_on: humidifierMoisture then: - if: condition: or: - switch.is_on: humidifierFanTemplateMin - switch.is_on: humidifierFanTemplateMedium - switch.is_on: humidifierFanTemplateHigh then: - switch.turn_off: humidifierFanTemplateMin - switch.turn_off: humidifierFanTemplateMedium - switch.turn_off: humidifierFanTemplateHigh else: - switch.turn_on: humidifierFanTemplateMin else: # we are out of water, turn OFF - switch.turn_off: humidifierFanTemplateMin - switch.turn_off: humidifierFanTemplateMedium - switch.turn_off: humidifierFanTemplateHigh - script.execute: blink_red_light script: - id: blink_red_light then: - script.stop: blink_blue_light - light.turn_on: # blink red light id: humidifierLight transition_length: 0.5s red: 1.0 green: 0 blue: 0 - delay: 1s - light.turn_off: humidifierLight - delay: 1s - light.turn_on: id: humidifierLight transition_length: 0.5s red: 1.0 green: 0 blue: 0 - delay: 1s - light.turn_off: humidifierLight - id: blink_blue_light then: - script.stop: blink_red_light - light.turn_on: # blink blue light id: humidifierLight transition_length: 0.5s red: 0 green: 0 blue: 1.0 - delay: 1s - light.turn_off: humidifierLight - delay: 1s - light.turn_on: id: humidifierLight transition_length: 0.5s red: 0 green: 0 blue: 1.0 - delay: 1s - light.turn_off: humidifierLight output: - platform: esp8266_pwm pin: D0 frequency: 10 Hz id: humidifierFanOutput fan: - platform: speed output: humidifierFanOutput id: humidifierFan # FAN is internal because we have 3 buttons to select mode #name: FAN ${upper_devicename} speed: low: 0.20 medium: 0.40 high: 0.60 ``` ### If You liked my work, You can buy me a coffee :) <a class="" target="_blank" href="https://www.buymeacoffee.com/luc3as"><img src="https://lukasporubcan.sk/images/buymeacoffee.png" alt="Buy Me A Coffee" style="max-width: 217px !important;"></a> ### Or send some crypto <a class="" target="_blank" href="https://lukasporubcan.sk/donate"><img src="https://lukasporubcan.sk/images/donatebitcoin.png" alt="Donate Bitcoin" style="max-width: 217px !important;"></a>
With this file you will be able to print MIST-O-Matic 3000 with your 3D printer. Click on the button and save the file on your computer to work, edit or customize your design. You can also find more 3D designs for printers on MIST-O-Matic 3000.