Strandbeest
thingiverse
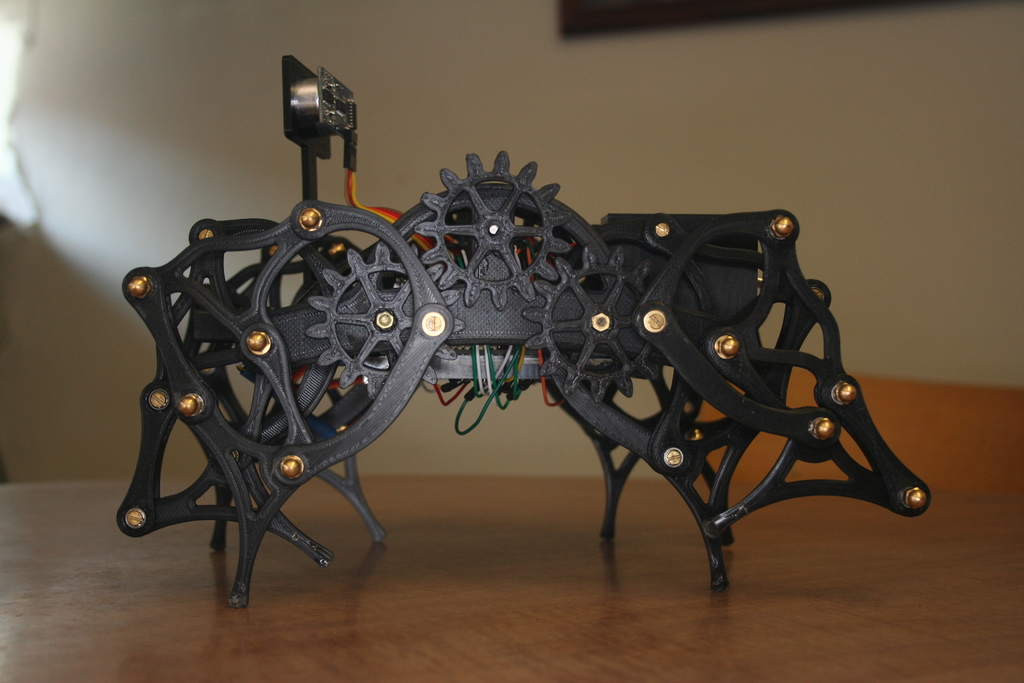
This is a slight remix of @nraynaud's Strandbeest Robot. This one differs primarily in that it was designed to be a semi-autonomous using basic obstacle avoidance running an Arduino Mega and various sensors. Differences from the original: 1. The connector is 20% wider in order to make room for the updated battery holder. 2. The battery holder was redesigned from scratch in Wings 3D in order to allow mounting of an Arduino Mega to the underside and a custom proto board holding the sensors to the top. It was also redesigned to house 4 x 603450 batteries (2 pairs in series to provide 7.4v). A dovetail connection was added to the front in order to mount an IR sensor as it was too wide to pass through the connector opening. Also pre-cut a hole in the front to mount a 9g servo. The sonar holder screws into it for 180 deg distance detection. 3. IR mount for a Sharp GP2Y0A02YK0F (sparkfun.com). 4. Sonar holder for a HC-SR04 (generic). 5. 2 holes in the rear for dpdt switches. 1 switch controls the vin from the batteries to the arduino and the other breaks the ground to the motors. In this way, I could still work on the code and not have it trying to crawl off the table. Notes on the build: 1. Wow. This was my first 3D print project and my first robotics project. I will say this. You had better have a LOT of patience or a LOT of determination. I had the latter. 2. I'm guessing that the number of bearing this thing requires has turned a lot of people off to making it. Yes, there's about $30.00 worth of 3x7x3mm bearings in there. The biggest issue I'm having is getting them to both fit and not keep popping out. In some cases I had to heat them up with the soldering iron and press them into place. 3. I decided on brass for the hardware. This created a problem as @nraynaud's design called for flat sided threaded bolts and/or rods. Apparently these just don't exist is brass so I had to get creative. And it seems that 25mm M3 screws don't exist either. In the case of the cranks, I again, used the soldering iron to embed brass nuts into the gear. This saved the 5mm difference and I was able to use a 20mm screw and thread lock. Even then it still occasionally breaks the thread lock and I have to take it apart and reapply. 4. The rounded brass nuts I chose were another challenge. It would appear that M3 Brass Nylock rounded nuts don't exist. So, using a straightened paperclip and some hot glue. I dipped the paperclip in the glue, swirled it around inside the nut and I made my own. I tried to take the @raynaud's suggestion and get higher rpm motors. I ordered 175rpm's from sparkfun, they sent me 150's. Even then I had issues where at 7.4 volts the motors simply didn't have the torque to go from a tile to carpeted floor. While I did make this and it does work I can't say that I'd recommend it as a first robotics or printing project. Reasons: I had a hell of a time getting a decent print of the connector. There was simply no way I could find to print it without supports. And then, trying to cut and pry the supports off caused me to break 3 of the print attempts. I contacted @nraynaud and he informed me he sent that part out to a commercial printer. Mine, just looks horrid and I really didn't feel like sanding it. Getting the bearings pressed into place was a nightmare that caused misalignments in a lot of the the joints. Even small deviations in alignment caused some of the joints to bind and not work properly or caused the bearing to pop out of their sockets after a bit of use. Overall: If you're an engineering student, I'd say this is a great project and you'd definitely get an appreciation for physics. If you're looking for a robotics project that has legs and doesn't have 18 servos to control, well, this definitely fits that build. Just be prepared to do lots of tinkering to get it right. Was it worth it? After some $200-300 in parts plus buying the printer, I'd have to say, probably, yes. Will I build another one? Hell no. Here's a link to a video of pre-arduino testing. https://www.facebook.com/RAKONEComputerRepair/videos/348142306736219
With this file you will be able to print Strandbeest with your 3D printer. Click on the button and save the file on your computer to work, edit or customize your design. You can also find more 3D designs for printers on Strandbeest.