Sub 30$ 3D laser scanner Open harware/software project
prusaprinters
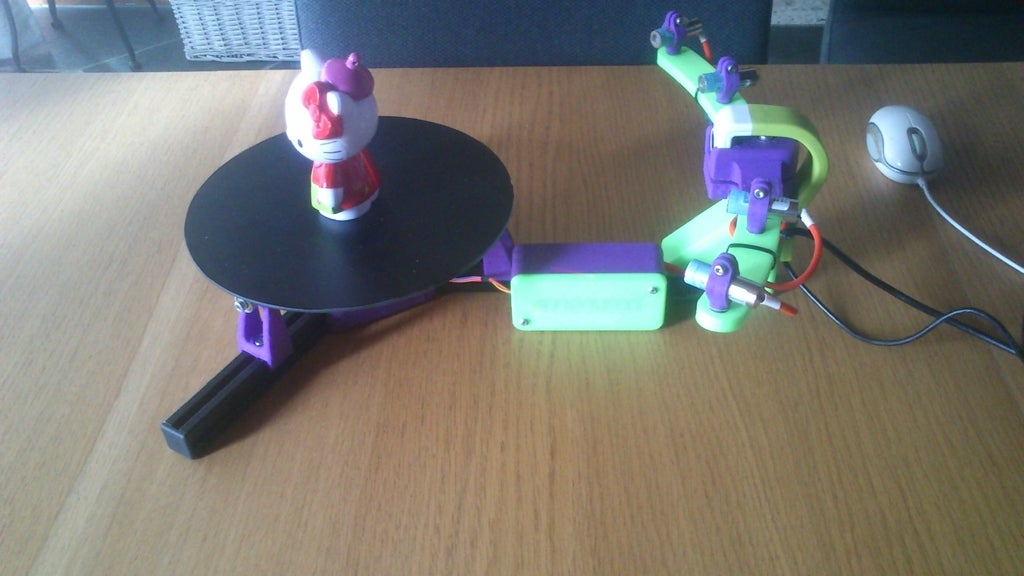
<p>*update<br/> French calibration available on github <a href="https://github.com/Sardau/Sardauscan">https://github.com/Sardau/Sardauscan</a></p> <p><em>update<br/> <a href="http://www.instructables.com/id/Build-a-30-laser/">http://www.instructables.com/id/Build-a-30-laser/</a><br/> i've adden a instructable to explain how to build, calibrate and use the sardauscan.</em></p> <p><em>update: V0.0.0.4 out : (much) faster better stronger</em></p> <h3>Sardauscan is a open source Sub 30$ 3D laser scanner that you can easely print yourself.</h3> <h4>Even 12$ if you already have a hercule HD twist. I think we can say it's "the cheaper 3d scaner on earth"</h4> <p>you just need a arduino nano, 1 to 4 line laser and a micro geared stepper (28BYJ-48)<br/> (see instruction for BOM)</p> <p>no external power needed. just 2 free usb port on your pc : one for the webcam the other for the rest.</p> <p><strong><em>UPDATE</em></strong><br/> I’m proud to announce you the release of the open source Software for the “cheapest 3d scanner on earth” the 30$ DIY Sardauscan.</p> <p>The software Is written in C# and allow you to compose your Scan task by drag and drop.</p> <p>Recommended Process is composed from these scan<br/> “Scan” => “IrQ filter” => “merge laser” (if you use more than one laser) => “Build Mesh by interpolation “ => “Save STL”.</p> <p>But if you are not satisfied with the build-in processing task, or if you prefer use another heavy but powerful software to work with your point clouds like meslab or other,</p> <p>you can just “Scan” => “Save Ply” and import them in your preferred application.</p> <p>While the software come with a building support of the Sardauscan hardware, and usb camera. You can easely write your own Hardware proxy via plugins.</p> <p>You can event build your own task to insert in your scan process.</p> <p>Source Code : <a href="https://github.com/Sardau/Sardauscan">https://github.com/Sardau/Sardauscan</a></p> <p>real time scan video : <a href="https://www.youtube.com/watch?v=TPb-gEVkBYo">https://www.youtube.com/watch?v=TPb-gEVkBYo</a><br/> postprocessing start @ 1:50, if you want to see the speed of post processing (smooth, mesh reconstruct, and stl generation )</p> <p>French discussion : <a href="http://talk.smartfri.odns.fr/index.php?topic=368.0">http://talk.smartfri.odns.fr/index.php?topic=368.0</a></p> <h3>Print instructions</h3><p>Unassociated tags: #EngineeringProject, #MakerEdChallenge2</p> <h3>Category: 3D Printing Summary</h3> <p>*update<br/> French calibration available on github <a href="https://github.com/Sardau/Sardauscan">https://github.com/Sardau/Sardauscan</a></p> <p><em>update<br/> <a href="http://www.instructables.com/id/Build-a-30-laser/">http://www.instructables.com/id/Build-a-30-laser/</a><br/> i've adden a instructable to explain how to build, calibrate and use the sardauscan.</em></p> <p><em>update: V0.0.0.4 out : (much) faster better stronger</em></p> <h3>Sardauscan is a open source Sub 30$ 3D laser scanner that you can easely print yourself.</h3> <h4>Even 12$ if you already have a hercule HD twist. I think we can say it's "the cheaper 3d scaner on earth"</h4> <p>you just need a arduino nano, 1 to 4 line laser and a micro geared stepper (28BYJ-48)<br/> (see instruction for BOM)</p> <p>no external power needed. just 2 free usb port on your pc : one for the webcam the other for the rest.</p> <p><strong><em>UPDATE</em></strong><br/> I’m proud to announce you the release of the open source Software for the “cheapest 3d scanner on earth” the 30$ DIY Sardauscan.</p> <p>The software Is written in C# and allow you to compose your Scan task by drag and drop.</p> <p>Recommended Process is composed from these scan<br/> “Scan” => “IrQ filter” => “merge laser” (if you use more than one laser) => “Build Mesh by interpolation “ => “Save STL”.</p> <p>But if you are not satisfied with the build-in processing task, or if you prefer use another heavy but powerful software to work with your point clouds like meslab or other,</p> <p>you can just “Scan” => “Save Ply” and import them in your preferred application.</p> <p>While the software come with a building support of the Sardauscan hardware, and usb camera. You can easely write your own Hardware proxy via plugins.</p> <p>You can event build your own task to insert in your scan process.</p> <p>Source Code : <a href="https://github.com/Sardau/Sardauscan">https://github.com/Sardau/Sardauscan</a></p> <p>real time scan video : <a href="https://www.youtube.com/watch?v=TPb-gEVkBYo">https://www.youtube.com/watch?v=TPb-gEVkBYo</a><br/> postprocessing start @ 1:50, if you want to see the speed of post processing (smooth, mesh reconstruct, and stl generation )</p> <p>French discussion : <a href="http://talk.smartfri.odns.fr/index.php?topic=368.0">http://talk.smartfri.odns.fr/index.php?topic=368.0</a></p> <h3> Project</h3> <p><strong>Intro</strong></p> <p>Seeing the price tag and limitations of commercial scanners I decided to challenge myself to build my own. It had to be cheaper and easy for anybody to build one using a 3D printer.</p> <p>Result</p> <p>The "Sardauscan" is a laser scanner, comparable to other professional laser scanners but for less than 20-30 times the price, and it has twice the number of lasers.</p> <p>My design principles were:</p> <p>· Keep it simple</p> <p>· Keep it low cost</p> <p>· Make it evolutive</p> <p>· Provide a complete solution</p> <p>The scanner is completely open source and open hardware:</p> <p>· The "Sardauscan" software is written in C# - the full source code is available.</p> <p>· You can write plugins for your own hardware or for your tasks.</p> <p>The software allows you to scan, smooth, build meshes and export to various formats.</p> <p><strong>How does it work?</strong></p> <p>The principle of a 3D laser scanner is simple.</p> <p>· A picture of the object is taken without any lasers firing</p> <p>· One laser is switched on and another picture is taken</p> <p>· Computing the difference between the two images, a laser trace (profile of the object) is obtained</p> <p>· By knowing the positions of the camera and laser you can derive the 3D coordinates of all the points on the profile</p> <p>· You do the same for all the lasers, turn the table and repeat the process until the table has made a full revolution</p> <p>And there you go, you have a complete point cloud representing your object.</p> <p><strong>What do you need ?</strong></p> <p>· A bunch of M3 (16 and 20 mm)</p> <p>· A bunch of M4 (12 and 20 mm)</p> <p>· 1x Arduino nano (Chinese copy, $4) <a href="http://www.befr.ebay.be/itm/NEW-Nano-V3-0-ATmega32">http://www.befr.ebay.be/itm/NEW-Nano-V3-0-ATmega32</a>...</p> <p>· 1x Chinese Stepper Motor (28BYJ-48) and controller (ULN2003) (5$) <a href="http://www.befr.ebay.be/itm/Uln2003-Stepper-Motor">http://www.befr.ebay.be/itm/Uln2003-Stepper-Motor</a>...</p> <p>· 1-4x Line laser 5v ($2.5$ piece) <a href="http://www.befr.ebay.be/itm/251688838898?ssPageNa">http://www.befr.ebay.be/itm/251688838898?ssPageNa</a>...</p> <p>· 1x Hercule HD Twist ($15) <a href="http://www.befr.ebay.be/itm/Hercules-HD-Twist-5-0">http://www.befr.ebay.be/itm/Hercules-HD-Twist-5-0</a>...</p> <p>· 20x20 profile (can be printed : there are plenty of STLs on the net)</p> <p>· optional 3x 4mm roller ($0.3 piece) (624 bearings</p> <p>Total: from $26.5 (1 laser) to $35 (4 lasers)</p> <p>About the 2020 lengths: this is not really important. The only constraint is to have the camera seeing the whole table.</p> <p>For example, here are the lengths I used for my build:</p> <p>· 2 x 140mm</p> <p>· 1 x 120mm</p> <p>· 1 x 250mm</p> <p>What to print</p> <p>All the STL files can be found on Thingiverse:</p> <p><a href="https://www.thingiverse.com/thing:702470">http://www.thingiverse.com/thing:702470</a></p> <p>· 1 x arm_left.stl</p> <p>· 1x box.stl</p> <p>· 1x box_door.stl</p> <p>· 1x box_arduino_clamp.stl</p> <p>· 1x arm_right.stl</p> <p>· 1x CORNER.stl</p> <p>· 1x MOTOR_MOUNT.stl</p> <p>· 1 to 4 x laser_holder.stl</p> <p>· 1X Camera_HOLDER_LOWER_PART.stl</p> <p>· 1x Camera_HOLDER_UPPER_PART.stl</p> <p>· 1x center_axe_MINIMAL.stl OR 1x table_AXLE.stl (OPTIONAL)</p> <p>· 3x roller_baseV2.stl</p> <p>· you can print 12x M4_tslot_nut.stl if you use a 20x20 profile and you don't have any</p> <p>Remarks:</p> <p>· The 2020 profiles are just here for ease of use. You can use whatever you have: wood, metal, …</p> <p>· If you want to use another camera, you will need to adapt “Camera_HOLDER_UPPER_PART” to match it</p> <p>· The bearing are optional. They are only necessary if you want to scan heavy objects or don't have a perfectly flat table</p> <p>· The build is simple, just look at the pictures. You can't do it wrong</p> <p>· Put the motor at the center, place the 3 profiles around and screw them. Place the corner, screw, put the arms, screw, …</p> <p>· There is a hole for each screw, you can’t get it wrong.</p> <p>· For the wiring, please refer to the diagram.</p> <p><strong>Firmware</strong></p> <p>At this point all you need to complete the hardware part is to upload the firmware to the Arduino. You will need the Arduino IDE or another sketch editor.</p> <p>The firmware (a regular Arduino sketch) is available at: <a href="https://github.com/Sardau/Sardauscan">https://github.com/Sardau/Sardauscan</a></p> <p>You will also need to install the AccelStepper library in order to compile it: <a href="https://github.com/adafruit/AccelStepper">https://github.com/adafruit/AccelStepper</a></p> <p>· Edit configuration.h to match your wiring.</p> <p>· Upload it to your Arduino</p> <p>Now that the hardware is ready, test it!</p> <p>· Connect to your Arduino with your IDE</p> <p>· Type “Sardauscan” – the Arduino should answer “yes”</p> <p>· Try the stepper: type “T R 100” – your table should turn 100 steps</p> <p>· Try the laser: type “L 0 1” for the first (0) laser to fire (1) – the first laser should light up</p> <p>If something doesn’t work, check your wiring and configuration.h – it should match.</p> <p><strong>Software and Calibration</strong></p> <p>To install the Sardauscan software, go to github (see link above) and download the latest binary version. Extract it and launch the executable.</p> <p>In the main interface, you will see 3 red icons – one for the table, one for the lasers and one for the camera. Click on them to connect to the hardware (right click to disconnect).</p> <p>If you use the standard Sardauscan firmware the table and the laser switches are linked.</p> <p>Now that the hardware is ready and the software connects to it, here comes the tricky part: calibration.</p> <p>The calibration takes 3 steps:</p> <p>· A manual calibration</p> <p>· The build dimension</p> <p>· The "Adjust" correction</p> <p>Be careful during the calibration: the result quality directly depends on it.</p> <p>To calibrate:</p> <p>· Click the target icon and the ‘Physical’ button.</p> <p>· Move your camera so that the vertical in the preview window crosses the exact center of the table.</p> <p>· Click on the center of the table in the preview window. The lines will help you align the calibration object.</p> <p>· Place the calibration object (see STL on Thingiverse) on the table, flat area facing the camera – use the horizontal line for help.</p> <p>· Click on the first laser icon on top to light up the first laser. Align the laser line to the vertical line in the preview window.</p> <p>· Repeat for all your lasers.</p> <p>Build dimension:</p> <p>· Click on the “build dimension” button and enter your build dimension.</p> <p>Adjust:</p> <p>· As a perfect calibration is difficult to achieve, especially with a higher number of lasers, the correction step will help you correct the previous errors.</p> <p>· Place your calibration object on the center of the table and click “quick scan”.</p> <p>· When the scan is completed you will see a top view of it. Each color corresponds to a different laser.</p> <p>· The goal is to superimpose as best as possible the different laser scans: select a laser in the combo box and rotate (left mouse button), scale (middle mouse button) and pan (right mouse button) the scan.</p> <p>Congratulations , your calibration is done!</p> <p><strong>Dafuq is this interface ?</strong></p> <p>To be evolutive the software is designed around tasks and processes.</p> <p>When you open the program you will see to the left a list of available tasks – you can drag them to the process list on the right then press the ‘Play’ icon at the bottom.</p> <p>Here is a non-exhaustive list of the available tasks:</p> <p>· Scan: scan an object</p> <p>· Grab Pictures: take pictures of the object for use in a photogrammetry program</p> <p>· Filter IQR: remove noise from the data with an interquartile range filter</p> <p>· Filter median: remove noise from the data with a median filter</p> <p>· Angle: merge laser scan by angle – smooth the scan and filter noise</p> <p>· Bezier: smooth the data by fitting a Bezier curve</p> <p>· Surface: smooth the data with a Laplace surface smooth</p> <p>· Save ply: save a PLY file to use with MeshLab or any other point cloud software</p> <p>· Save stl: save the STL file</p> <p><strong>Developer Corner : Evolution ? Own hardware ? Plugins ?</strong></p> <p>As mentionned the software is not linked to the Sardauscan build – it is made to be evolutive.</p> <p>You can do almost whatever you want with plugins.</p> <p>You have a magical algorithm?</p> <p>Do a plugin for it !</p> <p>You have a custom image acquisition hardware ?</p> <p>Do a plugin !</p> <p>You want to use your own hardware firmware for the table or the laser ?</p> <p>Do a plugin !</p> <p>You can look at the github repository, there are some plugins samples. It is really simple to code.</p> <p>To use the plugin, just copy then in the "plugin" subdirectory.</p> <p>Happy scanning !</p>
With this file you will be able to print Sub 30$ 3D laser scanner Open harware/software project with your 3D printer. Click on the button and save the file on your computer to work, edit or customize your design. You can also find more 3D designs for printers on Sub 30$ 3D laser scanner Open harware/software project.