Sunhokey Prusa I3 Anti-Z-wobble
thingiverse
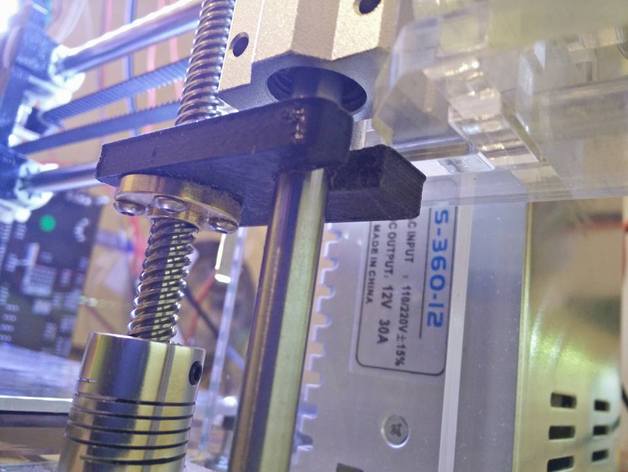
If you are experiencing a rough finish on your printed parts from the Sunhokey Prusa I3 then this mod will help you get rid of that. A floating X-carrige makes as the lines even and smooth as noting is pulling the Z-axis in different directions. This also is also a good improvement if your using autobed leveling, because if the autobed detection fails, the printer can no longer crash into itself as the hotend is "floating" and cannot go lower than the bed allows it to. The only thing needed are 8x M3 8mm screws (or just shorten the ones you already have on the printer). Print with 100% infill in the default orientation of the stl file. (No support) Sand or file the part so that it rides smoothly on the steel rod next to the threaded rod. It should not get stuck when you run the Z axis up and down, also make sure to not widen it too much. Attach the nut that's currently moving your Z axis up and down to the printed parts "rough" side (rough = top of print when on the bed) and secure it with the M3 screws (no nuts should be needed as it will thread good into the plastic) Make sure of orientation and install the mod on the two rods. The smooth (bottom) side should be in contact with the X-carrige. There is a recess in the plastic for a screw that is located on the X-carrige just behind the hardened steel rod so you can only mount it one way. Put everything back together. Level the Z-axis manually by rotating the rods so that they are equally in height. In addition to this mod i recommend you to change the default X-carrige to this one made by shackfu:http://www.thingiverse.com/thing:1026295 And use IGUS Dryline RJ4JP-01-08. Good luck! :)
With this file you will be able to print Sunhokey Prusa I3 Anti-Z-wobble with your 3D printer. Click on the button and save the file on your computer to work, edit or customize your design. You can also find more 3D designs for printers on Sunhokey Prusa I3 Anti-Z-wobble.