Super Retropiepod - 3.5" Raspberry Pi 3 Portable Retro Gaming Handheld
thingiverse
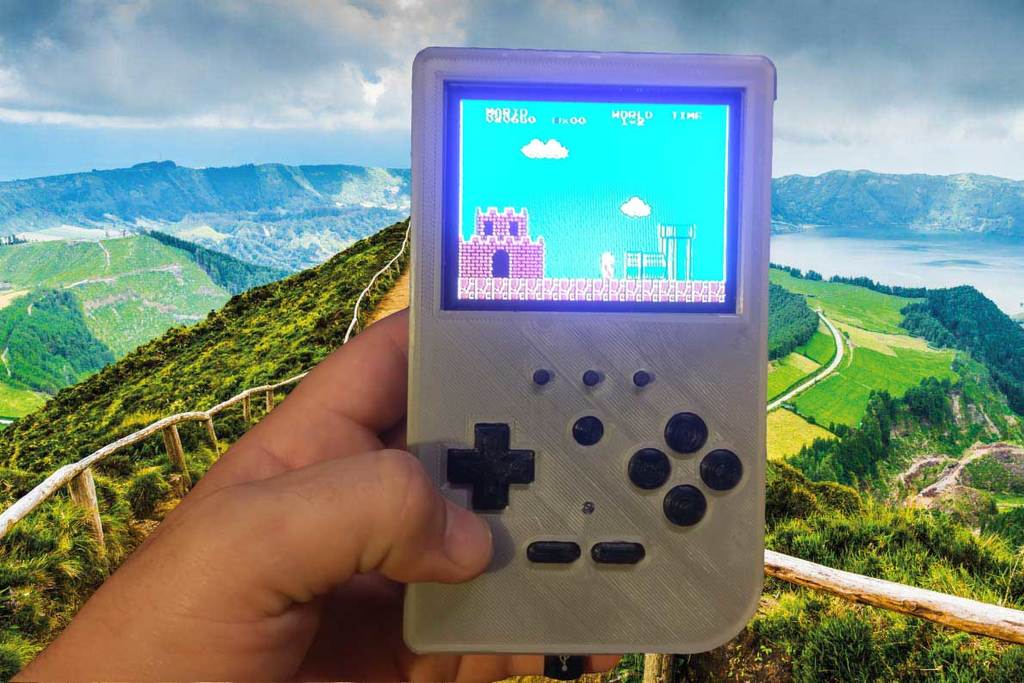
#Super Retropiepod! Best name ever! #Gerber Files For Button Boards Included! You can send the two RAR archives to your favorite PCB maker to get them made, or make them yourself! I use https://jlcpcb.com/ because it's cheap and fast, but the minimum order is 10pcs. I will be listing my spares on Ebay and will link it here. I spent a lot of money developing this. Just under $400 with parts and services. Please consider tips! See my attempt to play Pepsiman here on the Super Retropiepod: https://youtu.be/-517g8r_IGU #Instructions Below! I wanted to make a portable Pi gaming thing for my dad for christmas. I downloaded, printed and checked out a few but.... I dunno, I'm too picky. #What can it do? This is a Raspberry Pi based gaming emulation handheld. It's up to you how it goes together and the software it runs however RetroPie is what is recommended. Check out Retropie here: https://retropie.org.uk/ See what games it can play here: https://retropie.org.uk/about/systems/ The 3.5" color TFT LCD is backlit and has a 4:3 aspect ratio matching many old games. It has a mono speaker but is capable of stereo output via HDMI and Analog Headphone out. You could also hook it to an analog TV with a special adapter cable like this: https://www.amazon.com/TV-Out-Philips-Portable-Player-PET1002/dp/B00PCELGSY The Ethernet and 4 USB 2.0 ports on the Raspberry Pi are accessible with no special adapters needed. Wifi and Bluetooth are included on the Raspberry Pi 3 and 3B+, I highly recommend the 3B+ for the better wifi and extra power for those more intense games. Check out the Raspberry Pi 3B+ here: https://www.raspberrypi.org/products/raspberry-pi-3-model-b-plus/ The controls are simple but there's enough buttons for most games. D pad for direction control and 4 front buttons provide your basic SNES type controller setup. On the back there's two triggers and two bumpers to complete the package and make even Playstation 1 games easy to play. The D-pad Center Spire gets superglued to the circuit board between the D-pad buttons to give the pad something to rock on for that classic feel. Front center is a flush button that will return you to the main menu in Retropie from the game. This button is flush so you do not accidentally press it and leave your game. Under the screen are 3 small buttons, these come with the screen for Menu, Up and Down. I left these in because the little cheap screens I use offer contrast, brightness and other useful controls right on screen! #Modify the screen  Here's the stock wiring. You can remove all of it to get started. The points we need are marked. The 5v + needs to go on the second pin from the left on the top of the small chip in the bottom right of the board.  Here's the screen all wired for 5v and video. You only need the 3 wires. I plan on running these to the GPIO on the Pi but the video wire needs to be soldered to pad PP24 on the back of the pi.  Here's the composite video out pad on my test pi for example. #Setup Retropie Using something like Win32 Disk Imager on windows you can easily setup Retropie. - Download Retropie for your pi https://retropie.org.uk/download/ - Win32 Disk Imager download https://sourceforge.net/projects/win32diskimager/files/latest/download Burn the files to your SD card and edit the config.txt adding the following lines to the end of the file: sdtv_mode=0 hdmi_ignore_edid_audio=1 framebuffer_width=480 framebuffer_height=320 avoid_warnings=1 This sets the output and screen resolution as well as turning off low voltage warnings [Since the powerboost will cause them sometimes but it hurts nothing.] #Setup Controls The controls are based off the Adafruit sccript here: https://github.com/adafruit/Adafruit-Retrogame I have included a custom config file. The easiest way to get this working is use SSH and the above script to install the PiGRRL 2 controls. Once done shutdown the machine and remove the SD card then copy my custom config to it overwriting the current retrogame.cfg in the /boot/ partition. Now you can setup the keys in RetroPie. The config file also shows what pins to hook the buttons too. These buttons work by grounding the pin to send the signal and the Raspberry Pi has internal pull-ups so no additional components are needed. The pin numbers are the GPIO or BCM numbers.  The switch is wired so it goes from Off to On with no sounds to On with sounds.  There's a 3mm hole and space for LED to indicate low battery. This is attached to +5v with a resistor and grounded to the LBO pin on the Powerboost1000c. #Use Themes to make it easier to see! If you plug into an HDMI TV it will switch to that on boot automatically. Connect it to the internet and go to Retropie - Themes. Scroll down and find "TFT". This is a theme meant for these small, low res screens that makes it much easier to use! #Features & BOM: - 18650 battery https://www.amazon.com/gp/product/B01C4GFVN8 #or - 2500 MAH Lipo - use the cover without 18650 holder https://www.amazon.com/YDL-2500mAh-battery-Rechargeable-Connector/dp/B07BTY599F #or - 5000mah battery and the 3mm extra front cover with no 18650 back cover: https://www.amazon.com/uxcell-5000mAh-Rechargeable-Lithium-Polymer/dp/B0798DP98L/ - Adafruit Powerboost 1000c https://www.adafruit.com/product/2465 - Inexpensive 3.5" LCD https://www.amazon.com/gp/product/B0045IIZKU - 2 Way Slide Switch for Power and Audio On/Off https://www.amazon.com/gp/product/B008DFYHV2 - Small speaker https://www.amazon.com/gp/product/B0177ABRQ6 - 2.5 watt amp https://www.amazon.com/gp/product/B01MZYYGSK M2.3x8mm screws for mounting the boards inside https://www.amazon.com/gp/product/B01LXFTOAU/ - Uses "standard" tactile buttons https://www.amazon.com/CO-RODE-Tact-Button-Switch-6x6x5mm/dp/B00W0YUV1W - Some foam tape can help control wires and prevent issues with the pins coming through the button boards: https://www.amazon.com/gp/product/B01G382DX4 - Uses the screen's buttons for brightness - Better cooling with vents - Larger overall size 150mm tall 32m thick - 305 grams or 10.75OZ with the 3400mah 18650 inside. #I am making PCB files You could send off and have PCBs made for the buttons easily and cheaply with these files once completed. # Steam Link!? Yes, that's right, you can install Steam Link on this and play it. Check out me playing Bioschock here: https://youtu.be/Izp32G-ZzLY #Steam Link Setup SSH into the device, you can get your IP address from your router easiest in most cases. Get Steam Link and install using the first post here: https://steamcommunity.com/app/353380/discussions/0/1743353164093954254/ Once that is done in your terminal type or copy these lines exactly: - touch ./RetroPie/roms/ports/Steam.sh - nano ./RetroPie/roms/ports/Steam.sh Copy these lines into Nano - '#!/bin/bash' [remove ' marks] - steamlink Save and exit with CRTL+O and CRTL+X Back in terminal type these lines: - chmod +x ./RetroPie/roms/ports/Steam.sh - sudo reboot That's it! Steam will be listed under PORTS. You will need to be plugged in or on with. The D-pad should work like arrow keys and start = enter, select = escape.  This is not listed as a remix however it is inspired from the following Things: - Pigrrl2 https://www.thingiverse.com/thing:1277483 - Larger Screen Pigrrl2 https://www.thingiverse.com/thing:1635368 - All the others out there! #Click Watch for updates!! #Thank you! Like, share and enjoy! #Updates! - 12/18/18 Changed all sorts of stuff. Tweaked sizes and spacing. Finalized cases. Added a spire to the d-pad so it rocks instead of smooshing down all 4 buttons at once. - 12/19/18 Printed another test and tweaked everything into final positions. Uploaded new photos and files including a picture on how to wire the screen for 5v operation. It's pretty easy! I used 24AWG Silicone wire. - 12/19/18 #2 Ready to go! Final STLs uploaded. Source files uploaded. All changes verified to work. Final change to come is the wiring and setup guides. Those should be posted by the weekend. - 12/21/18 Ready to go! All files updated, build pics added. Config file for buttons added. - 12/28/18 I tried stuffing in a bigger battery and it failed. 8mm thick LiPo fits and 10mm did not so I made a new front case with 3mm extra space for massive 5000mah or so battery pack. More to come on this but the case file is uploaded. - 1/5/19 Added a little slot near the Pi's lights to let them come through opaque cases. Re-uploaded rear case files. - 1/10/19 Added Gerber files to make PCBs for buttons for better fit and finish. - 2/5/19 Got the PCBs from JLCPCB and added pics of how those get installed. - 2/30/19 I got spare PCBs!   You can PM me to buy a set at low cost and shipping.
With this file you will be able to print Super Retropiepod - 3.5" Raspberry Pi 3 Portable Retro Gaming Handheld with your 3D printer. Click on the button and save the file on your computer to work, edit or customize your design. You can also find more 3D designs for printers on Super Retropiepod - 3.5" Raspberry Pi 3 Portable Retro Gaming Handheld.