Super Simple Belt Tensioner
prusaprinters
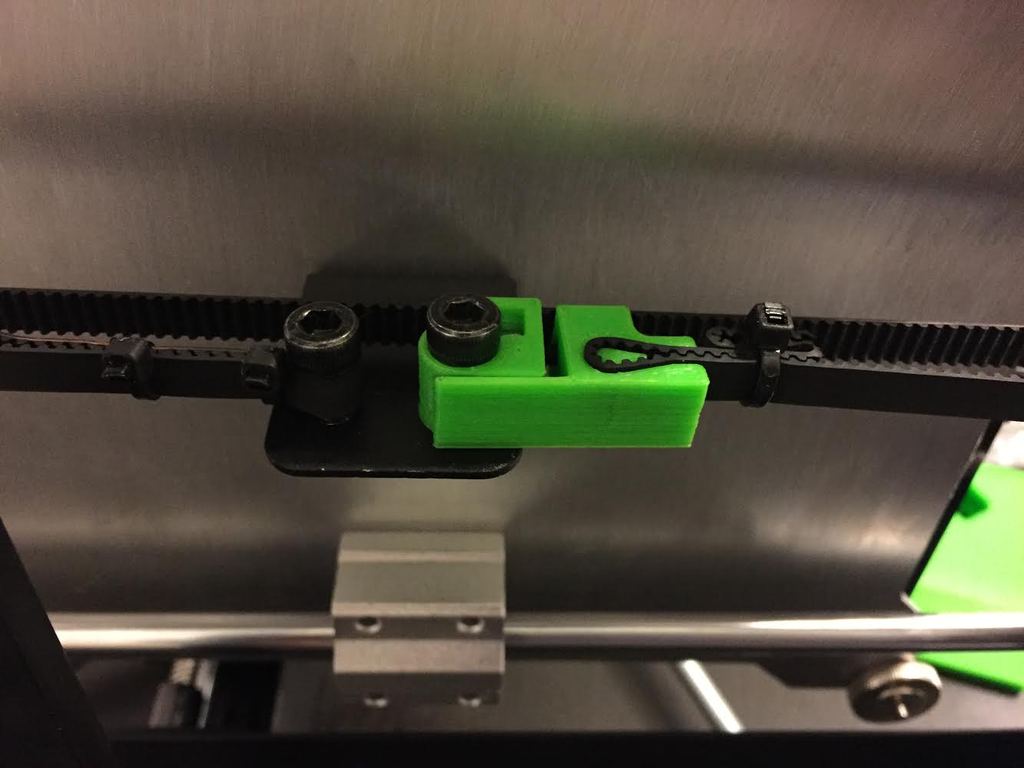
<p>Super simple belt tensioner for the Wanhao Duplicator i3 (and clones). Using this you can have easy-install and easy-tighten belts without the issues caused by the built-in spring tensioners. It's a quick print and works on both the X and Y axis.</p> <p>In addition to the two printed parts, you'll need:</p> <ul> <li>1x M3 22mm bolt -- You could use a different length, but 22mm is what I used. Any longer and you'll have to either modify the model or hold it steady by hand while screwing in the first few mms until the guide grooves engage. Any shorter and you'll lose variable length and have to use a tighter initial state for the belts.</li> <li>1x M3 nut -- Nylocs are preferred to keep the belts from loosening.</li> <li>(optional) small zip ties -- For managing the excess belt length.</li> </ul> <p>Installation is super simple:</p> <p>1.<strong>Print both parts.</strong> I recommend using thick walls and dense infill for strength, since you really don't want these breaking mid-print. Even completely solid both parts print in only about half an hour so it's pretty easy anyway. 2.<strong>Install the nut into Part 2.</strong> This can be a bit tricky as the slot is rather tight and the nut needs to be oriented such that two flat sides are parallel to the sides of the slot, meaning there will be a point facing upwards. I find the best way to go about this is to place the part on a table and use the thinnest pair of pliers you have to push the nut into place just far enough that it will stay. Then flip the part over and push it against the table to push the nut in farther. Finally, use a small tool -- the hex wrenches included with your printer work nicely -- to push the nut in all the way. Don't be afraid to use a little force. The nut needs to go all the way to the bottom of the slot and will generally "snap" into place. You can test to see if it's aligned by inserting your M3 bolt into the hole on the flat side. 3.<strong>Install Part 2 on your printer.</strong> This process is simple. unscrew the right bolt holding your belt in place (check the pictures if you're unsure which one is correct) and then put the screw through Part 2 before replacing it. 4.<strong>Insert the free end of your belt into Part 1.</strong> The existing loop of material in your belt isn't tight enough so cut the small zip ties off. Remove the spring tensioner (the thing that looks like part of a clothes pin) as well. We won't be needing that anymore. Pull the free end so there is no slack in the belt and take note of where it is roughly 3mm from the edge of Part 2. Remember, this is a tensioner so being exact isn't necessary. Form a loop at that part of the belt (remember to check the orientation) and insert it into the slot in Part 1. Use zip ties to neatly tuck away the excess belt if you desire. 5.<strong>Insert the M3 bolt through the hole in Part 1 and into the nut in Part 2.</strong> Screw it in until your belt feels tight. This is where this print really shines. Not only can you fine-tune your belt tension, you can do so from the front of the printer. Of course, you'll need a flexible screwdriver extension to reach the Y-axis tensioner without flipping your printer over.</p> <h3>Print Settings</h3> <p><strong>Printer:</strong></p> <p>Wanhao Duplicator i3</p> <p class="detail-setting rafts"><strong>Rafts: </strong> <div><p>Doesn't Matter</p></div> <p><strong>Supports:</strong></p> <p>No</p> <p class="detail-setting infill"><strong>Infill: </strong> <div><p>Something tough</p></div> </p></p> Category: 3D Printer Accessories
With this file you will be able to print Super Simple Belt Tensioner with your 3D printer. Click on the button and save the file on your computer to work, edit or customize your design. You can also find more 3D designs for printers on Super Simple Belt Tensioner.