Switching it up!
prusaprinters
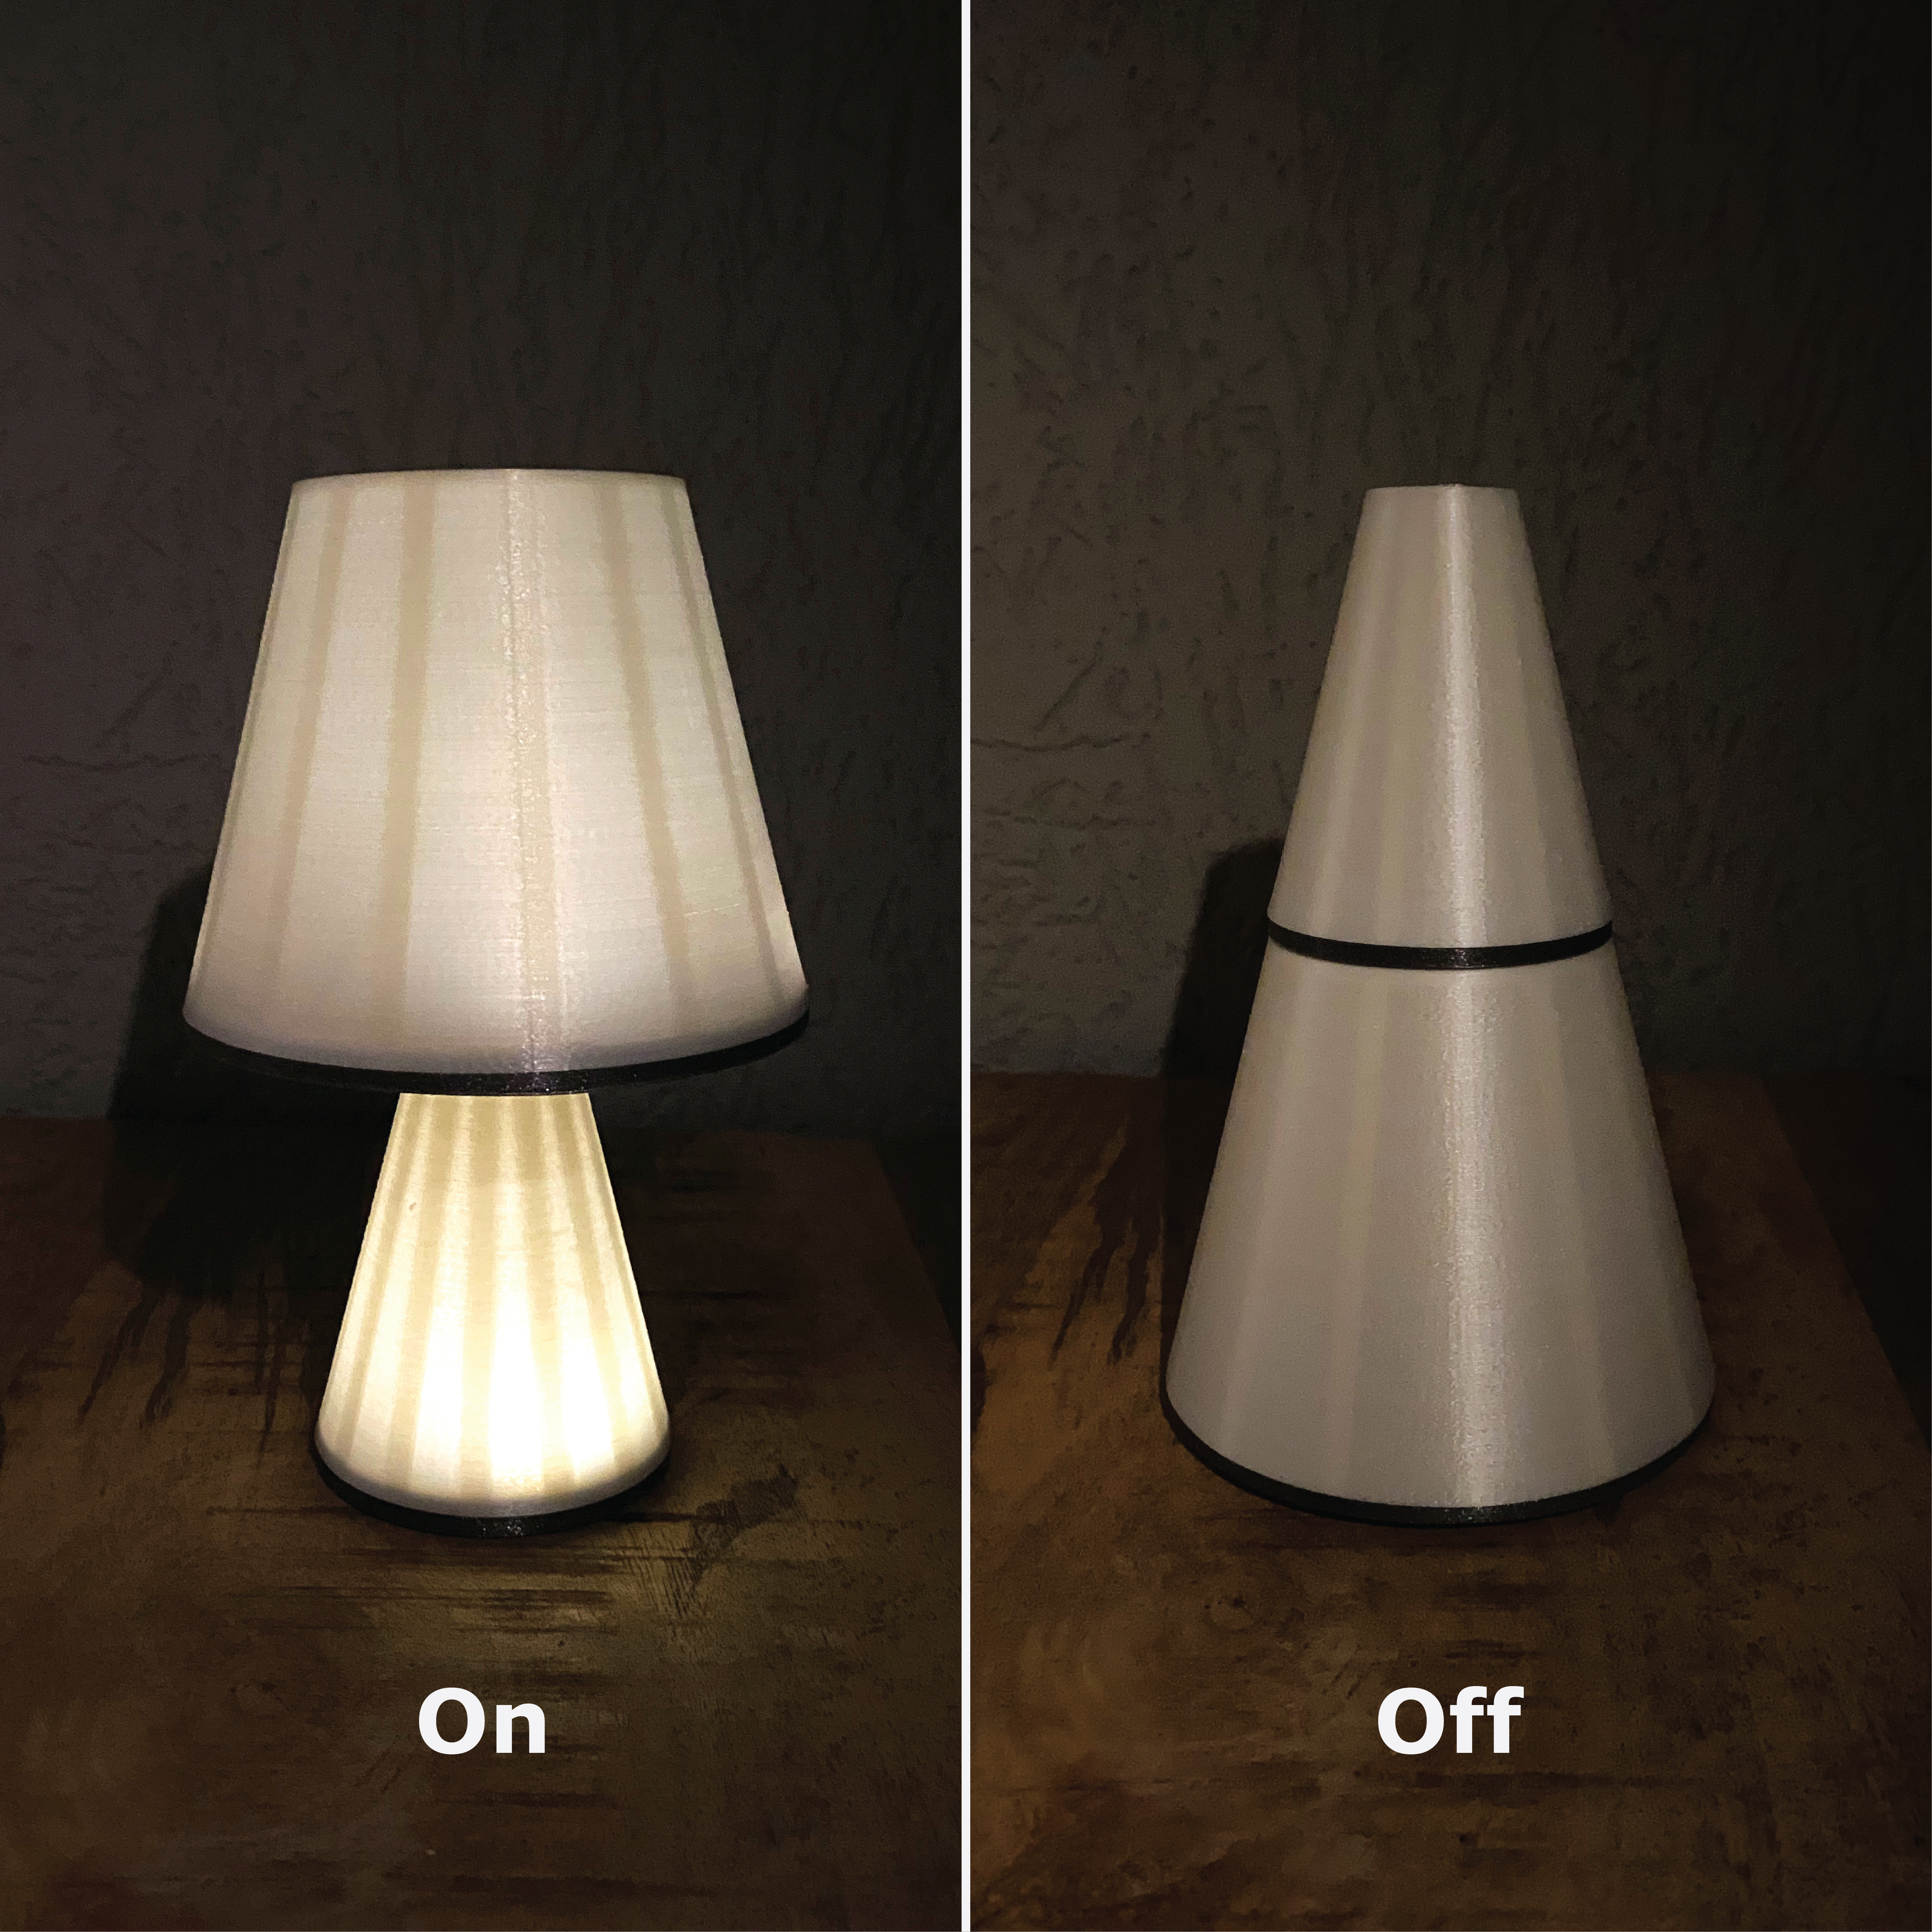
<p>The design of this classic lamp changes shape when turned off. When it is switched off the stand of the lamp can be placed on top of the lamp shade, staying in place through the use of magnets.</p> <p>When reversed, magnets in the top of the stand connect to those on the bottom of the shade. The light will turn on automatically, no external power source needed.</p> <h3>Print instructions</h3><h3>Design</h3><p>I started this project after reading about the "Lights and 3D printing" competition for September 2020. Please make sure to like the design :)</p> <p>We know that most lamps turn on/off through a physical switch. My goal with this project was to create a unique way to easily turn the lamp on/off without that classic switch. I was intrigued by the idea of a lamp that changed shape during this process. My aim therefore was to create a design that looked just as nice off as it did on.</p> <h3>Assembly instructions</h3><p><strong>1. Print the four pieces</strong><br/> The design consists of four printed pieces. The lamp stand, lamp shade and the bases of these two parts.</p> <p>The models in the STL files have the correct orientation. All parts are printed <strong>without support</strong> and with a layer height of <strong>0.2 mm.</strong><br/> Use an <strong>infill of 15-20%</strong> and a wall thickness of <strong>0.8 mm.</strong></p> <p><a href="https://imgur.com/txshRFU"><img src="https://i.imgur.com/txshRFUl.jpg?1" title="source: imgur.com"/></a></p> <p><strong>2. Glue the magnets into two of the four pieces</strong><br/> Magnets are an important part of this design. After printing the pieces the next step is to <strong>glue</strong> the magnets into the <strong>base of the stand and the lamp shade.</strong></p> <p>While placing the magnets make sure to <strong>alternate the poles</strong>, so the two pieces can only fit together in one orientation.</p> <p><a href="https://imgur.com/BGNzmUf"><img src="https://i.imgur.com/BGNzmUfl.jpg" title="source: imgur.com"/></a></p> <p><strong>3. Solder the LEDs for the stand of the lamp</strong><br/> The design exists of two separate parts in which LEDs are placed. However, the light will only turn on if you connect the two pieces. In the schematic overview you see the connections that have to be made within these individual pieces.</p> <p><a href="https://imgur.com/eaGYxGe"><img src="https://i.imgur.com/eaGYxGel.jpg" title="source: imgur.com"/></a></p> <p>For the stand solder the wires for the LEDs in the base. I used two LEDs from a LEDstrip for this piece.</p> <p>Make sure the wires are long enough so they can reach the top of the stand.</p> <p><a href="https://imgur.com/1Rc5osT"><img src="https://i.imgur.com/1Rc5osTl.jpg" title="source: imgur.com"/></a></p> <p>Now that you have the long wires, pull them through the printed stand as shown in the photo below.</p> <p><a href="https://imgur.com/5yjm7ki"><img src="https://i.imgur.com/5yjm7kil.jpg?1" title="source: imgur.com"/></a></p> <p><strong>4. Solder the LEDs for the shade of the lamp</strong><br/> The second part of the design that will light up is of course the shade. Since this part is slightly larger it is important to use more LEDs for this part. This depends on the strength of the LEDs, I used seven LEDs.<br/> In addition to the LEDs you have to add the battery (9V) as well. See the photo in step 3 of the schematic circuit for both the parts.</p> <p><em>If you will be using separate LEDs in series instead of LEDs from a LEDstrip, make sure the battery has enough voltage to light them up.</em></p> <p><a href="https://imgur.com/BBmJu6K"><img src="https://i.imgur.com/BBmJu6Kl.jpg?1" title="source: imgur.com"/></a></p> <p>While placing the components in the piece, pull the wires that have to connect to the stand of the lamp out of the holes at the bottom.</p> <p><a href="https://imgur.com/llgOQ8T"><img src="https://i.imgur.com/llgOQ8Tl.jpg?1" title="source: imgur.com"/></a></p> <p>Make sure to mark which wire is which or use colored wires to distinguish the GND and the positive. (I used a yellow indication on the positive wire).</p> <p><strong>5. Solder wires to the magnets</strong><br/> Now the LEDs and wires are in place and it is time to attach the magnets that will be used to connect the two pieces and simultaneously conduct the electricity, turning the lamp on.</p> <p>When magnets get too hot they can lose their magnetic attraction. However, there is a trick to solder wires to magnets without them losing their magnetic attraction.</p> <p>First, take a larger magnet than the one you will be soldering on. Place the smaller magnet on the larger one as shown in the photo.</p> <p><a href="https://imgur.com/Fiy7Fgo"><img src="https://i.imgur.com/Fiy7Fgol.jpg?1" title="source: imgur.com"/></a></p> <p>Now you can put solder on the smaller magnet as shown here.</p> <p><a href="https://imgur.com/tcjozed"><img src="https://i.imgur.com/tcjozedl.jpg?1" title="source: imgur.com"/></a></p> <p>Next, get a new piece of wire and put solder directly on the wire. After that you can solder the two components together.</p> <p><a href="https://imgur.com/ipd87wP"><img src="https://i.imgur.com/ipd87wPl.jpg?1" title="source: imgur.com"/></a></p> <p>Cut the other end of the wire so that only a short length remains and add solder to that end.</p> <p><a href="https://imgur.com/yizhrLH"><img src="https://i.imgur.com/yizhrLHl.jpg?1" title="source: imgur.com"/></a></p> <p>Keeping the setup where the small magnet is attached to the larger one, attach the wire from the magnet to one of the wires that you pulled out of the holes earlier.</p> <p><a href="https://imgur.com/ZStqVsa"><img src="https://i.imgur.com/ZStqVsal.jpg?1" title="source: imgur.com"/></a></p> <p>Now you have connected the magnet to the wire. Repeat these steps for all four wires coming out of the bases.</p> <p><strong>6. Glue the magnets that you soldered in step 5</strong><br/> After connecting all the magnets to the wires through soldering you can <strong>glue</strong> the magnets into place. Do this for both the lamp pieces and you are done.</p> <p>Just like with the magnets you glued in step 2, it is important to <strong>alternate the poles</strong>, so the two pieces can connect in one way only. In this case this will ensure that the GND will connect to the GND and the positive to the positive, preventing a short circuit.</p> <p><a href="https://imgur.com/DtzwnWB"><img src="https://i.imgur.com/DtzwnWBl.jpg?2" title="source: imgur.com"/></a></p> <p>Now you have two separate pieces. When the stand is placed on top, forming a tapered cone, these pieces don't conduct electricity.</p> <p><a href="https://imgur.com/ZuJPh4O"><img src="https://i.imgur.com/ZuJPh4Ol.jpg?1" title="source: imgur.com"/></a></p> <p>However, when the shade is placed on top of the stand, creating that classic lamp shape. The light will turn on automatically, no external power source needed.</p> <p><a href="https://imgur.com/vzqgcOc"><img src="https://i.imgur.com/vzqgcOcl.jpg" title="source: imgur.com"/></a></p> <p><a href="https://imgur.com/pJHiOmW">Click here to see a video of the lamp!</a></p> <p>Have fun!</p>
With this file you will be able to print Switching it up! with your 3D printer. Click on the button and save the file on your computer to work, edit or customize your design. You can also find more 3D designs for printers on Switching it up!.