SyriGo - Open Hardware Programmable Syringe Pump
thingiverse
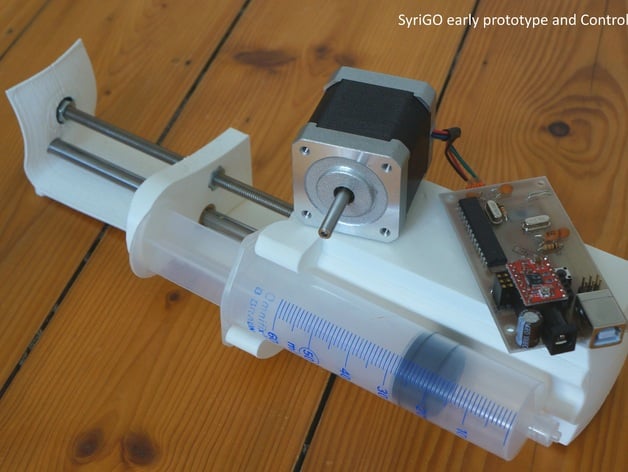
PLEASE NOTE: This project is still in progress and not yet ready for assembly! Update 03/11/16: After thorough testing, the SyriCtrl Board v1.1 is now fully functional. You can either assemble it or use it as a base for other projects. It's essentially an Arduino with integrated stepper driver capabilities. All necessary files, including the Bill of Materials (BOM), are available in the download section. Check back regularly for updates on project progress in the custom section below. Our lab was looking to purchase a programmable syringe pump and was shocked by the high prices of such devices (over 2000€ for an entry-level model). I searched for open-source hardware solutions but couldn't find any suitable pumps for laboratory use. Existing pumps are often bulky, difficult to clean due to poor environmental containment, unappealing in design, or impractical to use. So, I decided to design my own pump based on a Nema17 stepper motor, controlled by a standardized Pololu-like shield, an ATmega8 microcontroller, and full USB support via an MCP2200. This pump boasts the following features: - Extremely compact bench size of just 28 x 7 cm (lab space is valuable!) - Fully contained, sealable unit including the control PCB - Easy and fast 3D printing of all plastic parts (you can print all parts in one afternoon) - Mechanical parts are readily available - Total cost under 100€ (probably under 50€ if you're skilled) - Control by a PC via serial port - Fully programmable since it understands Gcode - Compatible with any syringe between 0.8 and 3.3 cm outer diameter (covering everything from µl Hamilton to 60 ml Braun!) - Modular design for easy updates All plastic parts can be easily printed with almost any FDM printer without support material. Mechanical parts are readily available online, as well as the electronic components. The PCB is designed with 8 mil spacing and can be produced by etching or ordered online for under 20€. The ATmega8 microcontroller is programmed via an ISP programmer or an Arduino bootloader over USB serial. If you don't have an ISP programmer, you can buy an ATmega8 with a pre-installed bootloader. The MCP2200 provides full USB support. Here's how I designed this pump: First drawings were made in March 2016. After a long pause, the main 3D design was completed in August, going through three iterations quickly. Circuit design was mainly done in September, followed by firmware implementation in the first half of October. I suspect it will take another two months until the pump is fully functional. Contact me if you have suggestions for the 3D design or firmware you'd like to see implemented. Custom Section: Update 21/11/2016: I redid parts of the mechanical design, making assembly easier. The built still needs proper documentation and firmware... working on it! Update 03/11/2016: Added an Arduino test sketch for the SyriCtrl Board v1.1. You can now test basic functionality, including stepper movement, buttons, LED, and serial (pretty much everything this board has to offer!). Update 30/10/2016: The new Control PCB SyriCtr. v1.1 arrived and is now tested and fully working! Eagle files and a PDF of the board are available here on this page. I still need to implement firmware though. Cheers, Marco Update 15/10/2016: Removed last hardware bugs, ordered new PCBs v1.1 which will arrive in two weeks and hopefully work right away. Enough time to implement Gcode into the firmware. The following commands will be supported: N and checksum, G0, G1, G4, G90, G91, G92, and custom M-Codes compatible with 3D printing firmware: M0, M17, M18, M114, M115, M220. Contact me if you want to see something else implemented. Update 28/01/2019: Added a BOM for the mechanical parts. The project is not forgotten.
With this file you will be able to print SyriGo - Open Hardware Programmable Syringe Pump with your 3D printer. Click on the button and save the file on your computer to work, edit or customize your design. You can also find more 3D designs for printers on SyriGo - Open Hardware Programmable Syringe Pump.