Syringe Pump
thingiverse
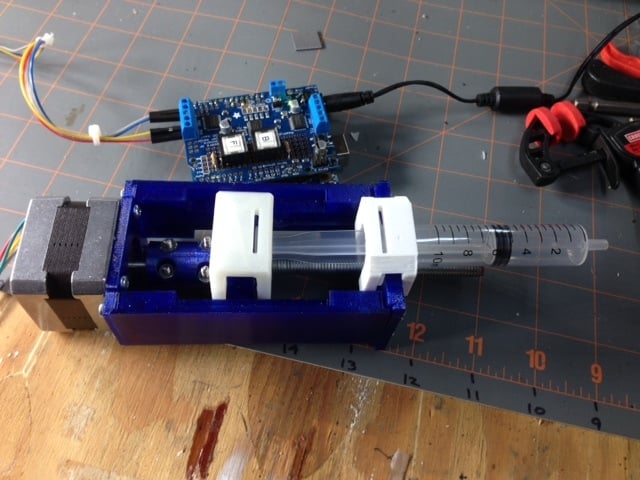
This is a remix of a syringe pump from Thingiverse 866904, https://www.thingiverse.com/thing:866904 Videos of the syringe pump are below: https://www.youtube.com/watch?v=_FIC06c-yx0 https://www.youtube.com/watch?v=x2p20UeCKdk I really liked the design but incorporated some modifications that made this already good design work even better for my particular use. I needed to dispense a more exact amount of epoxy in a more carefully controlled manner. The first modification was to enable a faster and easier way of mounting a syringe to the carriage. This was accomplished by securing the syringe body using friction fit collars that easily slip over the front and rear of the syringe. The second modification added an option to extend the side rail by 30mm. This allows the plunger to travel further within the syringe thus, extending the bead length if desired. The third and last modification was to the Adafruit motor driver software. This permitted the addition of a Fast Forward button and a Fast Reverse button. Please note the forward and reverse button must be held down during a reset of the UNO. In addition, the number of motor steps desired can be user set by modifying the "NumberOfSteps" line in the software. Note: The original driver software is based on the Adafruit motor servo shield program, thank you to Adafruit. The syringe is driven by a NEMA 17 stepper motor. The motor is driven by an Adafruit motor shield mounted on a standard UNO Arduino microcontroller board. On this setup, using a 1mm thread on the lead screw and a 10 milliliter syringe should produce movement of about 200 microliters of material per rotation. With no means to measure such a small amount of material accurately, quantity per rotation should be viewed as an estimate only. I chose to use the Adafruit parts listed below but there are many vendors who can supply equivalent parts. NEMA Motor Adafruit PRODUCT ID: 324 Arduino UNO Adafruit PRODUCT ID: 50 (Compatible) Motor shield Adafruit PRODUCT ID: 1438 The NEMA Motor, Arduino UNO and Motor shield shown in the schematic and wiring diagram (circuit board image) are the same parts as listed above. Motor driver software is included as a text file. Comments in the code explain why the variables are set as they are and how to change them. Much of the original driver software was deleted as unnecessary. The software is an attached text file the can be copied directly into the Arduino sketch program. These instructions, with some modifications, are from the original syringe pump upon which my modified version is based: INSTRUCTIONS: Print one of each part except for the rails: print two of those. Print the carriage with print support. The nut hole is hard to clean out, but leaves a nearly perfect opening to shove the M8 nut into. In addition to the printed parts, you'll need: 1 M8 nut (for the carriage) 120mm of M8 threaded rod. Note: 100 mm rod will word just fine although if you use the extra long rails then the 120 mm rod is needed. 4 10mm x M3 screws (for the motor) 8 20mm x M3 screws (for the frame) 1 10ml syringe (I used BHMedical 10 ml Luer slip disposable bought from Amazon) 1 NEMA 17 stepper motor Shaft coupling is a Thingiverse item 1329750 Parametric Z-axis coupler, assembled using 4-40 screws and nuts. I found that using some lithium grease in the rail grooves smooths the actuator movement. Using a 5 volt supply will work for powering the motor and the Arduino but for best result a 12 volt supply is needed to assure good operation. Use the power plug on the motor shield (see Adafruit Motor shield instructions). I have included STEP files to allow for modification of the parts of my design. Modification can be accomplished by most CAD programs. The STEP file will be imported as a solid that then can be modified as necessary. For all other parts CAD files are available from original syringe pump. The electronic and electrical diagrams were made in Fritzing electronic CAD program. Those file are available if they are requested. ///////////////////////////////////////////////////////////////////////////////////////////////////// UPDATE 9/20/2019 The calibration of the motor rotation to the amount of fluid deposited needed to be refined. This is a procedure to allow a more accurate method of measurement. Attached is a video that outlines the method. Additionally the text of the video has been added to the file folder. https://youtu.be/vqtG3EKpiiE A Synopsis of the procedure is outlined below: Setup Make sure the software is set to turn the pump motor to one turn, 200 steps for the typical motor . Upload the software to the Arduino. Use one 1 millimeter syringe to calibrate the system. Connect the 10 milliliter syringe to the 1 milliliter syringe using a ¼ inch clear vinyl tube. Fill the tube and partially fill the syringes with water. Try to keep the air bubbles to a minimum. Push to small syringe to zero. Put the large syringe in the pump. Back up the pump just enough to allow the syringe to fit. Start the calibration Start the first turn. Make sure the motor turns one full turn and no more. Record the amount on the small syringe. This will be the starting point and will vary each time the calibration is run. Run the motor and record the new amount. Continue until the end of the syringe. Typical readings are .03, .24, .67, .84, .97. Take the differences of these readings and add them up. Then take the average by dividing by 4. This is the amount of fluid in one turn of the pump. If you wanted 1 milliliter of fluid then you would take 1 divided by the average found above times 200 to get the number of steps for that amount. Other Changes Other changes to the files include an update to the program text. The motor was held in the stop position after reset. The electrical hold proved unnecessary to hold the motor still. This would cause the motor to heat up unnecessarily. The line “myMotor->release()” was added in three places to release the motor during reset.
With this file you will be able to print Syringe Pump with your 3D printer. Click on the button and save the file on your computer to work, edit or customize your design. You can also find more 3D designs for printers on Syringe Pump.