T2 Tilt Adapter for narrow band solar imaging
thingiverse
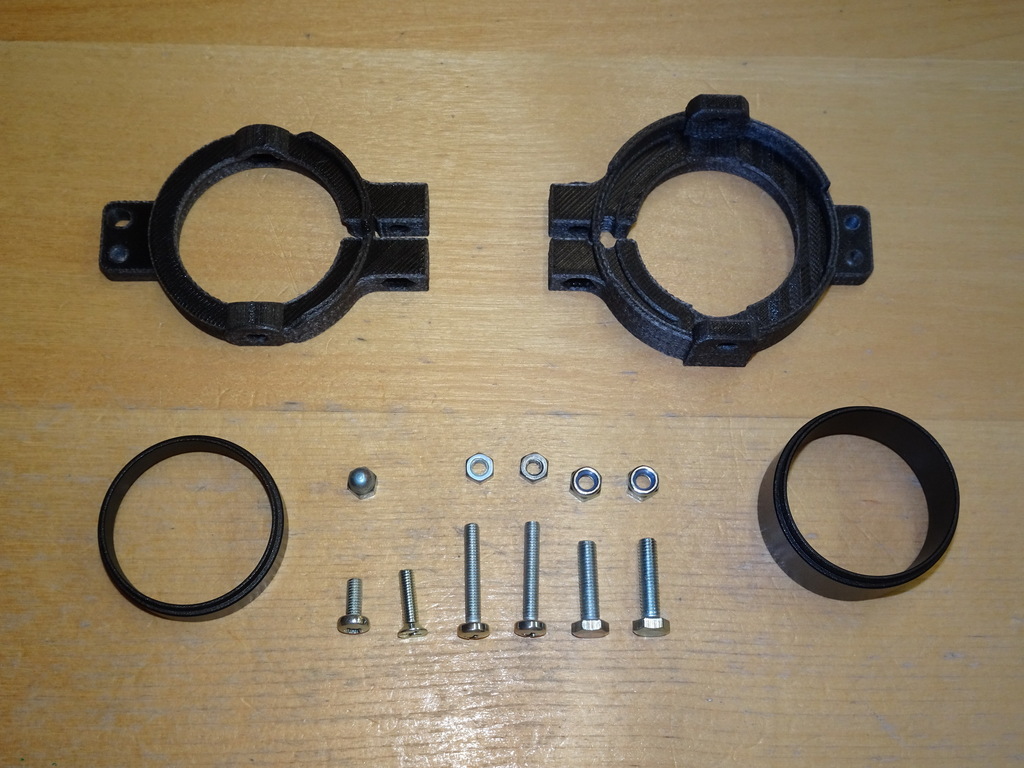
When imaging with narrow band H-alpha filters for solar imaging (prominences and chromosphere), the sensor protection glass and anti-reflection glass of the camera create reflections of the almost parallel light beam coming from the Etalon filter. This often induces interference, showing as Newton's rings in the image. It is possible to reduce or eliminate this in post processing. But any minor shift in the imaging train will make it almost impossible to compensate. Fortunately, there is one alternative option: tilting the camera by a few degrees (usually up to 5 degrees), to widen the distance of the Newton's rings, where they are no longer disturbing. See the effect with / without tilt here: https://picsngeek.at/constructions/tilt-adapter-for-narrow-band-solar-imaging/ This adapter is the required tool to tilt a camera by up to appropimately 6 degree. Apart from the mechanical construction, the adapter has an integrated guard against stray light (which would influence imaging severely). It is also possible to rotate the camera by losening one of the brackets screws. The adapter requires only a few parts to finish. Key features: - low profile with 22mm (depending on T2 extender used) - integrated stray light guard - camera rotation possible - thermal isolation from camera to filter (especially handy with heated Etalon filters) - tested with a 500g camera Required parts: - printed top and bottom adapter - 2x T2 thread extender with 44mm external diameter. 10mm minimum length. - 2x M5x15 with HEX head - 2x M5 stop nut (DIN985) - 2x M4x30 with flat head (any type of drive - flat, HEX, Philips, Pozi, ...) - 2x M4 nut - 2x M4x25 (or 1x M4x25 + 1x M4x20) Assembly: 1) cut M4 threads to the angle adjustment extension - 1 thread in bottom part, 1 thread in top part. 2) combine the 2 adapter parts 3) insert the M5 screws from the inside to the joints 4) attach the M5 stop nuts and thighten. Tighten to the point where you need a bit of force to swivel the adapter parts. 5) insert 10mm T2 extender to top part, thread looking to the top. Push the extender in, until it touches the tapered rim. 6) insert second T2 extender, thread looking to the inside of the adapter. Push the extender in, until the barrel touches the tapered rim. The thread may extend until the edge of the M5 screw head. 7) insert M4x30 screws and nuts to lock the T2 extensions. Do not over-tighten! 8) insert M4 screws to angle adjustment extension 9) attach adapter to telescope / camera If you found this useful, I would appreciate your support! Clear skies and enjoy! Attention! Never look at the sun with optical instruments without proper filters! Severe injuries and blindness may result!
With this file you will be able to print T2 Tilt Adapter for narrow band solar imaging with your 3D printer. Click on the button and save the file on your computer to work, edit or customize your design. You can also find more 3D designs for printers on T2 Tilt Adapter for narrow band solar imaging.
