Talon GT Rebel internal structure and mounts
thingiverse
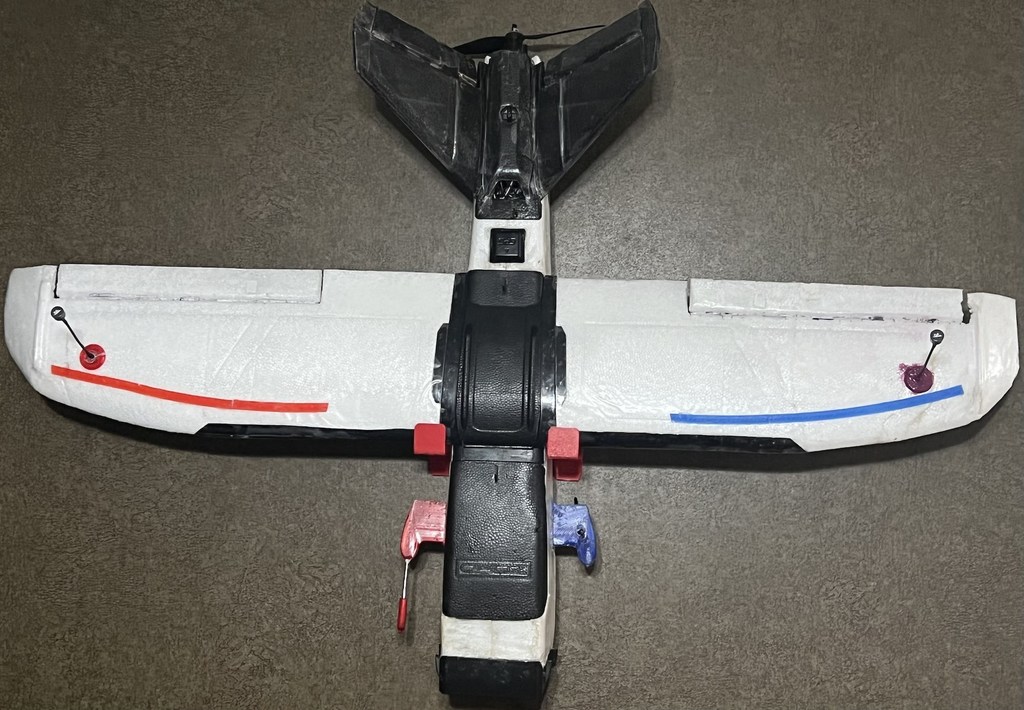
I'm an aerospace engineer and this is a project to bring the design of this craft more inline with my goals. Additionally this is a way to functionally, and in a fun way, exercise my skills. The ZOHD Talon GT Rebel out of the box is a fairly decent craft. However using high capacity (heavier) batteries, or adding a full FPV Medium-Long Range electronic suite, can dramatically alter the flight characteristics of the plane as well as place the center of gravity in a poor position. Also, electronics either are unprotected, mounted to the fuselage instead of wood, or within 3D printed mounts which are then attached to the fuselage. As such, the design goal is to provide secure and protective mounting for the electronics while remedying the center of gravity issue for a heavy payload (battery) configuration. The replacement structure has 4 sections; a flight controller section, a battery section, a camera mount, and a small extension. The clips fit over the open sections of the FC (H743-W V2) and hold it down, a couple of drops of plastic cement on the bottom of the clip will hold it secure. As a note, the clips are fairly snug and can break when installing if not carful. The sections fit together by laying snugly together but are not interlocking. Sections are to be mounted to the structure using an adhesive like Beacon Foam-Tac (NOT hot glue, epoxy, white/wood glue, or foam cure. Not sure on CA type glues.). When gluing plastic to plastic use a model cement like Duco Plastic and Model Cement. The mid section is for the battery with a larger than stock adjustment range. This area is to be lined with 10 lbs 2" Velcro strips. Velcro makes battery adjustment quick and, short of straight down nose crash, has a very strong bond. The forward section is a tray that holds a protective camera box. The air unit mount vents the heat while holding the unit by friction. General design of the box prevents access to the memory card. This could be adjusted for but is not relevant to my usage. The camera mount is sized for a DJI lens protector to be on the camera. The original nose design was changed by removing and replacing the "face" of the nose. The new face more efficiently directs air flow to the vents. Foam inside the nose area of the craft was modified (some removed) to fit the new mounts. Notes: The foam structures (fuselage/wings/tail) were wrapped with laminate to improve strength. Dry weight of the finished was 1169. This is ~300 grams heavier than others with comparable setups(minimal mounting/no laminate wrap). When calculated the stall speeds of the two configurations were only separated by between approximately 1 mph. As a measure against this rise, vortex generators were added (included in weight) to the outer half of the main wing. While there are some modeled for the outer winglet and tail I did not use them. Additionally, flaps (flaperons) were added to the controls. On launching, others hand throw this craft but I found it difficult to be reliable. Further it is a bit unnerving having the propeller so close to fingers during the throw. As such this craft is launched by a modified version of this catapult: https://www.thingiverse.com/thing:5148795. The parts were printed at .15mm with Atomic brand PETG. The only exception to this was the vortex generators which were printed at .04 mm as that is my printer's max detail. Camera antennas were mounted at the end of each wing (vertically). This required 2 MMXC to SMA adaptors and two SMA to SMA extensions. The crossfire immortal T antenna was mounted in the same stubby style Canard as the airspeed indicator in the mirror position. This layout should avoid interference between the antennas while providing maximum range. The nose "face" is about 90% shaped. I used a Dremel to finish shaping the piece as it "fits" and only required minor adjustments plus a slot for the camera vent. Designs In progress: Skids or Landing Gear (On hold) *Hardware* Flight controller: Mateksys H743-Wing V2 & V3 Receiver: Crossfire nano + Extra long Immortal T V2 Camera: DJI Caddx Air Unit Micro + DJI lens protector*** Camera Antennas: 2x TrueRC Singularity 5.8 Long Pitot: https://www.thingiverse.com/thing:5415024 GPS: M8Q-5883 Antenna Mounts: 1 file here + https://www.thingiverse.com/thing:5415024 Vortex Generators: https://www.thingiverse.com/thing:5416522 Transmitter: TX16S + Crossfire Micro TX V2 + VAS Longshot Headset: DJI Goggles V2 + TrueRC X2-Air MKII
With this file you will be able to print Talon GT Rebel internal structure and mounts with your 3D printer. Click on the button and save the file on your computer to work, edit or customize your design. You can also find more 3D designs for printers on Talon GT Rebel internal structure and mounts.