Tamiya Grasshopper Rear Sus and Gearbox conversion update (12/28)
thingiverse
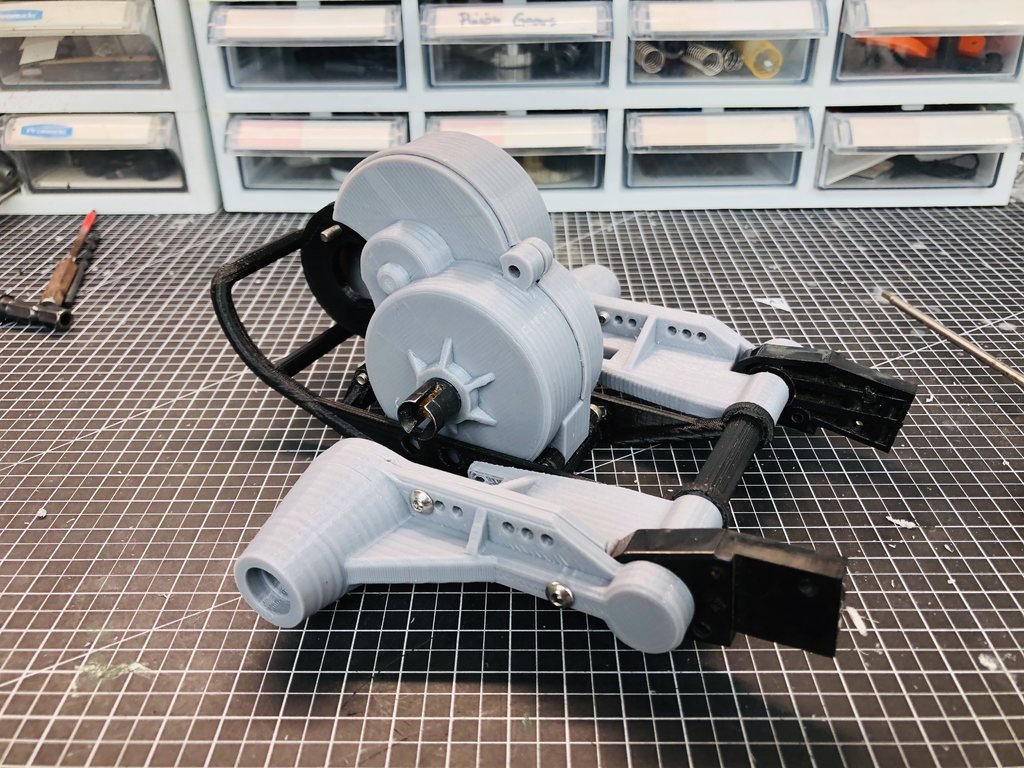
★★★Design minor update : rear outer arm (2021.1.11)★★★ shorten the outer arm width 1mm, to make sure wheel hubs do not touch arm when wheel nut is screwed in tightly. - 3.3.arm_outer_210111.stl also uploaded new all in one print file for rear arm (outer, inner, left, right) - 3.5.arm_all_210111.stl ★★★Design update : rear arms (2020.12.28)★★★ tested some of the design changes to gain enough strength in rough terrains. this change will ensure strength and accruate dog bone setting, so dog bones don't fall off easily - 3.3.arm_inner_201225.stl - 3.3.arm_outer_201220.stl requires below commercial parts to complete as my intention : - square RC universal dog bone 33mm, for tamiya TT01, TT02 (STD-533R) - tamiya cup joint for universal shaft, for TT01, DF-02 (53790) - rcawd oil dampers for 1/16 scale, 70mm (67mm hole to hole) I will update the full build procedure soon! ★★★Design update : gearbox mounts (2020.9.11)★★★ to fix the gearbox and motor more firmly, hole for additional bolt is added to the gearbox. all below files updated accordingly check out my youtube video for detail on assembly https://youtu.be/tkHTpqMSNXU you can also watch grasshopper in full speed drift with these 3D printed parts!(new) https://youtu.be/3_uYz51tFo0 1.Gearbox_L_200905.stl 1.Gearbox_R_200905.stl 2.mount1_lower_200818.stl 2.mount2_upper_200905.stl ★★★Design update : gearbox mounts (2020.8.23)★★★ to lower the gearbox position, slightly changed mounting points in upper and lower mounts. 2mm lowered gearbox position, which will ensure more secured contact between gear hub and driveshaft, preventing driveshaft fall off 2.mount1_lower_200818.stl 2.mount2_upper_200818.stl ★★★Design update : gearbox Right and inner arms (2020.7.18)★★★ minor change in right gearbox, slightly enlarged inner box for counter gear space and made inner swing arm main axle hole thicker, realized the older one may easily break. 1.gearbox_R.stl 3.1.arm_inner_L.stl 3.2.arm_inner_R.stl ★★★Design update : gearbox motor position (2020.7.12)★★★ gearbox : adjusted motor position to minimize gap between pinion and counter gear. All below 4 files need to be updated together : 1.gearbox_L.stl 1.gearbox_R.stl 1.gearbox3_motor_mount.stl 1.gearbox4_motor_cover.stl Design update : narrower outer arm (2020.5.25) after number of tests, realized dog bones fall off in jumps. To minimize that, I have uploaded new outer arm design with reduced width, about 2mms per arm. You won't need to print the whole outer arm, only print '3.5 arm_outer-short.stl' each side than just change it with older outer arm by unscrewing 3 bolts. Let me know if any problem or issues. Thanks! Design Finalized & New Upload (2020.3.29) to make sure my thing is properly searched, I am publishing my final things for grasshopper mk2 gearbox and trailing arm design. Design Update! (2020.3.15) After going thru some test runs, I have decided to change the design of center gear nut, and new hub has to be used accordingly. ★★★New Design : Gearbox5_nut_new.stl - changed the center nut's spline design to 'key' type, with simpler design, my printer was able to print the design properly, tested to endure number of high torque runs. - new hub joint part is required for this design : Tamiya 53790 (used in TT01) Please change the nut only if you already build the gear box, you will notice the change is not that difficult, you can easily disassemble gearbox not having to remove the hole gearbox mount and rear arms. ================================================================== Please check out my youtube videos for build & running these parts! New driver : PengSoo https://youtu.be/zE7bjocG2Bs Changing center gear nut - center gear nut will wears out, or break - recommend to change it as ordinary maintenance - 3d printed parts are pretty durable, the nut lasted few months for me, you may want to print some spare nuts at your first print! https://youtu.be/x2CQO9NICjo Hint & Tips on rear suspension - how to adjust the camber, - how to gain more ground clearance https://youtu.be/v1kAbf7oKc4 step by step instruction for install https://youtu.be/8ZGd0Yozjg4 beach run with wild one! https://youtu.be/bhGD2B_8SGY =================================================================== Initial Upload (2020.2.25) Again, this is an upgrade to my forever favorite tamiya grasshopper! Grasshopper's gearbox with rigid axle is what makes this car very unique, and everyone loves it's durability, simple structure, and even very good performance on easy roads! which made it a perfect beginner's buggy for everyone in this globe around my age^^ This conversion kit enables users to simply upgrade their hopper or hornet into a VW dune buggy style 'trailing arm' based independent suspension, with new designed gear box enabling rear positioned motor for better rear grip and shock absorbing. I tested the kit and am pretty satisfied, except the center gear nut(Gearbox5_nut.stl), which is not strong enough for life-time warrantee. This nut part have endured more than 3 pack runs, but will need to be upgraded to metal parts (will update when metal part is available and tested) if you are a serious heavy user. If you are not, this PLA nut may be enough, you can always reprint if it wears out. The benefit of conversion : - far enhanced rear grip, -> better road holding in any roads - higher road clearance -> better performance in rough terrain, such as grasses and sands - scale look -> similar architecture to real dune buggy, or more scale vehicles such as wild one/FAV This kit is a hop-up kit, just print, assemble and attach it to it's chassis, without any cut or modification to your original grasshopper/hornet kit. However you need below additional parts to make this kit run : - Tamiya 53790 (used in TT01) - Tamiya M03/05 30mm drive shaft (9805503), OR M03 option swing shaft(54410) - Tamiya Frog/Brat's wheel axle hub(9808039), OR Frog/Brat option Universal Shaft set (53908) - 6 O-rings for axle/joint hub, OR some silicone pipe - 70mm damper/spring, I used DT03's front CVA shock set - 2 more 1150 size bearings All the hopper/hornet's internal gear parts will be reused. I will update with further build instructions in my youtube channel soon, but I guess the build is pretty straight forward if you have basic RC skills. Few things to be careful when building the kit : 1. You need to be very careful with screw holes. 3D printed parts are not as durable and acurate as commercial kits, you need to trim every screw holes with 2.6mm drill bit before screwing. 2. Some parts will warp during printing, do set your printer well to minimize any warps =============================================================== Please check my other grasshopper upgrade parts for all of my designs. Thanks! 1) grasshopper front suspension upgrade parts (MK1, old design, using original spring) https://www.thingiverse.com/thing:3860829 2) grasshopper rear suspension upgrade parts(MK1) https://www.thingiverse.com/thing:3815254 3) grasshopper driver figure https://www.thingiverse.com/thing:3803664 4) spot light (can be used for most of tamiya old buggies) https://www.thingiverse.com/thing:3840276 5) Mini Actioncam(SQ23) Holder with driver figure for Grasshopper & Hornet https://www.thingiverse.com/thing:4018398 6) Grasshopper Gearbox and Rear Trailing Arm Conversion Kit https://www.thingiverse.com/thing:4248376 7) Foxeer Box2 Holder with driver figure for Grasshopper & Hornet https://www.thingiverse.com/thing:4305572 8) Grasshopper & Hornet Front wishbone suspension conversion kit https://www.thingiverse.com/thing:4392528 9) FPV Cam Foxeer Box2 mount for Tamiya Wild one or FAV https://www.thingiverse.com/thing:4460705 10) PengSoo driving grasshopper https://www.thingiverse.com/thing:4559208 11) Diff-lock part for tamiya grasshopper https://www.thingiverse.com/thing:4577456 Visit my youtube channel featuring grasshopper running with all the above 3d printed parts! https://www.youtube.com/channel/UCxkWI63GPeRBPdMNLkGIH7Q
With this file you will be able to print Tamiya Grasshopper Rear Sus and Gearbox conversion update (12/28) with your 3D printer. Click on the button and save the file on your computer to work, edit or customize your design. You can also find more 3D designs for printers on Tamiya Grasshopper Rear Sus and Gearbox conversion update (12/28).