Tamiya M Chassis Drift Rim for WPL D12
thingiverse
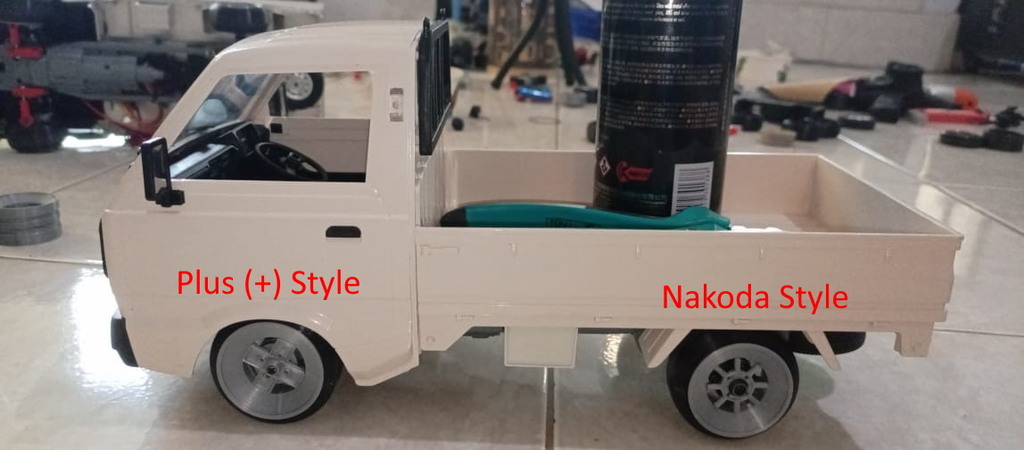
Feel free to sell the end product (printed material) for your profit if you want it, just don’t sell the design. If my design makes you happy, consider to buy me a coffee to keep my sanity - LOL : [Buy me a coffee](https://www.paypal.com/paypalme/teduhkristianto). (Any amount is highly appreciated – Om Tedi) Note: Slice the .stl file directly using Cura. If you try to "fix it" or "clean it" using other software, it might give unwanted result. Update: If you need same looks but simpler design: https://www.thingiverse.com/thing:4825610 My other Rims (deep dish style): https://www.thingiverse.com/thing:4776428 When I design this, there are 6 things that comes in my mind. 1. First, it should be looks cool. And because I love classic Japanese rims, so my design is heavily influenced by it. 2. Easy to print with little to no support 3. Easy to fix 4. Easy to customize 5. Can use different color with one extruder. 6. Little to no post processing. I'm lazy, I hate sanding. All the pictures you see is unprocessed, no sanding, no filling, no smoothing, no painting, none. If you want smoother, finer look then feel free to do post processing. This rims fits with WPL / MN RC Car that use 5mm hex. I use it on WPL D12. You can use it on C14 / C24, etc for drift conversion. You just need to change the "style" part to change the design, you don't need to print the entire rim. You can print the "style" with different color than the dish. I design it as close as possible to have same diameter as Tamiya M-Chassis rims. If you don't have Tamiya m chassis drift tire, you can print it here: https://www.thingiverse.com/thing:4724944 It can't use rubber tire. I design it to work only with hard plastic (drift) tire. Sakura Style: Hayashi Racing Yayoi inspired Suriken: SSR Star Shark inspired Nakoda: Hayashi street inspired Plus: SSR MKII Inspired You can try to design it your own if you get bored. It's just a small part anyway, don't be afraid to make mistakes. Installation instruction: 1. Attach top and bottom part using four M2 screw 2. Attach hex part to the top part using four M2 screw 3. Attach the style part after you place the rims on the car. 4. Use "ring" part if you want to. 5. you can attach the hex from the bottom part if you want to make "deep dish" style. 6. Don't overtighten the screw and tighten it evenly. If not, it can make the rims wiggle too much. 7. Insert tire from the bottom. You can't insert it from the top. Front hex is longer than rear hex so it will not move left and right as I design the length precise with the length of stock hex. However, if your WPL D12 is still new, it might be a little too tight. And of course it also depend on your printer tolerance. Rear hex is shorter because if you use front hex, it will touch the rear axle. Friendly note: 1. I suggest you to print hex in black color to highlight the style (design). 2. I print in 0.2mm resolution 15% infill (feel free to print it in lower resolution for more detail), except the hex part, I print it in 0.12mm resolution 100% infill as this part recive highest stress. 3. No support needed for top, bottom, style and ring, just arrange the placement in slicer so it will not create a bridge (bottom part face down). The only support you need is for the hex part. 4. I use it for drift and it holds pretty well. It might not be the case if you use it on road, but hey, you can't use it on road anyway, since it can't hold the rubber tire. 5. I design it to work fine with Ender 3 V2 standard setting (no horizontal expansion edit). It might work differently with your printer tolerance, so I suggest to test print first. I have a plan to make video about installation instruction but I haven't have time yet. Anyway, you can view this rims in action for a moment in these videos: https://youtu.be/8h6NLqnzOyU https://youtu.be/BaQRUSfYtAY Another good Rims for D12 by Jamie_H86: https://www.thingiverse.com/thing:4654178 (but it's a little bit smaller than M Chassis rim)
With this file you will be able to print Tamiya M Chassis Drift Rim for WPL D12 with your 3D printer. Click on the button and save the file on your computer to work, edit or customize your design. You can also find more 3D designs for printers on Tamiya M Chassis Drift Rim for WPL D12 .