Tamiya Truck 1/14 Low Boy Trailer v2 Detachable Neck Flip Axle
thingiverse
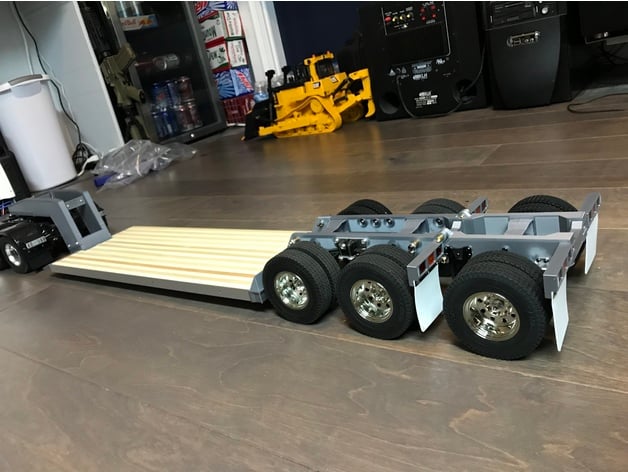
An upgrade over version 1 Still based on the tamiya flatbed kit Like my version 1 of this trailer, it is based off of the official Tamiya flatbed trailer and that comprises of the center section. I haven't installed the wood base quite yet as I wanted it clear what this looks like under the covers. Detachable gooseneck and flip axle I have made the front gooseneck (is that what its called?) detachable, and added a rear flip axle. Neither of these are required for this v2 trailer and you can mix and match front and rear from v1 as desired. Standard hardware most hobbyists will have lying around I used battery bullet connectors (4mm diameter) for the removable pins as they are readily available at most LHS and online. These pins secure the front gooseneck and the rear flip axle at both the top pivot point and at the bottom when secured in the down position. The pins are surprisingly strong and spring loaded which help make them a good choice and an adequate fastener. The downside is they require needle nose pliers for installation and removal. Parts list One Tamiya Flat Bed Kit One Lesu air bag suspension (X-8005) Extra set of tamiya dual wheels or another brand (for the flip axle) Four long bullet connectors (male) 4mm diameter. I like these for the hinge connectors: https://hobbyking.com/en_us/4mm-gold-connectors-low-profile-10pc.html Extra set of taillight lenses and mudflaps Some misc screws and nuts (most will come in the flatbed kit), all hardware is standard size tamiya metric screws and nuts (m3 I believe). Rear Lesu Suspension for flip axle, tamiya for the double fixed axles I used Lesu imitation air bag suspension (part no. X-8005) for the third axle as it is more compact than a single axle leaf spring. I don't love the mixing of the main axles' stock Tamiya leaf spring suspension and the airbag flip axle, but oh well. Light lenses and mud flaps from tamiya kit I had to make a new taillight bar, but included provisions for the stock Tamiya mudflaps. The light buckets will take a rectangle lens from the Tamiya flat bed trailer. No provision has been made to allow an LED to be placed however. As strong as PLA gets Since the front gooseneck is now a bit more forward to line up with the ramps, it is a touch more flexy, but I added a lot of material to the adapters that attach to the aluminum center section to help combat this. Unless you're loading something really heavy (like a small child) it will be fine. I also added a few holes in the aluminum base to allow for extra fastners to further stiffen this up. The rear frame rails are the same right and left, so just mirror the left side provided in your slicer software to get the right side. Some designs for 3d printed parts Appreciation to jan1cato, I used his crossbeam from here: http://www.thingiverse.com/thing:1903313 after adjusting it for size and shape. rcdesigna made these desings for the bed supports:https://www.thingiverse.com/thing:2335576https://www.thingiverse.com/thing:2335670 Happy printing. Print Settings Printer: Prusa i3 mk2 Rafts: No Resolution: .15-.2 Infill: 50% Notes: Print the front base adapter (the part between the gooseneck halves and the base plate) on its side as that will allow the grain to increase strength of that part. Its pretty beefy but I like to err on the side of caution. Some parts will require supports, just critically analyze them in your slicer program. Not a ton of support is required, however.
With this file you will be able to print Tamiya Truck 1/14 Low Boy Trailer v2 Detachable Neck Flip Axle with your 3D printer. Click on the button and save the file on your computer to work, edit or customize your design. You can also find more 3D designs for printers on Tamiya Truck 1/14 Low Boy Trailer v2 Detachable Neck Flip Axle.