Tandy 1000HX Gotek
thingiverse
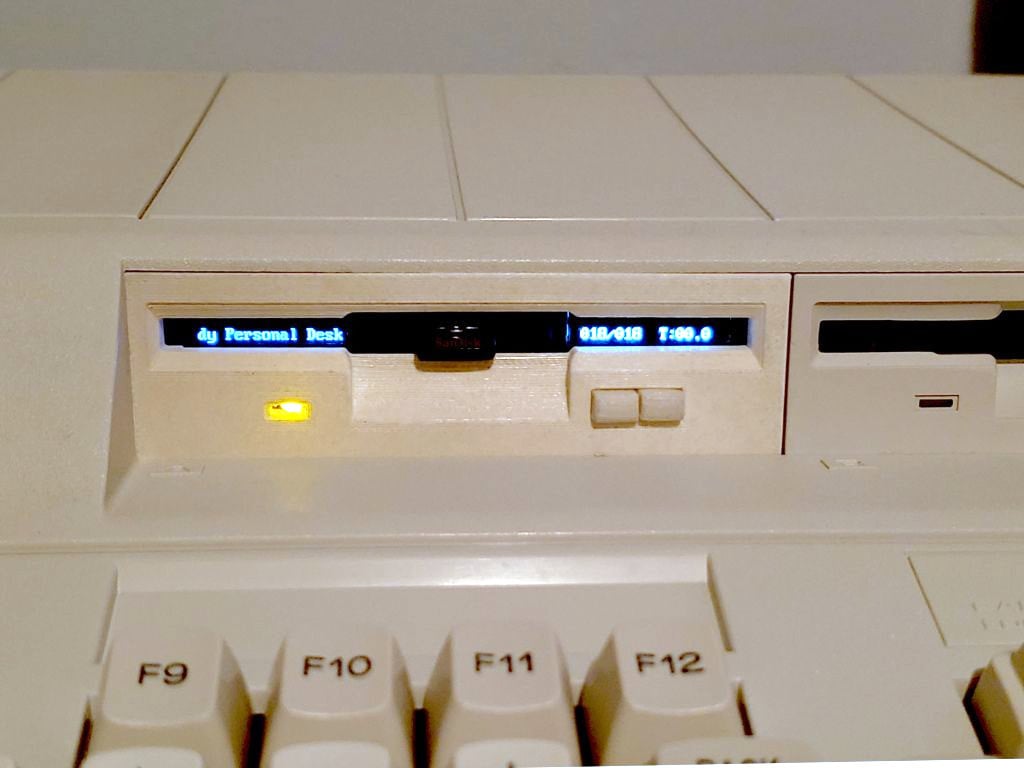
## Tandy 1000HX floppy mount for Gotek floppy emulator board. This project will require various modifications to the Gotek including soldering: ### Parts: * Gotek floppy emulator compatible with FlashFloppy firmware. * 2x identical OLED 0.91" 128x32 screens. * 7x 2.5mm self-tapping screws. * Amber or yellow 3mm led. * USB flash drive, most should fit but best if it’s flat or micro-sized. * Black electrical tape. * You will need to do some custom wiring and soldering. ### 3D Print notes: * Print front face, facing down. * Prints without any supports and can use low in-fill. * BuildTak-like build surface make a good matching texture for front face to Tandy plastic. * Buttons may require some sanding to fit well. * Platform STL includes a small standoff for mounting in drive bay A or B. * USB Surround STL should be printed in black or painted black. * Wedge can be used to lift the rear of the platform to help align front face up and down. ### Gotek modifications: * You MUST make several physical modifications to a Gotek before using it in a Tandy 1000 HX! See "Adrian's Digital Basement" YouTube video "How-to: Installing a Gotek in a Tandy 1000HX" for technical details, including: * Several pins need to be removed from the Gotek * Power need to be provided from the existing drive (as seen in Adrian's video) or extracted from the ribbon interface. * Need to use FlashFloppy 3rd party firmware to support OLED screens and 720k disk images * Additional modifications are also needed: * Additional wiring to support 2 OLED screens connected in parallel. * Un-soldering and removal of the existing up/down buttons on the Gotek PCB * Un-soldering and removal of the existing access LED * Suggested FlashFloppy FF.CFG settings: ``` display-type = oled-128x32 oled-font = 8x16 ``` ### Build Notes: * Create custom wires to connect to two OLED screens together in parallel and connected to the Gotek per OLED directions listed on the FlashFloppy site at https://github.com/keirf/FlashFloppy/wiki/Hardware-Mods. Normally you wouldn't wire two i2c devices together on the same id, but this works for me in this situation. * If soldering pin headers to OLED modules, try to keep them short/flush in the front. * Before fitting OLED screens into the front face, use electrical tape (ontop of the protective film if possible) to cover up the bottom line of text on one screen and the top line on the other. Also cover the solder points in the front so it's not noticed once fully assembled. * Mount in the correct OLED into the correct position on the front face. I used hot glue to keep in place, avoiding covering any components on OLED module in case the glue needs to be removed. * Insert the desoldered Gotek up/down buttons into the platform with the buttons facing forward, making sure they are pushed down as far as possible. * Suggested to cover the underside of the Gotek, where the buttons and LED was, with tape to prevent shorting against the buttons relocated below it. * Wrap a little bit of electrical tape around the 3mm led light so it only shines forward, otherwise it might light up the whole front face if using a white/light-colored filament. ### CAD files: * Original Fusion 360 F3D file provided. This is one of my first fusion projects but I did attempt to keep the timeline clean and provide various Parameters variables. * Exported STEP file for other CAD programs. * CAD files uses an OLED reference CAD drawing by Stilet Fox at https://grabcad.com/library/oled-0-91-128x32-1
With this file you will be able to print Tandy 1000HX Gotek with your 3D printer. Click on the button and save the file on your computer to work, edit or customize your design. You can also find more 3D designs for printers on Tandy 1000HX Gotek.