Tang Band 2.1 Desk Speakers & Subwoofer
thingiverse
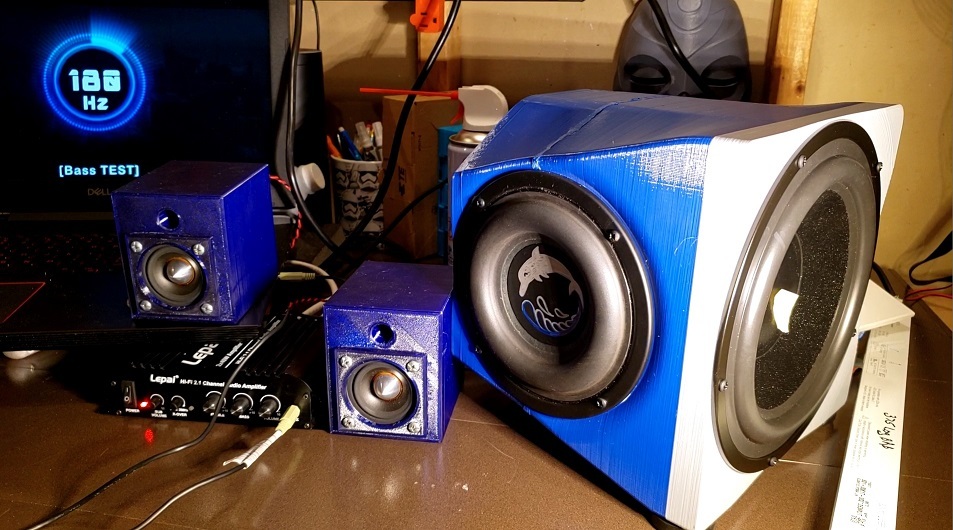
Tl:dr I designed and 3d printed a 2.1 speaker setup for my desk at work. Here's a silly video of the speakers in action. The section with the actual video of the subwoofer is recorded audio, not overlayed! All prints are 1 piece, including supports & internal bracing, and fit on an Ender 3 Pro. The Passive Radiator Subwoofer required more than 1000g of filament, so I added a runout sensor to the printer (it ended up failing during runout, but I saved the print!) My coworker had some old Tang Band 2" speakers sitting under his desk for a decade, and I needed some speakers for conference calls. Rather than buy some I figured I would give 3D printing some small enclosures a shot (All 1 piece print). The Tang Band 2" full range drivers were crystal clear and direct, but had no low extension at all. So I looked around for a matching subwoofer on Parts Express, and came across the W5-1138SMF which looked to be pretty popular. I then designed and printed a simple sealed subwoofer to complement the speakers (also 1 piece print). It sounded great but, I knew this sub was born to be ported instead of sealed. I then went back to the drawing board and all of the online ported designs, such as the Voxel design from Paul Carmody, were simply too big for my desk at work. I also found the Mini Earthquake design from 123Toid, but didn't like the design very much... I then crunched some numbers on WinISD for the 5 1/4" subwoofer with an 8" passive radiator, and the math checked out (really well actually). The goal was to get the whole thing printed, in one piece, on an Ender 3, including supports, bracing, without additional assembly such as gluing. I believe the final design was 218x218x200mm or so. Fusion 360 made it very easy to calculate internal volumes! All in all, it’s extremely overkill for my desk at work, but it sounds great, and was a great way to learn Fusion 360. There are a lot of ways to improve upon this design, but it sounds better than I thought it would, and I impressed my fellow engineers at work with what could be done on a $200 3d printer. I printed all the enclosures in PETG, very slowly (~30-40mm/s), and the PR subwoofer took about 220 hours to complete! Sealed Subwoofer: f3 = 70Hz (2.921 Liters) PR Subwoofer: f3 = 50Hz + 4dB @ 75Hz (25g Mass on PR, 5.979 Liters) Subwoofer Parts: Tang Band W5-1138SMF 5-1/4" Paper Cone Subwoofer Speaker - Part # 264-917 Dayton Audio DS215-PR 8" Designer Series Passive Radiator - Part # 295-492 Penn-Elcom F1687 Rubber Cabinet Foot 1.5" Dia. x 0.375" H - Part # 260-777 Round Speaker Wire Terminal Cup Spring Type - Part # 260-294 Speaker Parts: Tang Band W2-803SM 2" Extended Range Speaker Driver - Part # 264-805 (I used different speakers, but these will work and are the newer version. Should not need a front seal with these since the rim is much thicker) Parts Express Square Speaker Wire Spring Terminal Cup - Part # 260-297 Amplifier: Lepai 2.1 2x40W Amplifier LP-168HA without Power Supply - Part # 310-3080 2.1 x 5.5mm DC Coaxial Power Plug to Screw Terminals - Part # 335-370 Number #6 Screws for all (threaded directly into plastic) Number #6 x 3/4" Pan Head Deep Thread Black Screws 25-Pack - Part #081-423 YouTube: https://youtu.be/wrLrgwqP9oY
With this file you will be able to print Tang Band 2.1 Desk Speakers & Subwoofer with your 3D printer. Click on the button and save the file on your computer to work, edit or customize your design. You can also find more 3D designs for printers on Tang Band 2.1 Desk Speakers & Subwoofer.