Tanker car for OS-Railway - fully 3D-printable railway system!
thingiverse
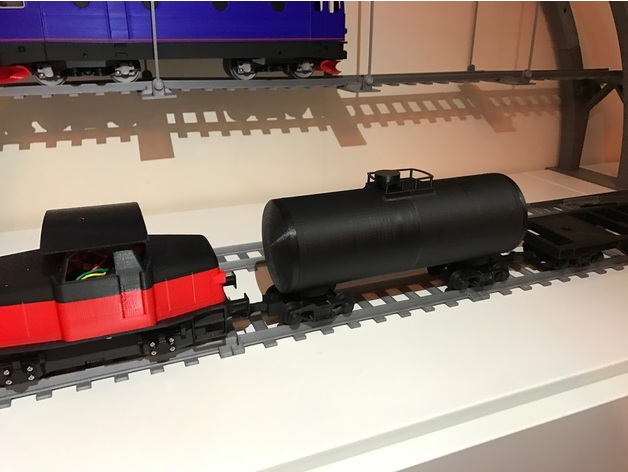
This is a tanker-car for the OS-Railway concept. Click here for the OS-Railway main page: http://www.thingiverse.com/thing:2146361 This car is based on the same bogies as the freight car chassis you can find in the following link: http://www.thingiverse.com/thing:2152351 But for convenience I've included all parts you need on this page so you don't have to download anything from there. First look at the pre-assembled STL's called buildplate_something, but all parts are also included separately. If you wonder why the main tank parts are rotated the way they are, it's to compensate for a not-perfectly-calibrated Z-axis. I noticed that at least the Prusa can suffer from a tilting Z-axis which will make the prints tilt. Even if it's a very tiny angle it will be amplified if a part is split in two and printed so that the angles adds to each other. If the parts are rotated 180 degrees compared to each other, the angles will take out each other and the tank will still be straight. What you need: 6pcs M3x10 2pcs M3x10-12 8pcs M2x6 2pcs wheel axles 3mm x 42mm suggest carbon fiber 8pcs ball bearings 3mm id, 6mm od, 2,5mm width (or use the dummy PLA bearings included, they actually have a very low friction against carbon fiber but you may need to drill them out a bit to make the shafts turn loose. I actually used these on my prototypes to save ball bearings and this works way better than expected!) Print Settings Printer: Prusa i3 mk2 Rafts: No Supports: Yes Resolution: 0.2 Infill: 100% Notes: Build plate 1 - bogies and misc parts 100% infill no support no raft no skirt 0.1-0.2mm resolution is OK Build plate 2 - main tank parts 100% infill no support no raftskirt is needed! the parts have a very small footprint 0.25mm will produce OK result and reduce print time Build plate 3 - tank ends 100% infill Support from build plate no raft no skirt Use as low layer height as you have time for, as the rounded angles will show the edges from the layers very visibly if you use thick layers. You can of course seal these steps if you sand and paint the tank for example. Build plate 4 - wheels 100% infill no support no raft no skirt will be OK with 0,2mm layer height, but if you have time use 0,1mm. Post-Printing Assembly CA-glue works very well with PLA, especially the gel-type which is easier to use than the usual super-thin one. Stat by gluing in the tank_connector into the tank piece that has a hole in the roof, and make sure that the connector ring don't block the hole for the tank cap insert. Then glue the two tank pieces together. The rest is hopefully self explanatory but don't hesitate to ask any question in the comments! How I Designed This Designed using Fusion 360
With this file you will be able to print Tanker car for OS-Railway - fully 3D-printable railway system! with your 3D printer. Click on the button and save the file on your computer to work, edit or customize your design. You can also find more 3D designs for printers on Tanker car for OS-Railway - fully 3D-printable railway system!.