Tantillus (Ultius) Compact Ultimaker Slider Adapters
thingiverse
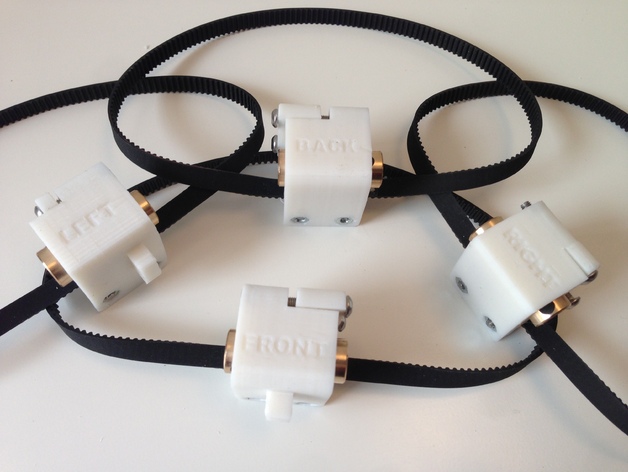
Updates 31th march 2016: Uploaded a Compact-Plus version of the back slider and rodclamp the first version collided with the right slider at the furthest back right 2mm position. Why these sliders: Wanted to do yet a makeover of my Tantillus printer, and have decided to take it closer to the Ultimaker by embracing their sliders and in doing so, make it possible to use Ultimaker Carriages on the Tantillus. I Call my printer an Ultius Printer. Features Very compact and sturdy build! Constructed for Ultimaker carriages. Open ended GT2 belt usage Using Ultimaker (8*11*30) bushings Easy to change carriage if needed Belts, Rods and BOM 4x pieces of GT2-6mm belt with a length of 359mm each. Duct tape or similar 2x 6mm 147mm steel rods 4x bushings Ultimaker 2 size (8*11*30mm). Ýou can either use Graphite Copper or Sintered Copper. Find them on Aliexpress 8x 20mm m3 screws.* 8x 25mm m3 screws.** 16x m3 nuts. *If you use the Compact-Plus option you need 12x 20mm m3 screws instead of just 8. **If you use the Compact-Plus option you need 4x25mm m3 screws instead of 8. Recommendations Use Spacers between the GT2 pulleys and the outer bearings to stabilize the XY rods. The "Left Sliders Compact-Plus" version is optimized for the use of E3Dv6 printhead mount for Ultimaker Original (at youmagine) and will give you an additional 5mm on the X-axis I created some Tantillus top corners w. room for spacers which I'll recommend using. Print in ABS to make the pieces heat-resistant if you plan on creating a heat-chamber, as PLA likes to go soft at around 50c You might want to take a look at my Tantillus (Ultius) lead-screw Z-axis - complete for further optimizing the Tantillus. My Inspiration Aside from having build 3psc Ultimaker 2 clones, where one was a printed clone, I have looked intensively at the myriad of different Ultimaker and Ultimaker 2 Sliders out there. The TwisterBlocks have been a special inspiration in this Projects, which is why I mention them here :) Carriage used I have used the E3Dv6 printhead mount for Ultimaker Original. You can use any carriage made for Ultimaker printers. Print Settings Printer: JennyPrinter Rafts: No Supports: No Resolution: 0,2-0,25mm Infill: 40-100% Notes: I have printed these with 0,2 to 0,25mm layer height and infill ranging from 25 to 40 - I ended up printing at 100% infill for final parts as it really isn't that much more filament. Perimeters I used: 2 times 0,4 Top/bottom: 0,6mm Feel free to make them however you see fit, but above settings should be adequate. I printed the first many versions in PLA with rather high temp to make bonding better. I printed final version in ABS to make them heat-resistant in heatchamber Post-Printing Cleanup and preparations Remove supports using a small needle-plier and _scrape_ off any leftover brims. Run a 3mm drill through all the holes and make sure the screws run smoothly through. Especially important for the holes for the screws holding the 6mm rods in place! Pre-set all the nuts into the sliders using a longer screw and a needleplier to hold the nuts if needed. Be sure to insert the "Tight Clamp GT2" pieces (small pieces with teeth for the belt) before pulling nuts into the holes on top, or you can break the slider - Use the small notch to align them properly to the Slider. You might want to put a small dap of superglue onto each of the nuts holding the "rodclamps", so as not to risk pushing them out when changing carriage/rods. They might sit very tight depending on your printer though, making it unneededBelts Cut your GT2-6mm belt into 4 pieces of 359mm length.The belts should end with a teeth (high) on each end. For each piece of belt: Note: this is just to keep the belt in place when fixing the Tantillus Tight Clamp GT2 in place. Cut a small piece of duct tape: around 20mmx6mm or so. Place one end of the belt halfway onto the tape. Match the other end of the belt onto the tape. (There will be 2 teeth right after each other. This is fine.) Place the newly created belt-loop with the piece of tape in a Slider with teeth pointing up/out. Put the "Tantillus Tight Clamp GT2" on top of the belt with the notch lined up with the notch on the Slider You are going to need some sort of plier to pressdown on the "Tantillus Tight Clamp GT2" in order to fix the screws through the mount holes Remove support using a needleplier Remove support using a needleplier Put a 3mm drill through all the holes and make sure the screws run through smoothly Install nuts using a longer screw, screwdriver and needleplier Support the structure when installing the nuts. Use a plier when installing the GT2 piece to hold the belts.Make sure you install the bushing first.If it is impossible even with the longer screw-tip you can use the smaller tantillus_tight-clamp-small_gt2.stl I uploaded the 18 march Assembly Step 1Start by sliding the right rod through from the right.Add 1x thin spacer, 1x 5mm spacer, 1x GT2-20 pulley - hook over the belt of the BACK slider. Be sure to orient it correctly.Now add yet a GT2-20 pulley and hook over the belt of the FRONT slider. Notice the orientation. Finish by adding 1x 5mm spacer and 1x thin spacer.Take some time to makesure everything is right! Assembly Step 2Slide in the front rod from the lower (on this photo) sideAdd 1x thinspacer and 1x 5mm spacer. Add a GT2-20 pulley and hook over the belt of the RIGHT sliderPut the rod through the FRONT slider and put on a GT2-PulleyHook over the belt of the LEFT slider (check orientation) and add 1x 5mm spacer and 1x thin spacerAdd top Corners as you go tostabalize it. Assembly Step 3Slide in the left ord from the rear side of the casingAdd 1x thin and 1x 5mm spacerAdd a GT2-20 pulley and hook over the belt of the BACK sliderWhile pushing in the rod further you need to keep a hand on the pulleys so as not to ruin the belt and sliderPut the rod through the LEFT slider and add a GT2-pulley.Hook over the belt of the FRONT slider and add 1x 5mm spacer and 1x thinspacer.Take your time when doing this step. Almost done! Assembly Step 4Slide in the BACK rod from the right hand side of the case (lower side of this photo).Add 1x thin spacer and 1x 5mm spacerAdd a GT2-20 pulley and put over the belt of the RIGHT sliderKeep the pulleys in place whiles sliding the rod further inPut the rod through the BACK slider.Add the final GT2-20 pulley and loop over the belt of the LEFT slider.Add the final 5mm spacer and a thin spacer. Add/remove spacers as necessary if the belts are not perfectly aligned over and under the sliders. How I Designed This Used Tinkercad Used Tinkercad.com as always. It's free and online :) Custom Section Recommendations I'll recommend printing the corners I also just put up on thingiverse, which makes room for spacers between the bearings and GT2 pulleys. This will make for much smoother running while holding the rods in place at the same time. Same as Ultimaker 2 printer. Spacers I used 8x Spacers, each 8mm inner diameter, 16mm outer diameter and 5mm thick. I also used 8 normal metal spacers, each 0,8mm thick. You might need to add or remove spacers as needed in order to make the belts run directly over/under the Sliders. Squaring the Axes I recommend you print and use these two tools from Youmagine:Adjustable Axis Alignment ToolUltimaker XY Axis Square
With this file you will be able to print Tantillus (Ultius) Compact Ultimaker Slider Adapters with your 3D printer. Click on the button and save the file on your computer to work, edit or customize your design. You can also find more 3D designs for printers on Tantillus (Ultius) Compact Ultimaker Slider Adapters.