Tantillus (Ultius) lead-screw Z-axis - complete
thingiverse
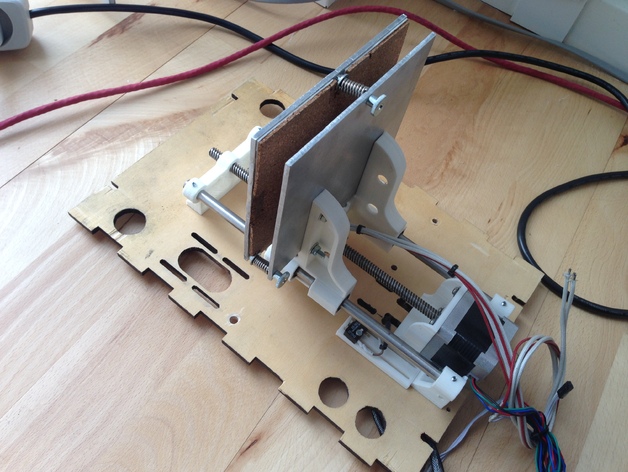
Update 10th April 2016 Added New Z-left, middle and right and 2 new versions of the motor bracket: one with and one without the Z-max endstop holder. They are all denoted v1.2 Changes: Reduced the depth/length of the "wings" going out backwards as they could hit the z-max endstop holder and/or screws in some instances (not tested on printed cases). Made room for 20mm M4 screws and generally slightly tweaked the middle piece. Rounded a lot of corners and added Ultius and M4 text to the middle piece. Might come later I have thought about making a set for M3 screws. I made this last year for my Tantillus. I call it an Ultius, as it sort of ended up looking and working bit like an Ultimaker, so Tantillus + Ultimaker = Ultius :) Z-Height: When using an E3D Volcano I have around 12cm of Z-height! If you use J-head or normal E3D you are going to get substantially more Z-height! The arms for the bed has been trimmed down a lot to make more Z-height Space. Endstops: I have made it possible to adjust the max-endstop. The MAX endstop can be adjusted using the slides to the left of the motor Mount. I had my arduino+ramps at the bottom and needed to make sure there was room for it. If you use MAX-endstop as homing you no longer have to contend with the nozzle dipping Down in plastic when homing. BOM: I used a TR8*8(p2) lead screw and there are holes to Mount the NUT to the middle part I used *6 psc m4 screws and locking-screws to put the Z-axis parts together, but I guess you can use whatever you find... or just glue it. Used M5 screws and lockingnuts to Mount the entire axis to the frame. You need some rather long M3 screws for the Lead-screw nut. Hardest part: You do need to drill some new holes to Mount this. Might want to make the holes a tad larger to make room for adjustment Mount it as straight as you can... tighten it almost down then run the axis up and Down to make sure it runs without problems.. then straighten it down. Take your time doing this. Recommendations: Assembly: if possible I recommend installing the Z-stage with the case disassembled as it will make it much easier to make it run smoothly. Endstop: I'll recommend using the MAX endstop for homing instead of MIN endstop. When using MIN endstop for homing the nozzle dips Down into molten plastic when homing, and can drag this plastic along onto the print. Using MAX to home you solve this issue. It is imperative you adjust Z-heigh precizely when using this method. New slides: I'll recommend taking a look at my new Tantillus Compact Ultimaker Slider Adapters Corners: also take a look at my Tantillus top corners w. room for spacers Print Settings: Printer: Tantillus Rafts: No Resolution: 0,2 Infill: 25 Notes: You shouldn't need supports, but you might. Use 2-3 perimeters. Print in ABS if you want to use heated chamber. How I Designed This: Tinkercad I imported some of the original STL files from Tantillus and rewamped them. Others I did from scratch. I can't honestly remember where I got my ideas or how much is completely my own ideas, but I know the Tantillus A2 inspired me some. As you can see I have used both aluminium and acrylic plates. At first I printed straight on Acrylic with nice result for both abs and pla, but I wanted to try heated plate, so cut up some aluminium plate and attached a silicone heating element. Worked great. Z-height: When using an E3D Volcano I have around 12cm of Z-height! If you use J-head or normal E3D you are going to get substantially more Z-height! The arms for the bed has been trimmed down a lot to make more Z-height Space which was my main goal for this design, apart from the lead-screw option.
With this file you will be able to print Tantillus (Ultius) lead-screw Z-axis - complete with your 3D printer. Click on the button and save the file on your computer to work, edit or customize your design. You can also find more 3D designs for printers on Tantillus (Ultius) lead-screw Z-axis - complete.