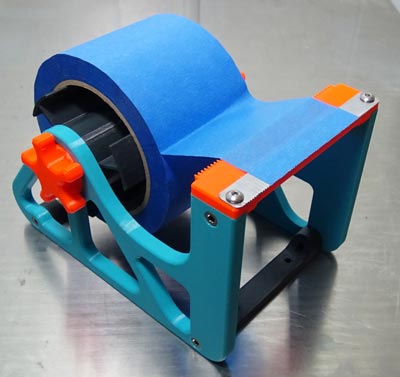
Tape Dispenser Vers. TD3 for Blue and Shipping Tape
prusaprinters
<p><strong>UPDATE 18NOV2021:</strong> Added alternative left and right frame parts modified to hold the blade 20mm lower than the original design. Use files TD3-FrameLeft-LowBlade.STL and TD3-FrameRight-LowBlade.STL instead of TD3-FrameLeft.STL and TD3-FrameRight.STL.</p><p><strong>UPDATE 22AUG2021: </strong>Added alternative part "TD3-FlushHubBolt-3Start.STL". These hub bolts come without the ears, making them flush (almost – they stick out about 2mm) with the sides of the dispenser in order to make it less wide overall. Also added picture of dispenser with the flush hub bolts installed.</p><p><strong>DESCRIPTION</strong><br/>A gravity-independent bench or wall mountable tape dispenser for 1-, 2-, 3-, 4- & 6-inch wide blue, masking or packing tape on 3-inch inside diameter rolls. Use the optional metal blade for shipping/packing tape. All parts print without support.</p><p>This is the third revision of my tape dispenser design, and is much improved from previous versions.<br/>The first one completely SUCKS! It is at: <a href="https://www.thingiverse.com/thing:140138">https://www.thingiverse.com/thing:140138</a><br/>The second one is better, but is only 3 inches wide, and is at: <a href="https://www.thingiverse.com/thing:4110302">https://www.thingiverse.com/thing:4110302</a> and <a href="https://www.prusaprinters.org/prints/22608-tape-dispenser-3-inch-blue-or-shipping-tape">https://www.prusaprinters.org/prints/22608-tape-dispenser-3-inch-blue-or-shipping-tape</a></p><p><strong>BUILD</strong><br/>First, decide whether you want a 3-, 4- or 6-inch wide dispenser. Remember that tape rolls less than the hub width will work on any hub of greater or equal width, for example, a 1-inch, 2-inch or 3-inch wide tape roll will work on any of the hubs. More than one roll can be put on a hub, size permitting.</p><p>All printed parts are made with PETG filament.</p><p>Print these parts for any dispenser width:<br/>1 piece - TD3-FrameLeft.STL (or alternative part TD3-FrameLeft-LowBlade.STL)<br/>1 piece - TD3-FrameRight.STL (or alternative part TD3-FrameRight-LowBlade.STL)<br/>2 pieces - TD3-HubBolt-3Start.STL (or alternative part TD3-FlushHubBolt-3Start.STL)</p><p>Print these additional parts for 3-inch wide dispenser:<br/>1 piece - TD3-Hub-3inch-3Start.STL<br/>2 pieces - TD3-Base-3inch.STL<br/>1 piece - TD3-Blade-3inch.STL</p><p>Print these additional parts for 4-inch wide dispenser:<br/>1 piece - TD3-Hub-4inch-3Start.STL<br/>2 pieces - TD3-Base-4inch.STL<br/>1 piece - TD3-Blade-4inch.STL</p><p>Print these additional parts for 6-inch wide dispenser:<br/>1 piece - TD3-Hub-6inch-3Start.STL<br/>2 pieces - TD3-Base-6inch.STL<br/>1 piece - TD3-Blade-6inch.STL</p><p>Attach the Base and Blade parts to the Left and Right Frame parts with 6 pieces - 4mm x 0.7mm x 10mm Socket Head Cap Screws. The screws self-tap into the Base and Blade parts.</p><p>The Hubs and Hub Bolts use 3-start threads with a moderate designed-in clearance so they will have a better chance of fitting well when printed with various nozzle sizes and flow rates. The threads are designed with one millimeter difference in diameter. The Hub designed thread size is a 3-start 30mm x 10.5mm pitch. The Hub Bolt designed size is 3-start 29mm x 10.5mm pitch. The actual print size depends on the many factors of print settings, but the designed sizes allow for a good range of sloppiness, and functionally, a loose fit here is as good or better than a tight fit.</p><p>If you will only be using blue or masking tape or other paper tape, mount the blade with the serrated edge facing outward.</p><p>If you will be using packing tape (and/or blue or masking tape), mount the Blade part with the serrated edge facing inward, and mount the metal blade to the Blade part using 2 pieces - 4mm x 0.7mm x 6mm Button Head Hex (or Phillips) Drive Screws. The screws will self-tap into the printed Blade part.</p><p>The metal blade may be made from a hacksaw blade.</p><p>Cut the hacksaw blade to these lengths:<br/>For 3-inch dispenser - 91mm<br/>For 4-inch dispenser - 117mm<br/>For 6-inch dispenser - 168mm</p><p>I took the temper off the blade by heating it to red hot and letting it cool slowly to make cutting, drilling and finishing a little bit easier. I used an abrasive cutoff wheel to cut the blade held in a vise and finished the cut end with a belt sander to get the desired length and shape (corner fillets). Drill 4mm diameter holes in the hacksaw blade 5.5mm from each end (assuming using the above listed lengths), and centered on its width. You can use one of the existing holes in the blade to save some drilling. Be sure to clamp the blade securely when drilling -- it's still very tough even after reducing the temper.<br/>The blade holes are on 80mm centers for a 3-inch dispenser.<br/>The holes are on 106mm centers for a 4-inch dispenser.<br/>The holes are on 157mm centers for a 6-inch dispenser.</p><p>I used a narrow belt sander to remove the paint from the hacksaw blade and produce a brushed finish.</p><p><strong>PRINT SETTINGS</strong></p><p>Printer brand: Prusa I3 MK3S</p><p>Rafts: No</p><p>Supports: No</p><p>Resolution: 0.2mm</p><p>Infill: 15% grid</p><p>Filament brand: Prusament PETG</p><p>Filament color: Any</p><p>Notes: 2 perimeters, 4 bottom layers, 5 top layers</p><p> </p>
With this file you will be able to print Tape Dispenser Vers. TD3 for Blue and Shipping Tape with your 3D printer. Click on the button and save the file on your computer to work, edit or customize your design. You can also find more 3D designs for printers on Tape Dispenser Vers. TD3 for Blue and Shipping Tape.