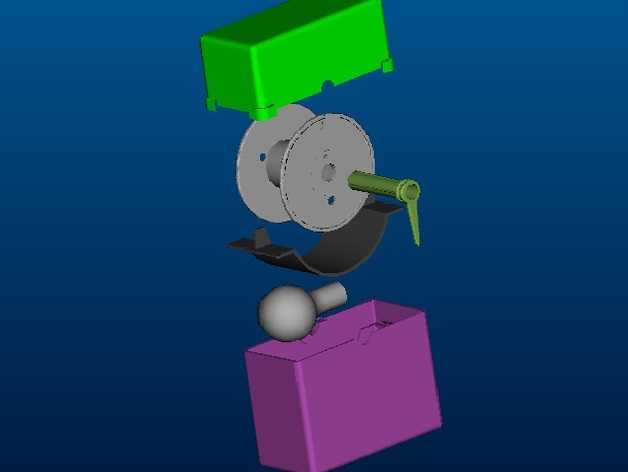
Taulman spool holder heater/dryer box
thingiverse
Taulman Nylons are amazingly strong but are very hygroscopic. When printing large objects that take more than a day to print, the filament can absorb enough moisture from the air (despite copious amounts of desiccant inside a nearly airtight enclosure) to significantly degrade and weaken your print due to the moisture being driven off at the extruder nozzle. If you can hear very light snapping / popping noises at the extruder nozzle while extruding there is too much moisture in the filament...even fresh filament from Taulman, despite being vacuum packed with desiccant often has too much moisture in it to print cleanly. To solve this problem I created a heated enclosure to keep the filament dry. I also added a pointer to the spindle to give a visual indication that the filament is feeding into the printer. Print Settings Printer Brand: MakerBot Printer: MakerBot Replicator 2X Rafts: Doesn't Matter Supports: Doesn't Matter Resolution: 0.2mm Infill: 100% Notes: I used ABS for the box bottom and top and Taulman 910 for the spindle and heat shield (ABS distorts from the heat) Post-Printing Things you will need First clean and trim any supports from the parts. 1) Find, buy or salvage a light socket and cord from a lamp or light fixture. 2) Dimmer or rheostat of some kind or proper wattage light bulb to attain and maintain about 140 degrees Fahrenheit (Roughly 25 watts) 3) You will also need a roll of 2" or wider aluminum foil tape. 4) Black semi gloss spray paint 5) Thermometer Light socket salvaged from bathroom vanity fixture and 60 watt incandescent bulb How I Designed This Assembly instructions First thing to do is to test fit the light socket and drill or cut a hole in the bottom half of the enclosure where you want the cord to exit. Then line the entire inside of the lower portion of the box with aluminum foil tape (THIS IS IMPORTANT!!!) as it will prevent the ABS from distorting or melting from the light bulb which just rests on the bottom of the box. Install the light socket and light bulb then route the cord through the hole you made...I added foil tape around the hole to hold the cord in place and to block off excessive amount of air from coming in through the gap. Now for the heat shield. Apply aluminum foil tape to the bottom of the curved portion of the heat shield and then spray paint it with semi gloss black paint. This will help dissipate the heat from the light bulb evenly to the upper half of the enclosure. Place the heat shield into the lower half of the enclosure and snap it into place. Install a spool of nylon by inserting the spindle into the spool (this should be a snug fit) if it is too loose the spindle will not rotate with the spool. You can add a little blue painters tape to it if needed. Set the spool and spindle in the lower half of the enclosure and then thread the filament out through the slot in the top half and finally position the top half onto the lower half of the enclosure. If you have a Makerbot you can hang the box on the back of the printer or just set it on the bench surface. All that is left to do is to adjust the temperature by selecting the proper size bulb 20 to 30 watts or use a larger bulb 60 to 100 watt and a rheostat or light dimmer. Use a thermometer or infrared temp sensor to monitor temperature until you get a stable 140 degrees Fahrenheit. Completed set up Heat Shield Taulman 910 covered with Foil tape and painted semi gloss black Spool and spindle set into lower half of enclosure Adjusting rheostat to achieve 140 degrees Fahrenheit
With this file you will be able to print Taulman spool holder heater/dryer box with your 3D printer. Click on the button and save the file on your computer to work, edit or customize your design. You can also find more 3D designs for printers on Taulman spool holder heater/dryer box.