TAZ5 E3D Titan Mount
thingiverse
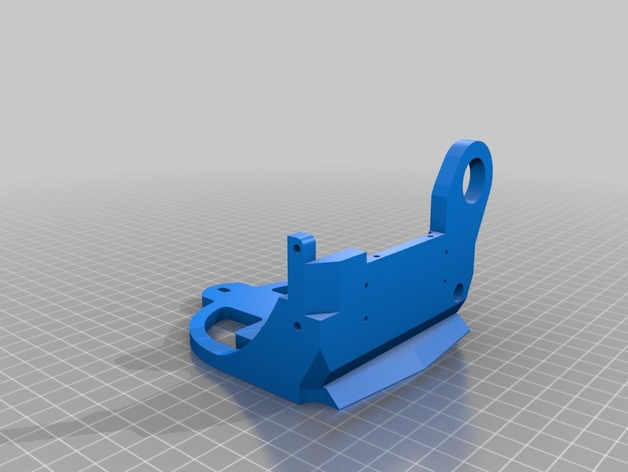
Update 4/28: Tweaked the X mount, made the bed for the motor mount slightly wider. When printed, the motor mount was a hair too tight. Disclaimer: This is not pretty, but it's functional. Didn't waste time cleaning it up 100% and making it pleasing to the eye! I wanted to reduce the weight of my X carriage so I could increase my print speed. The stock TAZ5 extruder assembly is very large, and by the time you take into account the larger heatsink fan I added, plus the capacative auto-leveling system, my X carriage weighed in at about 762 grams. When I saw the E3D Titan, plus it's ability to use a smaller stepper, I jumped on it. Of course, a custom mount had to be made. This is version 2 of my mount. Version 1 had some sag to it, there was not enough support to keep the motor/hotend from tilting forward a bit. This version added some extra supports to reinforce it against that. The way this is set up is so a standard NEMA17 (for example - if you are using the stepper from your original TAZ extruder) sits on the shelf, with the back of the motor all the way through the mount and touching the X carriage. This accomplishes two things: First, it puts the weight of the motor as low as possible, and as close to the X rails as possible, in an attempt to reduce any twist/sag the weight of the motor might induce in the X rails. The standard TAZ mount has the motor up high, and offset towards the front of the machine, the farthest point of the motor 82mm from the X carriage. My placement puts the motor 36mm closer to the carriage/rails, which should reduce any twisting/torque. I know there's a formula to figure out the difference in force, but I graduated high school too many years ago to remember it! :) Second, it gives full access to the Titan, making it easy to load filament, switch out hot ends. I toyed with putting the motor in turned 90 degrees left or right, but that put the tension spring or the thumb wheel in a hard to reach place. The part that you sandwich in between the Titan and the stepper is 2mm thick, so fits perfectly with the standard screws the Titan ships with. My setup uses a capacative auto-level system, and to get the probe as close to the hotend as possible (Y offset 0, X offset 33mm), I had to move the print fan to the other side of the carriage. To do that I had to reverse the fan and fan mount, plus tweak the angles of the fan duct a bit to both make it fit, and to aim the airflow correctly. If you don't need/use the sensor, just chop that off in 123d Design and save some print time. I included STEP files so the parts could be more easily edited as solids. Issues: So far the only issue with this design is for the new fan duct, I used the original files, forgetting the fan had heat set inserts, so the screw holes were way too large. I compensated for this by heat setting nuts into the fan mount. You'll likely want to check hole diameters and see how you can make it work. Sorry I didn't clean it up - busy trying to get this going and then printing, not a ton of time to clean it all up. I'll post an update sometime soon when I get the time. Edit 6/19/16: Added some photos of it mounted, and also added a version that does not have the capacative probe mount. I actually scrapped mine because of issues I was having with accuracy. Figured most people did not use one anyway so no need to waste time printing that part. Print Settings Printer Brand: LulzBot Printer: TAZ 5 Rafts: Yes Supports: Yes Resolution: .25 Infill: 60% Notes: The print settings above are just what I used. It probably doesn't need a raft, but I used one to fight against warping, as I printed this in ABS. It should probably also be printed at a higher infill and higher resolution, but, I shaved 2 hours off the print by lowering the resolution and infill, and it seems to work just fine. Want a stronger part? Up those settings. I also used supports to make sure the hole for my capacative probe was sound. Edit 6/19/16: I uploaded a version without the capacative probe mount. Using that it wouldn't need supports either. Also, been using this for months now, not a single problem. Post-Printing Screws: Sorry folks, I can't help you there. A lot of what I used were smaller 4-32 SAE screws I had from one of those cheap Harbor Freight screw sets, so the holes aren't exactly standard. I also made most holes a little smaller than necessary so that I could drill them out larger to fit whatever screws I could find. How I Designed This Done in 123D Design using a STEP file I found of an older TAZ mount as the base, then tweaking and editing it about 400 times to get it right.
With this file you will be able to print TAZ5 E3D Titan Mount with your 3D printer. Click on the button and save the file on your computer to work, edit or customize your design. You can also find more 3D designs for printers on TAZ5 E3D Titan Mount.