Telsa Phone Charger NO SUPPORTS REQ'D
thingiverse
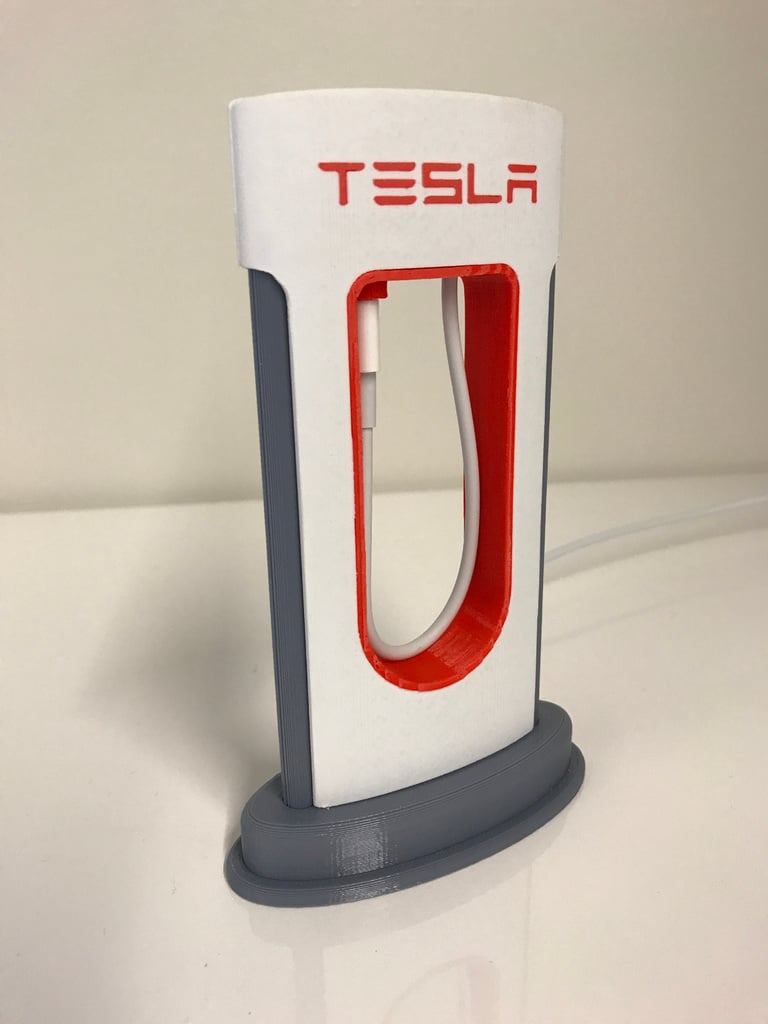
I love the design from https://www.mysupercharger.net/ for this Tesla Supercharger phone charger. However, it appears that it was made in Blender, requires crazy supports, and is very difficult to print. I wanted a model that is **EASY** to print and requires **NO SUPPORTS**. This model was created from scratch in Fusion 360. All the pieces are printed laying down. All pieces are designed for a tight fit (0.25 mm tolerance), so no glue is required. The red lettering is designed to be pressed into white side pieces. I used a hammer to gently "motivate" the letters into place. **UPDATE 8/25/2017** All of the base parts are for lightning connectors (6.7 mm x 1.5 mm) and have openings for connector heads of 7 mm x 10 mm and 3.0 mm cable diameter. * USB-C connectors (8.3 mm x 2.5 mm) use all of the base parts except where there is a USB-C version. These allows openings for connector heads of 8 mm x 11 mm and 3.5 mm cable diameter. * micro-USB connectors (6.83 mm x 1.78 mm) use all of the base parts except where there is a micro-USB version. These allows openings for connector heads of 8 mm x 11 mm and 3.5 mm cable diameter. **UPDATE 11/18/2019** * I exported a new version of the iPhone red center piece that should now be completed flat on the one side to make printing easier. * I created a version 2 of the red Tesla letters that are 0.1mm thinner than the original version to help those who are not able to get the letters to fit. **NOTE:** Please let me know if you have a different charger that doesn't work with one of these and I can add a custom Red Center piece that works for you. ** ASSEMBLY INSTRUCTIONS:** 1. Insert the red center piece into the white side piece with the cord channel 2. Push the cord through the hole in the gray base 3. Push the cord through the hold in the red center 4. Adjust the length of exposed cord in the middle and then push the cord into the channel in the white side piece 5. Cover with the other white side piece 6. Push the 2 gray columns into the gray base 7. Slide the gray base assembly up into the top assembly 8. Push the cord out the side channel on the bottom and cover with the final gray base piece
With this file you will be able to print Telsa Phone Charger NO SUPPORTS REQ'D with your 3D printer. Click on the button and save the file on your computer to work, edit or customize your design. You can also find more 3D designs for printers on Telsa Phone Charger NO SUPPORTS REQ'D.