Tempus Foam Blaster
thingiverse
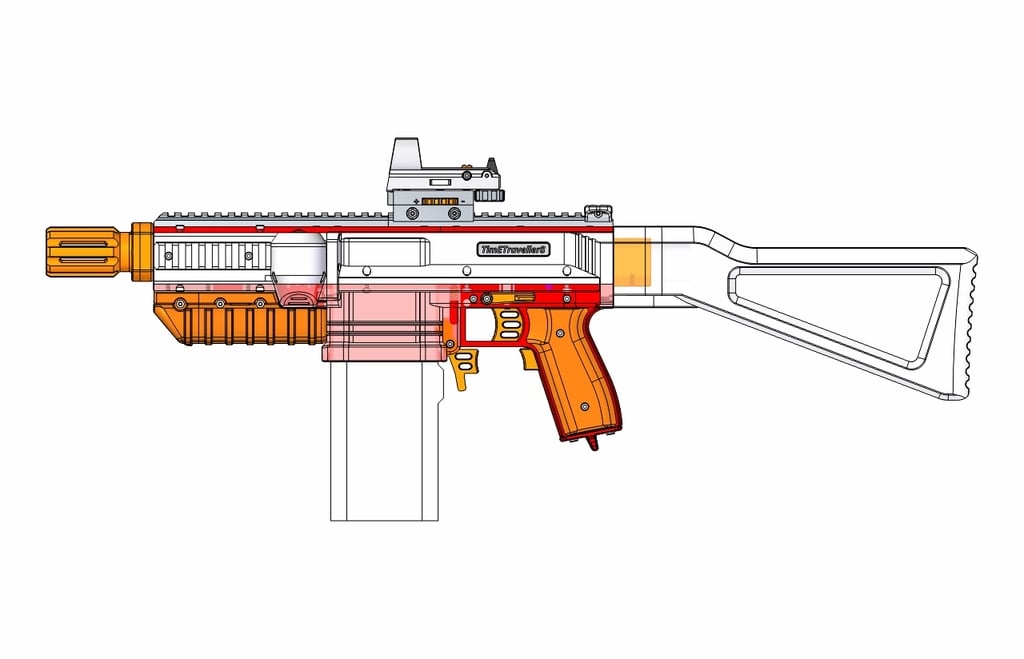
UPDATE06-Wiring Diagram Added Also Tempus Blaster Build Tips thread started here:- https://www.tapatalk.com/groups/britnerf/3d-printed-tempus-blaster-build-tips-t6462.html UPDATE05-Motor-Cover Update Adds extra cable channels to suit Full Auto Version (Coming soon). Updates all versions of the Motor Cover to V1-2. UPDATE04-RH Frame Update (Rev Trigger Version) Updated Part:- TFB_FRAME-RH(REV TRIG)_V1-1.stl Affects Micro Switch installation in Rev Trigger frame. Relocates Microswitch, Large Switch Rev Trigger now works with both switch types. TFB_TRIGGER-REV(REV TRIG_MICRO SWITCH)_V1-0.stl is no longer used. (See Photo for New Microswitch Installation). UPDATE03-Rev Trigger Update (for Full Size Microswitch Option) Updated Part:- TFB_TRIGGER-REV(REV TRIG_LG SWITCH)_V1-1.stl Fixes problem - Rev trigger could pull out of the assembled frame (See Photo for Differences). UPDATE02-Tempus FB-Stealth Theme Update New parts give the Tempus a more Sci-fi blaster look (https://www.thingiverse.com/thing:4941207) UPDATE01-Half Dart Update Files for the dedicated Half Dart Version are listed here (https://www.thingiverse.com/thing:4922971) Tempus Foam Blaster INTRODUCTION After making some modifications to exisiting blasters, I reached the decision that I wanted to have a go at an entirely new design. For my first design I have gone for a mechanical pusher mechanism & nice simple wiring installation using a Mosfet board. DESCRIPTION The Tempus is a 3D printed foam blaster roughly equivalent to a modified Stryfe. Features:- Pusher Mechanism similar to a Stryfe except the ratio of trigger to pusher movement is different & uses a separate spring for each. Grip designed for Rev trigger and No rev trigger versions. Uses a Mosfet board mounted up front near the motors for super simple wiring. Has Battery grip to house the Lipo up front allowing standard worker type /nstrike attachment stocks. Has Battery Pistol-grip option. Designed for full darts, with half dart conversion parts. It has an interlocking construction for the frame, for strength & ease of alignment. Cage design uses horizontal flywheels similar to the Gryphon, and it uses a compatible muzzle attachment pattern for commonality. It does require a large build size for some of the parts, the longest being the Magwell frame which is 218mm long although it may fit on something smaller diagonally. Should be ok on Prusa i3 or Ender size machine. DESIGN NOTES This blaster is designed to fit the parts listed below; it may be a struggle if you try to build with different equipment. Firstly the Flywheel cage, I have done a standard version to suit typical flywheels (I use Bulldog flywheels being in the UK!). _Also there are special cages for Daybreak flywheels, Hurricane & Pulsar mini flywheels, and also Dual stage options. Motors need to be 130 size as the cage is ventilated to suit these. For a Mosfet board, I use the uknerfwar version (size 20x30mm). Activated with a small size Microswitch such as a Cherry DC2 or similar, or Full size Microswitch option for the clicky feel on the Rev trigger version. The battery grip (fits 21x38x95mm), while the battery Pistol-grip is smaller & really requires XT30 size connectors (fits 21x34x85mm). 3D PRINTING NOTES Refer to the 'Tempus_Recommended_Print-Settings.pdf' document. The following parts need special consideration:- Some of the small parts such as the Mag release pusher benefits from a finer layer height of say 0.15mm. The Motor cover does require supports. The Flywheel Cage is best printed using PETG (for temperature reasons) and does benefit from a finer layer height of say 0.15mm to better reproduce the barrel shape. The Flywheel Cage does require supports for the motor cut-outs, while the Flywheel cover is best printed upside down with no supports. Also I used PETG for anything to do with the picatinny rails. Basically the rails themselves, and the Battery Grips. PETG has a stronger layer adhesion and works better than PLA for Picatinny mounted parts in my experience. PARTS REQUIRED See the 'TEMPUS-PARTS REQUIRED.txt' document and the Assembly Guide. ASSEMBLY NOTES See the 'ASSY GUIDE.pdf' document. Also the 'TEMPUS_Photo Build_V1.pdf' document for build tips. DISCLAIMER This foam blaster could be confused for a real weapon, I would thus strongly recommend printing predominant (more than 50%) in bright or transparent colours. It is not a toy, even with lower power setups this blaster is likely to achieve 100fps+ so is not suitable for younger children. Always act responsibly, do not aim the blaster at animals or people from whom you don't have permission to do so, wear eye protection, etc. ADD-ON PARTS Quick Point Sight, https://www.thingiverse.com/thing:4705126 Quick Point Sight-Open, https://www.thingiverse.com/thing:4887523 Muzzle Options, https://www.thingiverse.com/thing:4702060 Sling Mount, https://www.thingiverse.com/thing:4708379 LICENCE Tempus foam blaster is licensed under the Creative Commons - Attribution - Non-Commercial. Make the Tempus for personal use as many times as you wish, or make copies for friends and family for the cost of filament alone. If you are interested in selling and manufacturing the Tempus, please contact me. Feedback is very much welcome and though I might not be able to respond to everyone, I read everything. If you run into issues, I'll do my best to help. It will be a lot easier for me to fix a problem than for you to re-model a part. Designing my first blaster has generally been a fun experience, a bit more difficult than I thought it would be though! Stock mounts and magwells were the most trouble, oh and mag releases they are the worse thing of all! Thanks for reading. Tim.
With this file you will be able to print Tempus Foam Blaster with your 3D printer. Click on the button and save the file on your computer to work, edit or customize your design. You can also find more 3D designs for printers on Tempus Foam Blaster.