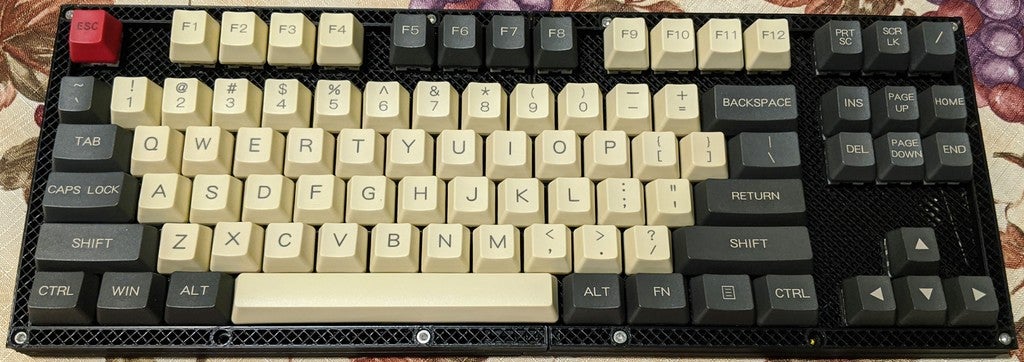
Tenkeyless Keyboard - Plate Mount - Hand Wired
prusaprinters
<p>I was inspired by the <a href="https://www.thingiverse.com/thing:3478494">SiCK-68</a> but wanted a tenkeyless layout, so I designed it from scratch.</p> <p>Here are some other features I added in my design:</p> <ul> <li>Case holds plate at a slight incline</li> <li>Threaded inserts are used for the case-closing screws</li> <li>Provision for 4 8-neopixel strips inside, for some mood lighting (but I didn't actually install them in my keyboard yet)<br/> I used zero top and bottom layers for the top parts, hoping that it will allow the LEDs to shine through better. The infill is 3mm grid. This seems to be fine for strength, the top/plate doesn't deflect appreciably when typing normally.</li> </ul> <p>If you follow my recommended wiring plan, you will need 20 I/O pins for the matrix; a simpler plan would use 23 pins, but that was more than were available on the controller I wanted to use, the Adafruit ItsyBitsy nRF52840. 20 pins still leaves one free for driving NeoPixels. I chose <a href="https://github.com/KMKfw/kmk_firmware">KMKfw</a>, a Python based keyboard firmware, and hope to enable BLE HID in the future.</p> <p>Recommended construction order (which I did not follow, lfmf):</p> <ul> <li>Pin and glue top half together</li> <li>Install keyswitches & keycaps</li> <li>Solder Row wiring with diodes</li> <li>Solder Column wiring</li> <li>Wiring runs between the half-columns</li> <li>Pin and glue bottom half together</li> <li>Wiring runs to microcontroller</li> </ul> <p>If you use my recommended wiring plan, the half-row between the numbers and F-keys is a good place to route the column wires between the two sides. Pay attention to the wiring in the Page Up/Down area, it deviates from the general pattern. I also have a feeling that there's a deviation from what that svg/pdf shows and the actual wiring; the attached tkl.py file for kmk is of course for my actual wiring.</p> <p>The OpenSCAD files are a bit of a mess, but in principle you can use this as a starting point for other keyboard layout designs. However, if I had to do it again, I'd probably use <a href="https://github.com/swill/kad/">https://github.com/swill/kad/</a> to create svg files for the plate and bring them into the rest of my 3d CAD workflow.</p> <p>The prints are quite large, at around 200x140, and there are 4 big prints in total plus the 5 pins.</p> <p>I ended up not using the clips to retain the Itsy Bitsy microcontroller, because they interfered with the pins. Instead, I just used double-sided tape. This part of the design could use refinement.</p> <h3>Print instructions</h3><p>A relatively forgiving print, 0.2mm layer height is fine. No supports. I used PLA.</p> <h3> Bill of Material</h3> <p><em>This bill of material is a work in progress. Verify it yourself, don't order blindly</em></p> <p>(These are not affiliate links, but I do work for Adafruit and many of the links point there)</p> <p>~400g Filament (I used PLA)</p> <p>87 Keyswitches 87 (I'm using Kailh Purple)</p> <p>87 Keycaps (I'm using a YMDK 125-key set)</p> <p>87 Diodes</p> <p>5×2 <a href="https://www.wasdkeyboards.com/cherry-mx-plate-mounted-stabilizer-clips-2pcs.html">Costar Plate Mounted Clips</a></p> <p>4×2 <a href="https://www.wasdkeyboards.com/cherry-mx-keycap-stabilizer-insert-2pcs.html">Costar Keycap Stabilizer Insert</a></p> <p>4×2 <a href="https://www.wasdkeyboards.com/cherry-mx-stabilizer-spring-for-2x-keycaps.html">Costar Stabilizer Spring for 2x+ Keycaps</a></p> <p>1 <a href="https://www.wasdkeyboards.com/cherry-mx-stabilizer-spring-for-spacebar.html">Costar Stabilizer Spring for Spacebar</a></p> <p>12 <a href="https://www.mcmaster.com/94459A130">M3 x 4mm threaded inserts</a></p> <p>12 <a href="https://www.mcmaster.com/94459A110">M2 x 2.5mm threaded inserts</a></p> <p>12 M3 x 8 screws</p> <p>12 M2 x 4 screws</p> <p>1 <a href="https://www.adafruit.com/product/3800">Itsy Bitsy M4 Express</a> 1 Or nRF52840 or 32u4 or M0</p> <p>1 <a href="https://www.adafruit.com/product/3258">panel mount micro USB connector</a></p> <p>Solid core wire for wiring</p>
With this file you will be able to print Tenkeyless Keyboard - Plate Mount - Hand Wired with your 3D printer. Click on the button and save the file on your computer to work, edit or customize your design. You can also find more 3D designs for printers on Tenkeyless Keyboard - Plate Mount - Hand Wired.
