Tenlog TL-D3 Pro Z stabilizer
prusaprinters
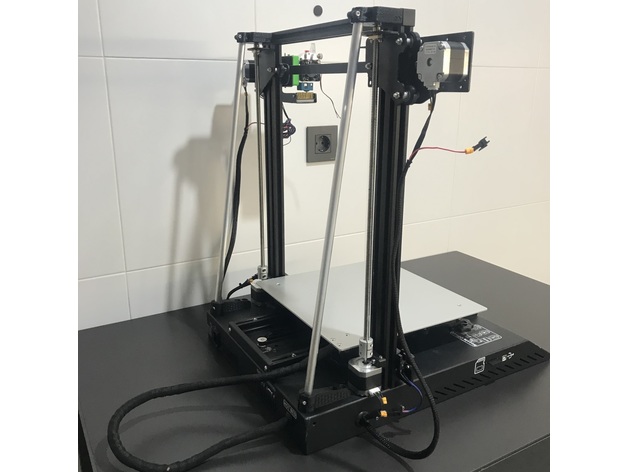
<h5>Material's list</h5><ul><li>4 units -- <a href="https://s.click.aliexpress.com/e/_9AhNFn">Nuts M3</a></li><li>4 units -- <a href="https://s.click.aliexpress.com/e/_AXohaV">Screw DIN912 M3x18</a> </li></ul><p>You can choose three types of tube / <i>puedes elegir tres tipos de tubo</i>:</p><ul><li>2 units -- Aluminium Tube outside diameter 12mm L=525mm (use the stl with name D12)</li><li>2 units -- Aluminium Tube outside diameter 10mm L=525mm (use the stl with name D10)</li><li>2 units -- Aluminium Tube outside diameter 1/2" L=525mm (use the stl with name D1_2)</li></ul><h5> </h5><h5>Steps to follow for installation</h5><p> </p><ul><li>Remove the original leadscrew / <i>Retira los soportes superiores del eje z</i></li><li>Assemble the new top brackets (use the same nuts and screws) / <i>Coloca el nuevo soporte utilizando la misma tornillería, la tapa superior se puede usar la original o imprimir la nueva</i></li><li>Remove the electronics cover / <i>Retirar la tapa de la electrónica</i></li><li>Remove the two rear screws on 4020 profile to fixed the bottom support / <i>Sacar los tornillos que fijan el perfil 4020 situados por la parte trasera del motor del eje z</i></li><li>Assemble the z_bottom support / <i>Colocar los nuevos soportes inferiores para las barras del eje z</i></li><li>Assemble the z rods / <i>Colocar las barras de aluminio en los soportes</i></li><li>Make sure the z axis is well perpendicular to the base / <i>Asegurarse que el eje z es perpendicular a la base</i></li><li>Tighten all the screws / <i>Apretar todos los tornillos ( asegurarse que el eje Z esta perpendicular a la base)</i></li></ul>
With this file you will be able to print Tenlog TL-D3 Pro Z stabilizer with your 3D printer. Click on the button and save the file on your computer to work, edit or customize your design. You can also find more 3D designs for printers on Tenlog TL-D3 Pro Z stabilizer.