Tensioners for JG Maker Artist-D
prusaprinters
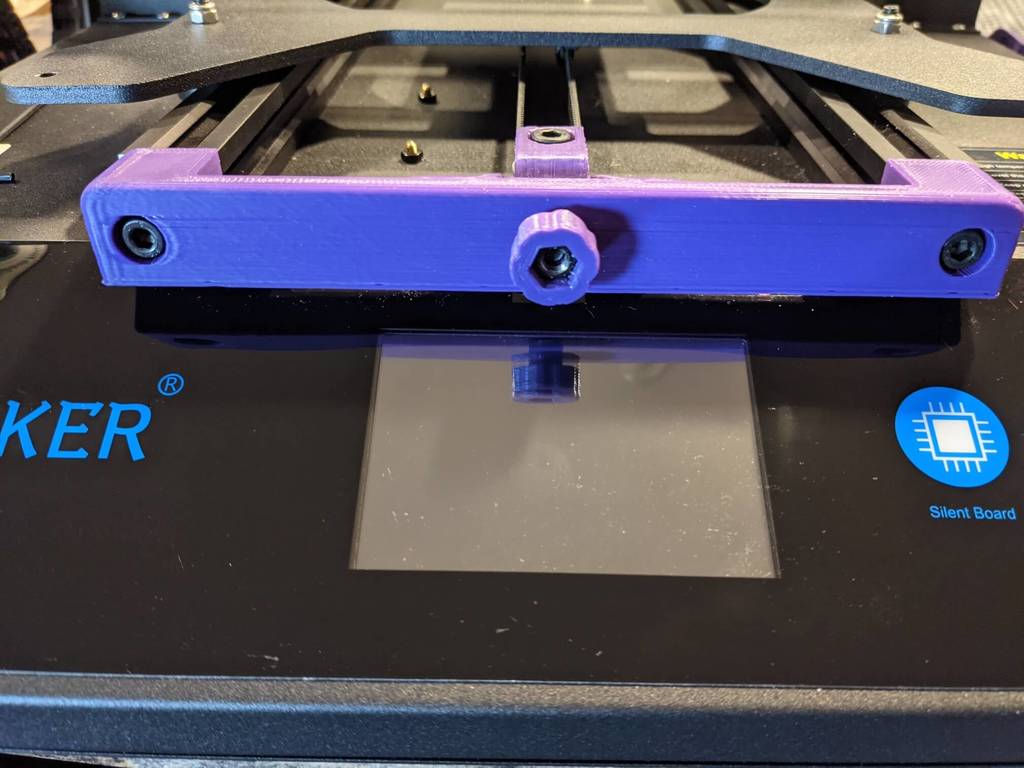
<p>I had y-axis issues with my i3 Mega that were fixed by <a href="https://www.thingiverse.com/thing:2789837">Todd Lowe's tensioner</a>, so when I had similar trouble with my Artist-D and the y-axis was so similar, it seemed like a good place to go. I was half-way done designing it from scratch when I noticed he had generously posted his source file so I couldn't pass on that. (Thanks Todd!)</p> <p>Should you feel you need to secure the base more, I've added holes for two 3 mm screws, but you'll have to drill holes in the case for those, since there are none by default. TBH, I doubt you need them.</p> <p><strong>Don't over tighten the bolt that secures the pulley.</strong> Without the pulley, possibly with a longer bolt, tighten the bolt until the nut is snug in the carriage. Then remove the bolt and add the pulley, rolling the pulley with your fingers. As soon as it starts to roll rough, back off the tightness until it's smooth again. (hint: you might need to drag a file over the carriage edges that contact the pulley a few times until it fits properly.)</p> <p><strong>Make sure your bed doesn't wobble after installing.</strong> You might need need to open up the base to rail holes with a drill.</p> <hr/> <p><strong>Like my work? Post a make!</strong></p> <hr/> <p><strong>Which base do I need?</strong> You'll need to open the base and remove the existing bolt that secures the pulley. Should you decide to Dremel or grind off the nub on the top of the printer base will determine which base you need. Cut off the nub and you shouldn't need to change the belt length. Don't want to cut it off? You'll need a longer belt and the "no cutting" base. You'll also need to remove the center bolt and remove the bed in order to replace the belt. Easier to cut off or grind off the nub.</p> <p>To remove the center bolt in the bed, remove the spring plate. Find the center of the bed by drawing a line half-way between the corners. With a sharp knife, but a half-inch hole in the middle and remove the magnet. Finally, you'll need to remove the adhesive covering the bolt. Using an allen wrench, remove the center bolt. It's a lot of work. Easier to cut off or grind off the nub.</p> <hr/> <p><strong>Knob or no knob?</strong> If you prefer to have an adjusting knob, you can put the use a hex bolt head inside the carriage and the nut in the knob. You'll have more travel but have exposed threads and that stupid knob, but the belt length will be less fussy. The "bigger knob" is recommended, since it fits the hardware better. Let me know if you find a knob you like better.</p> <p>Don't like the knob? Put the hex nut in the carriage and the bolt head on the base end. You'll have less adjustment for the belt and it might take a few attempts to get your belt length correct. BUT, without the knob, you could end up with the bolt eventually hitting the belt, as the belt stretches. If that happens, just add a few washers. Best to use the knob.</p> <hr/> <p><strong>Update 7/04/2021</strong>: Updated both bases, moving the bed to rail holes out a bit and a bit larger diameter.</p> <p><strong>Update 7/08/2021</strong>: Updated both bases, since they could interfere (lightly rub) with large bed leveling wheels, like these. Why would you want those large wheels? The stock wheels are hard to turn if you swap out the stock sprints with these silicone spacers.</p> <p><strong>Update 7/11/2021</strong>: Added z-axis tensioner for Pro with a longer slot. Will add one for Pro with 2040 top bar replaced if someone can get me some dimensions.</p> <hr/> <p>Hardware:</p> <p>knob: #5 x 30 mm hex bolt, washer and nut, and #5 x 16 mm bolt & nut.</p> <p>no knob: #5 x 20 (or 25) mm hex bolt, washer and nut, and #5 x 16 mm bolt & nut.</p> <p>6mm belt on <a href="https://www.amazon.com?linkCode=ll2&tag=thingiverse09-20&linkId=e4759bff1fa9a55a0f897d801ce2d765&language=en_US&ref_=as_li_ss_tl">Amazon</a> 35 inches is generous.</p> <hr/> <h3>Print Settings</h3> <p><strong>Printer:</strong></p> <p>JGMaker Artist-D Pro</p> <p><strong>Rafts:</strong></p> <p>No</p> <p><strong>Supports:</strong></p> <p>No</p> <p><strong>Resolution:</strong></p> <p>200</p> <p><strong>Infill:</strong></p> <p>at least 20%</p> <p><strong>Filament:</strong> eSun PLA+</p> <p>Purple.</p> <p><strong>Notes:</strong></p> <p><strong>Print with 4 outer layers for strength</strong></p> <p>z-axis tensioner should probably be printed in PETG for strength.</p> Category: 3D Printer Parts
With this file you will be able to print Tensioners for JG Maker Artist-D with your 3D printer. Click on the button and save the file on your computer to work, edit or customize your design. You can also find more 3D designs for printers on Tensioners for JG Maker Artist-D.