terraPin 6X9 120 film Pinhole Camera
thingiverse
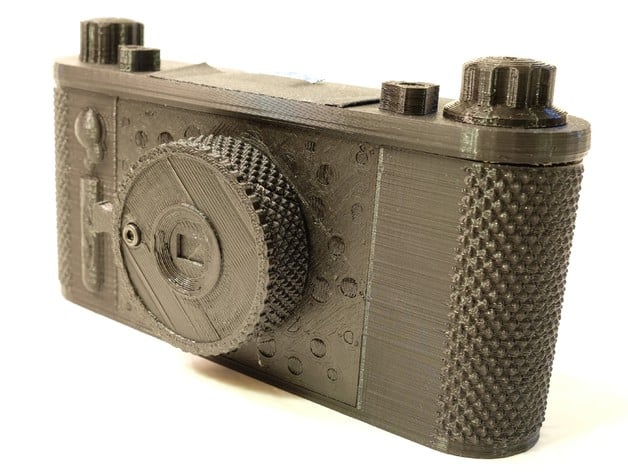
Derived from the terraPin 6X6 pinhole camera, this shoots a wider frame at 6X9. Assembly is essentially the same, but the extension is printed in two parts, upside down to avoid overhang issues. The terraPin 6X9 Pinhole Camera is unlike any other pinhole camera, 3D printed or otherwise. Developed after years of experience designing and constructing pinhole cameras, the terraPin is intended to be very easy to assemble, modify, and hack. Derived from the P6*6, this terraPin also uses 120 film, with a 6 X 9 cm frame, like many classic medium format cameras. Dozens of P6*6 / terraPin pinhole photographers around the world provided input and feedback to help shape the terraPin 6X9. The "Slider" joint between the body and extension allows for effortless changes in focal length, angle of view, and magnification. One camera body and film transport mechanism can be used with multiple extensions, each with their own pinhole and shutter blade. At this time only a 40mm extension has been designed. Let me know your preferences and I will endeavor to meet them. Assembly is a snap. A dovetail joint sandwiches the pinhole and shutter without fiddly fasteners. A single bolt holds the joint securely and provides a pre-load on the shutter fulcrum, and two more bolts clamp the shutter assembly to the slider. Reduced number of glued joints in the terraPin. Velvet or felt is no longer required for light-tight construction. NOTE There is the potential for a light leak at the bottom of the extension-body joint, which manifests at the top of a landscape photograph (remember the image is inverted on the film). For more information see thing:703591: terraPin Stawp Gap See terraPin High-Strength Winder (1/4" shaft) for additional winder/knob options! Because of the wider format and short focal length, there is significant light falloff across the frame. The center of the frame should be metered for f/154. A radius 1/4 the width of the frame meters at f/174, which makes the majority of the frame +/- 1/3 stop. The extreme corners are -1 2/3 stops compared to the center of the frame. Other features: Tripod mount Frame indexing window with cover slide Bolts secure the cap to the body during use for greater security Greatly reduced fastener count terraTool mini allen driver for opening/closing camera Multiple knob choices to customize your terraPin (can be retro'd to any Schlaboratory 3D printed pinhole camera) Dual winding knobs for precision indexing / rewinding (film swaps) Lefty-friendly shutter assembly (easy to change orientation, but film indexing requires right-to-left film transport). Film clips prevent unspooling of film during unloading ("fat roll") Exposure calculations for center and 1/4 width metering. STILL fits on the smallest of print beds (Body may require 45 degree rotation - Let me know if you need this!) Designed for PLA 3D printing CLICK HERE for 6X9 photos in my Flickr terraPin pool (tagged "t69").CLICK HERE for terraPin prototyping and development pictures. To Do List: Update User's Guide Finish OpenSCAD script to generate trim plates to fit 52mm threaded rings for lens cap and filters Expand exposure calculations for additional films Assembly and instructional video Customizer app for generating camera viewfinders Detailed assembly instructions and illustrations Upload more photos made with the terraPin 6X9 TBD The terraPin 6X9 was modeled using Tinkercad and OpenSCAD. Credit and thanks to Thingiverse citizen Aubenc for the Knurled Surface Library v2, which greatly improves the appearance of my cameras. Updates Minor modifications to cap and film clip to improve fit Jan 2015 Added exposure data with reciprocity failure for Kodak Portra 160/400, 5/28/15 - see: Pinhole_Exposure_Durations_t69_f174.pdf ATTENTION This work is licensed under the Creative Commons - Attribution - Non-Commercial license. This license applies only to the files and documents available for download from the Thing Files section of this Thing.All other related content (photographs, videos, and verbiage such as contained in "Description" or "Instructions" ) are excluded from this license. with all rights reserved, unless specifically available for download This notice constitutes a clarification, not a change, to licensing for this design. Instructions NOTE: Because the 6X9 frame is indexed by numbers on the side of the of the 120 backing paper, AND due to design considerations, the terraPin 6X9 advances film on the LEFT side of the camera. It is not ambidextrous like the 6X6 design. Tools and Materials 2 x 12mm M3 socket head machine screws and 3mm nuts 1 x 8mm M3 socket head machine screw 1/4 -20 flanged nut for tripod attachment 0.26mm diameter pinhole (See Links section for information on making a pinhole aperture) 12mm diameter disk of translucent (red) plastic X-Acto knife Files for smoothing/ shaping mating surfaces Super glue 3mm tap for shutter pivot/fixing bolt 2.5mm allen wrench or hex bit for terraTool Black Sharpie I recommend that you print this in black PLA, if possible. PLA has the desirable properties of high strength, minimal warping, and biodegradability. Any part that serves to keep light out should be printed in black. NOTE: I have found that some black PLA filament is not opaque enough for camera building. Use the "Opacity Test Tool" per the the original terraPin instructions. NOTE: PLA is shiny and you may get internal reflections that look like flares or ghosts. An easy fix is a coat of flat black paint (use a primer) on the angled walls inside the extension. The most opaque 3mm PLA I have tested is made by Shaxon and is available through Fry's Electronics among other dealers. Black PLA that has failed the opacity test include 3mm from Inventables and Lulzbot. I will update this list as testing and feedback progress. Print Parameters: Owing to the tight tolerances in this camera design, make sure your 3D printer is well tuned and calibrated. Minimum of two perimeters all parts. Minimum 3 solid layers top and bottom of printed parts. Layer height 0.25mm (All vertical dimensions are multiples of 0.25mm). Minimum infill 50% for any part that must be opaque ( I often use 75% infill). The 40mm extension differs in construction from the original terraPin, assembly details pending. The 12mm M3 bolts sandwich the shutter and pinhole together. As always, the shutter is designed for disassembly for easy replacement of pinhole or experimentation. Helpful and interesting links: An encyclopedic article with cross references:http://en.wikipedia.org/wiki/Pinhole_camera A self-described comprehensive pinhole tutorial:http://www.diyphotography.net/the-comprehensive-tech-guide-to-pinhole-photography The basics from Kodak - a quick and dirty primer.http://www.kodak.com/ek/US/en/Pinhole_Camera.htm Make your own pinhole:http://www.withoutlenses.com/articles/how-to/drill-your-own-precision-pinhole-apertures Pinhole Designer - an excellent pinhole design and exposure calulator. The reciprocity failure function is gold. Sadly, Windows only, but worth it.http://www.pinhole.cz/en/pinholedesigner/ Mr. Pinhole - More calculators and more links.http://www.mrpinhole.com/index.php Worldwide Pinhole Photography Day:http://www.pinholeday.org/ A paper pinhole camera, 2D printed in a Czechoslovakian magazine, in the 1970's: http://www.pinhole.cz/en/pinholecameras/dirkon_01.html Books, books, books; Knowledge is power:http://www.amazon.com/s/ref=nb_sb_noss_1?url=search-alias%3Dstripbooks&field-keywords=pinhole+photography
With this file you will be able to print terraPin 6X9 120 film Pinhole Camera with your 3D printer. Click on the button and save the file on your computer to work, edit or customize your design. You can also find more 3D designs for printers on terraPin 6X9 120 film Pinhole Camera.