Terror Dog Head (life size option)
thingiverse
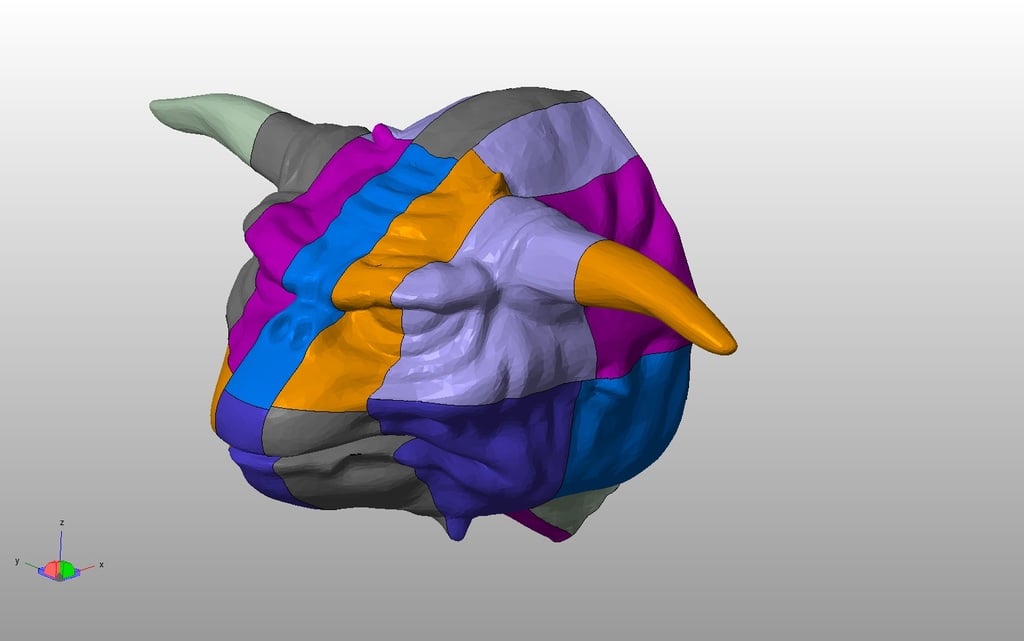
UPDATE: FIRST TEST SUCCESSFUL!! :-) Working on making the horns in 2 piece prints if needed ______________________________________________ The initial model by MustangDave is how this began, but I really liked the re sculpted version by Geoffro. I wanted to make a happy medium of each, then edit it to make just a head bust. So, here we are. :-) Geoffro made a superb model of the Terror Dog. Only problem for me, was there were way to many polygons forming the model. It made working with the model difficult. I used the reduce command in mesh mixer to drop it just enough, as to not bog down my computer or software, not too mention, there are now less chances of errors popping up in your slicing software due to the massive amount of polygons from the previous model. (this was a learning process for me, so humor me) I think I found a happy medium between MustangDave and Geoffro's work, and made a decent resolution model and so far it's doing great. "INSTRUCTIONS" If you take all the "TD CUT" files, and drag them into the program Netfab or even Netfab basic, all at once, it will give you the "puzzled together" look that some of my pics show. Doing this, will make it easier to identify each part, when it's time to fuse them all together. Just highlight each part in Netfab, and it will tell you which one it is. "PRINTING" Since this is a work in progress, and I'm still in the printing process, let me tell you what I used to save filament usage, and you can go from there. ;-) For each file, I've set my layer thickness to .04 instead of a .03 or .02 I didn't think it was necessary to have fine layer thicknesses for a large print like this. I'll explain why at the bottom of this summary. The infill is entirely up to you. I've been toying around with virtually hollow infill settings. Currently, I'm using .03 for the infill. (again, knowing your printer capabilities will really help) "THE PRINT FILES" TDCUT 1 and TDCUT 7 are the horns. Everything else has been cut and quartered down to allow printing each part on a 10" print bed possible. The files themselves, start out small in size. Use your printer slicing software to adjust the scale size of each printed part to your liking. BUT REMEMBER THAT SCALE SIZE!!! It will have to be the same for each part. For me, I stared with TD cut2 point 1 and have been progressing from there. For my Robo R1 Plus model printers, I've set my scaling for each piece 15 X bigger than the file as it's dropped into my print field. The scaling is entirely up to the person printing. I assume no responsibility for damage to a printer, if the person printing is unaware of the build volume their printer supports. As each part prints out, you may see various pin holes in your printed "puzzle pieces" if your infill is too light. For me, I'm not worried about this because the final product in the end, will have filler in any holes before painting and finishing. I did this with a large Slimer and it worked great!!! In all there are 22 files to print this out. For me, (and very much like other massive prints I've done this way) I'm a firm believer in Gorilla Epoxy!! When all the piece are complete, Gorilla Epoxy can be your "adhesive" of choice since the stuff works outstanding with PLA plastic. Now, remember the pin hole comment above? Using a body filling agent like spot filler (Bondo makes a tube of it that works great) can fill any minor holes the print may have produced due to thin infill settings and such. Again, this is all up to the person printing the model, as well as their final detailing methods. I've made a number of full scale props such as this.....some of which I will continue to add to my list here....and my methods shared here, have produced OUTSTANDING results so far. An extra tip which I think will help in the long run. Use a sharpie or something to label each print when done. I have notice this thing is like a jig saw puzzle from hell if you don't keep track of each part. lol Just remember your scaling, and the tips about using Netfab for assembly process. Good luck. Mike
With this file you will be able to print Terror Dog Head (life size option) with your 3D printer. Click on the button and save the file on your computer to work, edit or customize your design. You can also find more 3D designs for printers on Terror Dog Head (life size option) .