Test disk schooter
thingiverse
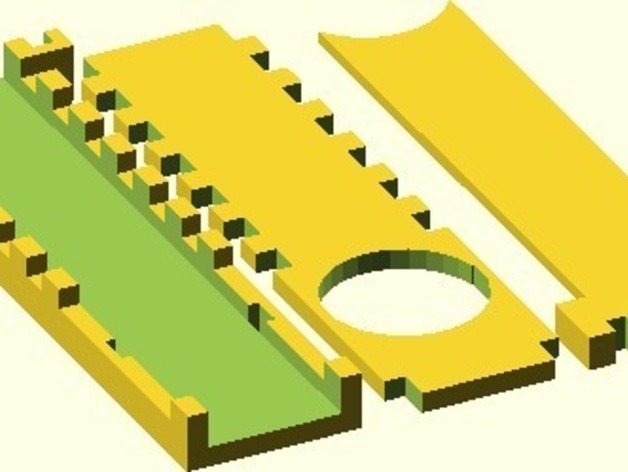
This is actually a test object for the disk shooter contest. I don't have a 3d printer, and was wondering about a few different things to see how well they print. This actually consists of 3 pieces that are put together. This was designed for 19 mm by 2 mm disks. The disks.stl file just contains 16 disks that should be the right size. I tried to give a little space around objects, so I definitely want to know how that works out when printed. I also designed the bottom and top to interlock together. They won't snap together, so much as fit together with tabs and slots. If you print this for me, I'd be very very happy! I also want to know the design flaws of this. This is a WIP because I'm trying to make it have a cartridge to hold the disks. There are two modifiable variables in the OpenSCAD document. "l" (lowercase L) is the length of the disk shooter. It is currently set at 100 for 100mm. "num" is the number of tabs used to put the bottom and top pieces together. Really, all that does is define the spacing for it, as some tabs aren't fully there because of the hole in the top piece to load the shooter. The default is 10, but in this case, only 8 are technically visible. Also, the minimum working number is 1, the maximum is 20. Please post pictures and give tips if you print this, or if you just know how to use openSCAD better than I do. Thank you! Instructions There are 3 pieces to this. There is the bottom, the top, and the plunger. This object is 100 mm x 100 mm basically, so it should just barely fit on a makerbot platform. (Note that you do not need to rotate any piece) 1) Put the bottom and top together with the slots. (make sure the hole in the top is on the opposite side of the part of the bottom where the rubber bands will go) 2) Either glue them together or tape around the pieces. 3) Put the plunger into the slot, inserting on the side with the hole. 4) Take 2 rubber bands, and put them on each side, attaching one end of the band to the bottom (at the end where the slots are, away from the hole in the top piece) and attaching the other end to the plunger. 5) Load a disk (currently can only fire one at a time, again, this is a WIP to see if it's printable) 6) Pull the plunger back enough to let the disk fall in place, and release to fire.
With this file you will be able to print Test disk schooter with your 3D printer. Click on the button and save the file on your computer to work, edit or customize your design. You can also find more 3D designs for printers on Test disk schooter.