Test Obliterator X800 + Eraser Thief + Yard Wand #backtoschool
thingiverse
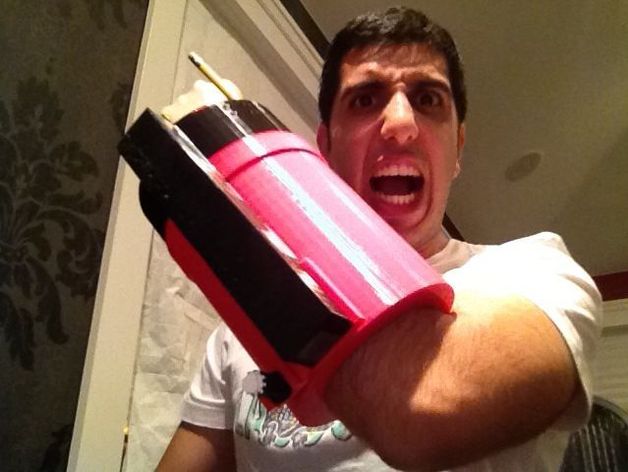
Arjun's entry for the Thingiverse #backtoschool Challenge 2013! See the official challenge rules here: http://www.thingiverse.com/challenges/back-to-school/ My creations: +Test Obliterator X800 (Pencil Case) +Eraser Thief (Pencil Topper) +Yard Wand (Extendable/Retractable Ruler) WATCH THE VIDEO DEMO: http://www.youtube.com/watch?v=KFnHFoKe1wI Description: Pencil-reloading arm gauntlet that fits on your arm, retractable/extendable ruler that extends up to 1 yard, and a pencil topper that acts like a cookie cutter for erasers! 100% 3D Printable. Obliterate your tests with a fresh pencil for every page! What's Included: PENCIL CASE: The Test Obliterator X800 is a pencil-reloading arm gauntlet! Twist to eject a new pencil right into your hand! It holds 8 pencils. Never be without a writing utensil. It fits right on your arm! RULER: The Yard Wand is a ruler that extends to become longer - just like a wand! It can be extended to just over 3 yards. (actually, currently it lists only millimeters, and the yard wand extends to precisely 94.5cm, which is 3.1 yards! PENCIL TOPPER: No time for cute decorations! Does your standard pencil eraser constantly run out? Do you prefer the higher quality, fancy erasers like the MAGIC Eraser or STAEDTLER Eraser, but don't like lugging around that entire rectangle? THOSE DAYS ARE GONE, HONEY. With the Eraser Thief Pencil Topper, you can twist it through any large eraser to carve out a cylindrical eraser that fits perfectly on your pencil! Now your wooden pencil has super eraser powers! Instructions This is 100% 3D Printable. No additional parts necessary. WATCH THE ASSEMBLY VIDEO FOR INSTRUCTIONS: http://www.youtube.com/watch?v=xiYc4T6qOeo WARNING: Scroll down and read the "Notes" section before printing. Important information regarding STL printing, left-handedness, etc. Total PLA used ~ 0.2kg to 0.4kg (1/5 to 2/5 of a spool). -Let me know if I'm wrong, this is a best guess. Print the parts in the order listed (e.g. PART 01, PART 02, PART 03) and assemble. So for example, X800 Part 01 is the base. Then you stick the X800 Part 02 inside of Part 01. Then connect Part 03 on top of part 02, and so on. Thank you to user Barz3 who reminded me to answer questions about materials and print settings: Print Settings and Build Times +I used PLA from MakerBot Industries +I used Makerware v2.2.2.89_BETA to print everything. High/Standard/Low resolutions are standard profiles inside Makerware. I always print with my build platform heated to 40C (heated platform comes with Replicator 1 Dual and Replicator 2X), but your 3D printing techniques may vary. Almost everything was printed at low resolution, without rafts. +Below are settings I used and approximate print times. TEST OBLITERATOR X800 PART LIST: (30hrs) +PART 01 - OuterShellBottom: LOW resolution, 10 hour print time +PART 02 - CylinderBarrelBottom: LOW resolution, 3 hour print time +PART 03 - PencilHolder: STANDARD resolution, 30 minute print time for 1 piece NO RAFT; 1hr45min for 8 pieces (WITH RAFT to prevent any pieces getting knocked over and ruining the entire build) I recommend you print the alternative version for thicker/larger pencils FIRST. If that fits too loosely, try the normal one. +PART 04 - CylinderBarrelsConnector: STANDARD resolution, 2 hour print time (LOW res is fine, but might break after several uses: 1 hour print time) +PART 05 - OuterShellConnector: STANDARD resolution, 2 hour print time (LOW res is fine, but might break after several uses: 1 hour print time) +PART 06 - OuterShellTop: LOW resolution, 3 hour print time +PART 07 - CylinderBarrelTop: LOW resolution, 3 hour print time +PART 08 - InnerShellConnector: STANDARD resolution, 2 hour print time (LOW res is fine, but might break after several uses: 1 hour print time) +PART 09 - Final Cover: LOW resolution, 3 hour print time +PART 10 - AccessoryHolder: STANDARD resolution, 45 minute print time +PART 11 - AccessoryHolderInserts: HIGH resolution WITH RAFTS, 10 minute build time. YARD WAND retractable ruler PART LIST: (6hrs) +ALL parts printed on LOW resolution setting without rafts. Note: consider adding more mouse ears around the corners if you prints are peeling. I had peeling issues. +PART 01 - Main Ruler: LOW resolution, 1 hour print time +PART 02 - Ruler 4: LOW resolution, 1 hour print time +PART 03 - Ruler 3: LOW resolution, 1 hour print time +PART 04 - Ruler 2: LOW resolution, 1 hour print time +PART 05 - Ruler 1: LOW resolution, 1 hour print time +PART 06 - Yard Wand Base: LOW resolution, 1 hour print time ERASER THIEF Pencil Topper PART LIST: (35 minutes) HIGH resolution, 35 minute print time I recommend you print the alternative version for thicker/larger pencils FIRST. If that fits too loosely, try the normal one. Note 1: Rotate and move to build platform before printing These STL files are NOT print-ready. In other words, you will have to use your judgment to re-orient some pieces around the X or Y axes (such as the YardWand pieces and the CylinderBarrelTop) before you can print. Note 2: Use Sandpaper to Smooth out "X800 PART 02" for best results (optional) For optimal results, you may want to use sandpaper to smooth out X800 PART 02 so that the pencils can slide up and down very easily. Some pencils wouldn't rise because of severe friction, but using sandpaper made it perfect. Note 3: Different Parts for Different Pencils Sizes The "X800 PART 03 - Pencil Holder" and the "Eraser Thief Pencil Topper" come in two versions: one for normal wooden pencils (7mm diameter, e.g. a standard Ticonderoga pencil), and a slightly enlarged version for pencils pencils (~7.5mm diameter pencils). If your pencils don't fit into the normal versions, you can print out the alternative part meant for thicker pencils! Note 4: Right Handed v.s. Left Handed The Outer Shell Base (X800 PART 01 ) has 4 holes on both sides. You can attach the accessory holder to either side, depending on whether you are left-handed or right-handed. I uploaded an alternative version of the base outer shell (X800 PART 01) for left-handed people! Note 5: Don't block the pencils with the accessory connector cylinders! The cylindrical connectors (X800 Part 11) that connect the accessory holder and outer shell base together might be a tad bit too long. Don't let them go too inside the outer shell, or they will obstruct the path of the pencils as they move along the inside. I think this part should be re-designed so that the cylinders are not allowed to go all the way through the outer shell, and so they cannot poke through the accessory holder either. (if they are poking through the front of the accessory holder, you won't be able to slide in the ruler). Future Improvements: (DONE)-Test Obliterator X800 Outer Shell needs a hole to allow easy reloading of pencils once you use all of them. -An alternative Outer Shell needs to be printed for left-handed people -The holes on the Outer Shell that allow accessories to be attached need to be modified so that connecting pieces cannot poke inside the shell and obstruct the pencils. -The holes on the accessory holder need to be modified so that connecting pieces cannot poke through and obstruct the pathway for the ruler to slide in. -The Yard Wand ruler should be slightly tweaked so that the ruler pieces cannot fall apart when the ruler is fully extended. -Enable Thingiverse Customizer compatibility to auto-generate a Test Obliterator X800 based on the size of your arm. -Enlarge Eraser Thief hole so that the pencil can fit all the way through, allowing you to raise the eraser higher as it wears away.
With this file you will be able to print Test Obliterator X800 + Eraser Thief + Yard Wand #backtoschool with your 3D printer. Click on the button and save the file on your computer to work, edit or customize your design. You can also find more 3D designs for printers on Test Obliterator X800 + Eraser Thief + Yard Wand #backtoschool.