Tetsuobot (mag + Traxxas connectors)
thingiverse
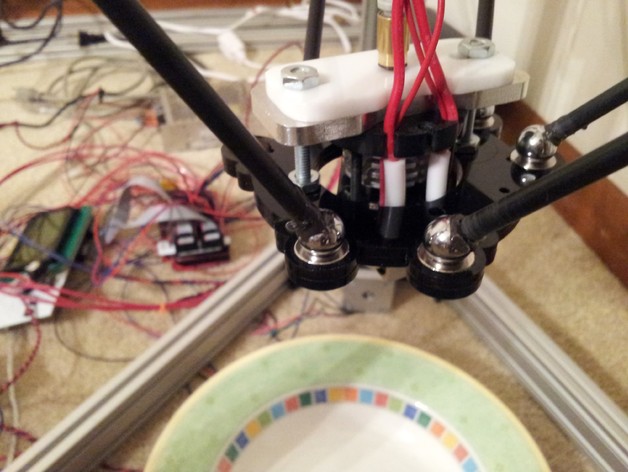
This delta bot is built with MakerSlide and magnetic carriages and effector. It was initially commissioned, but the magnets failed due to insufficient pull. The maker then remade everything using a laser cutter and made it capable of handling Traxxas joints. A crucial reminder is that the stance between connections on the effector must match the carriage's stance for proper functioning. An update a year later reveals that with a mag effector like this, one should double-down on magnets for safety - at least 8lbs of force per socket. This is especially important after converting to an airstruder as the shorter connection and nema 17 motor may cause flopping around, leading to problems. For improved magnetism, consider using two top pieces from this design with thinner acrylic for the bottom or no bottom at all, using epoxy. Alternatively, one could use socketed magnets on top and a solid 1/2" round magnet beneath. For even greater strength, there are options to use 52lbs+ magnets but that would be overkill. An initial issue was the effector being tilted when extended outwards due to unequal distance between rods at the carriage and effector. This has been corrected in effector v2 which matches the carriage's spacing. All parts, except for the "Top Corner", are laser-cut acrylic pieces welded together with Weld-On SCIGRIP #3. The end stops require two #4-40 x 3/8" bolts and a single M5 to mount on the Makerslide. Carriage parts have two sets of mounts - one for magnets, another for Traxxas mounts. Three v-groove bearings with one eccentric spacer or two with two eccentric spacers can also be used to save money. The effector is similar in design, offering two mounting options. The hot end plate was made to mount the PTFE tube holder. Pachinko balls from eBay (smooth ones) are used and JB-Quik welded to carbon rods for the joints.
With this file you will be able to print Tetsuobot (mag + Traxxas connectors) with your 3D printer. Click on the button and save the file on your computer to work, edit or customize your design. You can also find more 3D designs for printers on Tetsuobot (mag + Traxxas connectors).