Tevo Tarantula Super X Mod
thingiverse
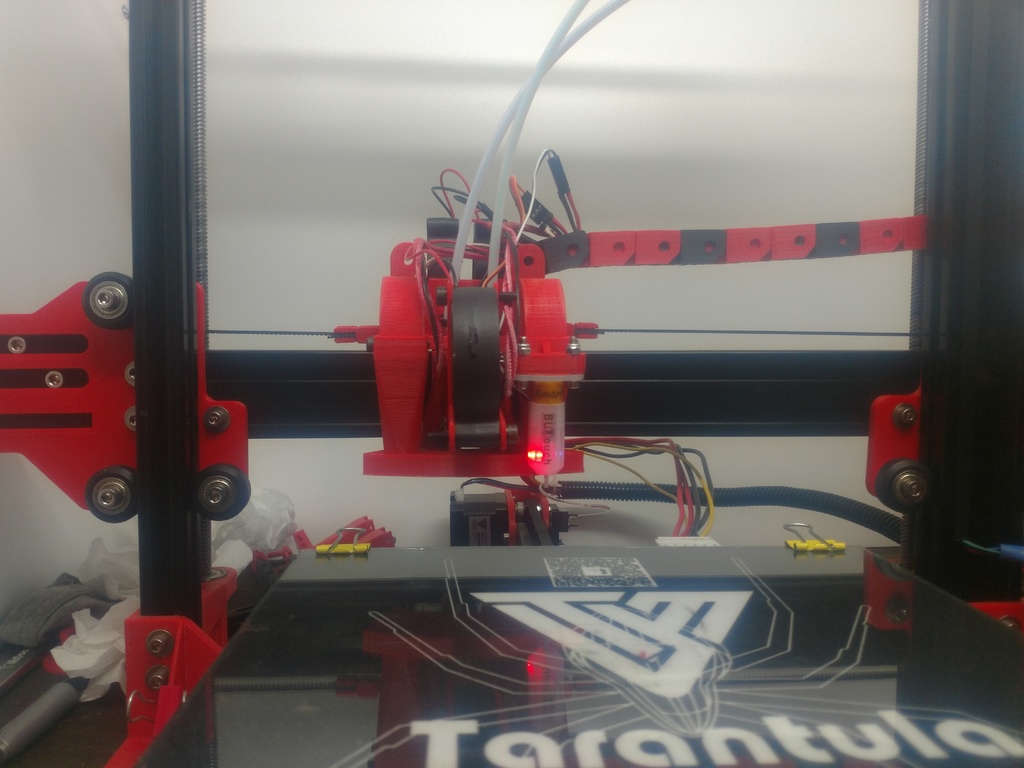
Edit - 11/28/2020 - I updated the dual nozzle carriages by refining the design of the drag chain links, which greatly improved their functionality. The refined links are now part of a separate collection and can be found at this link: https://www.thingiverse.com/thing:2869475. I also replaced the Super X Motor Block with updated chain link connectors. Edit - 11/25/2020 - I added two new revisions to the ducts, bringing the total to Rev 6. This latest version includes a BLTouch mount on one of the downspouts and increased the duct openings by another 0.5mm. The downward pitch of the jets was also increased, along with the manifold (5º). This allows for plenty of clearance to blow air only at the print and not on the hot end. Edit - 11/22/2020 - I made some alterations to the Super X Carriages while cleaning up the code in the SCAD file. The fan tunnels now have filleted corners, are wider, and with less severe turns, which will aid in air movement and reduce turbulence. In the process of moving the tunnels around, I was able to free up some room near the front idler wheel hardware. Edit - 11/19/2020 - The drag chain pin receiver hole on the Carriage was still misaligned, but I've corrected it and reprinted the carriage to verify that the chain links up correctly. All is well again! Enjoy. Edit - 11/17/2020 - I updated the Dual and Single nozzle carriages as there were flaws in the drag chain linkup. I'm printing the altered carriage now and will report back if everything lines up, but I'm confident everything will be good and that's why I released the updated files beforehand. Edit - 10/20/2020 - I removed the drag chain links as I've greatly refined the design. The refined links, along with other components, will be joined together in a separate collection and I will add a link to that in this description. Drag Chain Collection - https://www.thingiverse.com/thing:2869475 Edit - Happy New Year!!! - 1/1/2020 - Super X Duct (rev 6). This time, I added a BLTouch mount on one of the downspouts and increased the duct openings by another 0.5mm and also increased the downward pitch of the jets as well as the manifold (5º). Edit - 12/28/2019 - Thanks to Jim Brown for giving me the measurements for a single extruder heat sink mount, I grafted this in for those with single nozzle kits. Edit - 12/22/2019 - I added two more revisions to the ducts. Rev 3 gets very close to the bed, but I use bulldog clips to hold my glass and Rev 3 kept getting caught up. Rev 4 backs it off just another mm and clears the bulldog clips. Edit - 12/15/2019 - As of about 10/15/2019, I've been using my own remix of this project which entailed remixing my other designs, so rather than update all of my other remixes, I just put everything I have here. What I did different was to bring the BLTouch outside the carriage and away from the heat block, made the carriage a 3 wheel car, greatly updated the fan ducts that print great and blow as desired. Missing parts (Mechanism & Turnwheel) can be found @ this link as my design began as a remix of that Thing. https://www.thingiverse.com/thing:1730521
With this file you will be able to print Tevo Tarantula Super X Mod with your 3D printer. Click on the button and save the file on your computer to work, edit or customize your design. You can also find more 3D designs for printers on Tevo Tarantula Super X Mod.