TG Simon
thingiverse
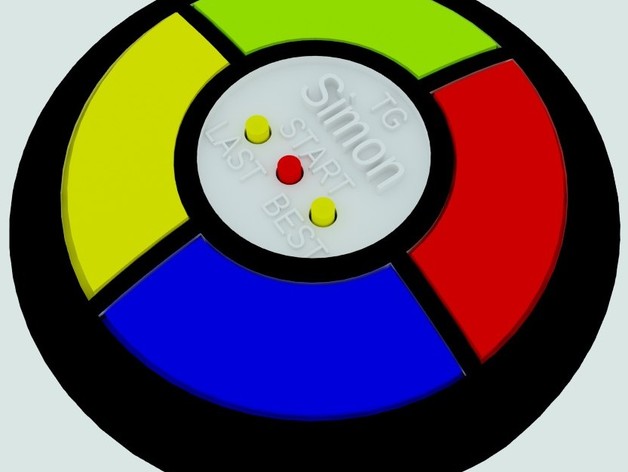
TG Simon is a simple memory game, I have uploaded the design so you could have it ready for Christmas, the instructions are a work in progress however I have uploaded all the files you will need, it has a arduino Uno at its heart, and is a fully self contained and functional game...... enjoy. Instructions ** These Instructions are a work in progress, check the picture if you get stuck. Non printed parts list. 2 x 5mm red LED's all around 3volt 2 x 5mm blue LED's 2 x 5mm green LED's 2 x 5mm yellow LED's 4 x 220 Ohm resistors for LEDs 7 x 6mm square momentary switches - Got 100 on ebay for about $4.00 I used about 2m of cat 5 cable chopped up for connections. 1 x 9v battery clip 1 x 9v battery 8 x 3mm nut and bold about 10 to 15mm long about 10 screws to hold in Arduino and screw the whole thing together - you will need to cut these to length as you go, I just used my pliers. 1 x length of heat shrink to protect and strengthen all soldered connections. 1 x strip Header Terminal Strip ( about $1.00) at jaycar 1 x Miniature DPDT Panel Mount Switch Size 35(L) x 13(W)mm. Actuator height 6mm.Mounting holes 28mm apart.3mm diameter holes for screws. CAT. NO. SS0821 I got this one from Jaycar. 1 x Arduino UNO R3 1 x Speaker OBO -1205A (-D5+342) piezo if using a 8 Ohm speaker instead make sure you connect a 100 Ohm resistor in series with it. super glue. Mini Amplifier for speaker / piezo - see circuit diagram 1 x 1M Ohm resistor 1 x 150k resistor 1 x BC547NPN transistor 1 x 10 uf electrolytic Capacitor I have designed all the parts to print without support, I recommend at least 3 shells and some parts may need light trimming as some filament will run a little, but that should be in areas you can't see. Printed Parts 4 x Paddle (large) buttons, 1 of each colour. 4 x sets of 2 Paddle button brackets whatever colour they cant be seen. 3 x Control Buttons 2 x yellow, 1 x red or mix it up. 1 x Top - Black 1 x Button support, same colour as Top 1 x Base - Black 1 x Battery Cover - Black 1 x Power switch 8 x LED support brackets - clear to opaque All switches are run from the ground not the +5V. Anybody who like to right instructions your help would be appreciated. I have uploaded the code for the arduino, the tune library came pre installed in my assembler but I uploaded it just in case. You can learn all about adding library's on the arduino website. I have uploaded a file with thepinout of the arduino in case anyone gets stuck. Ok here are the basic assembly instructions. Turn the top upside down and place in the 3 control buttons, red for start.Place in the 4 Paddle buttons - see picture.Place in all 8 paddle support brackets and bolt them into place, make sure the bolts aren't sticking up or the next layer wont sit flat.Cut the leads on the LED's about 5mm long, wire them in parallel, 2 per paddle with a extra negative wire poking out about 70mm near one corner of the paddle (this will connect to the switches later to keep things neat) and glue them into the LED support brackets leave about 150mm on the +ve lead to connect a 220 Ohm resistor(now) and then to the arduino later, use heat shrink as you go, even cover the resistor to keep it neat. * The red paddle is above the battery compartment, make sure all the wires are close to the corner, you can use the button support to double check.Glue the LED's into the paddle buttons, try not to get glue on the paddle button brackets. Clean out any screw holes that are blocked. Pre wire all the buttons, from one side leave about 150mm of lead to connect to the arduino later, from the other side connect them all together this will be the -ve or ground wire then from one of the middle switches run an extra -ve about 150mm long to connect to the arduing gnd later, on each of the 4 outside switches leave enough wire (about 50mm) to go the the -ve from the LEDs. I found wiring one switch, gluing it into place then wiring the next was the easiest. Try placing one of the switches in place and putting the button support into place and pressing on the paddle button to get a good feel for where the switch need to be glued, they should sit on the bottom of the slope. - don't forget the heat shrink.Using the centre mounting screw holes mount the button support to the top.Make up the amplifier - see the attached circuit diagram - leave the leads long enough to put it out of the road for when you put the covers on.Break up the Header Terminal Strip into 3 pieces. 2 pins for the power in, 8 pins for terminals 0-7 and 7 pins for terminals 8-13.Follow the attached pin out document for what connections go where - don't forget the heat shrink. - see picture.Feed the wires from the 9v battery clip from outside in and connect +ve to switch then from switch as shown on the pin out document (+ vin and - GND)Upload arduino sketch - to the arduino you wont be able to plug it into the PC after you have mounted it.Cut screws to length and mount the arduino - I only used 2 screws.Glue switch and piezo into place.Plug in the remainder header pins and screw on the cover - loosely, to tight and the paddle buttons will jam and you wont be able to play !.Insert battery. *Insert battery cover and screw into place. *This is the rough draft of the instructions - let me know If I missed anything or misspelled anything, ENJOY !! GAMEPLAY. When TG SIMON starts and after every game ends it will enter menu mode and the following options become available:- START will start a game on game 2 (14 turns). LAST will play last game if more than one button was pressed. BEST will play the longest game. press green then START for game 1 (8 turns). press red then START for game 2 (14 turns) ÃÂÃÂÃÂÃÂ default. press yellow then START for game 3 (20 turns). press blue then START for game 4 (31 turns). hold green and red - mute hold green and blue - unmute **When selecting a game it will flash that colour to confirm the game selected after you press the START button.
With this file you will be able to print TG Simon with your 3D printer. Click on the button and save the file on your computer to work, edit or customize your design. You can also find more 3D designs for printers on TG Simon.