Thank You Thing
thingiverse
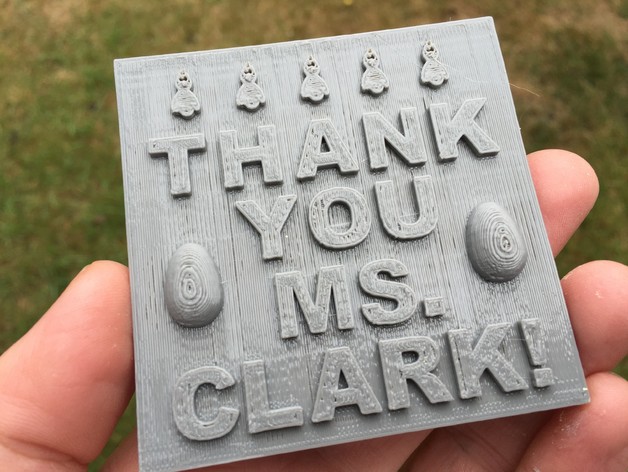
"What do we say to our terrific presenter, class?" "Thank you!" These words have been spoken hundreds of times by every teacher around the world. While having a classroom of polite children show appreciation is in fact quite rewarding, receiving a customized, 3D printed thank you note is even better! How I Designed This I find Tinkercad to be best for my design needs, but you will no doubt select the tool which works best for you. If needed, you may borrow my design here. Standards NGSS Overview and Background This lesson introduces students to the basics of 3D design while also sharing the amazingness that is 3D printing with community members who visit your classroom or school. Objectives Students will design (or contribute to the design) and print a thank you thing for a classroom visitor. Audiences Elementary (teacher guided design) Middle and high school (independent design) Subjects Design Skills Learned (Standards) NGSS: 3-5-ETS1-1 (Third through fifth grade) Lesson Plan and Activity Following a presentation by a classroom visitor, brainstorm some of the key take-away lessons learned. These ideas can be incorporated into the design. Have students sketch ideas for a thank you thing fitting to the purpose or interest of the presenter (card, medal, trophy, etc.). If working with younger children not yet capable of designing independently, merge several ideas. For older students allow them to each design their own thing, or work in teams. For instance, in the included example Ms. Clark, a wildlife biologist, gave a presentation on local owl species. To thank her for her time, our thing featured small owls and eggs. Introduce Tinkercad and allow time for students to complete the tutorials. Extension: Increase the design challenge for older students by requiring that things use no more than a set amount of material. This will require students to run the slicer program multiple times, further improving skills.Optional Have students start with a template, such as the four part jigsaw thing above. This will decrease the time spent designing from the ground up, also also creating a more collaborative thank you thing. Another option is to import a thing, such as this trophy from Thingiverse user tc_fea, and add suitable text or decoration. Print, and if needed redesign and reprint, thing(s). If possible, have the guest speaker return to the class to receive their thank you thing(s) for added impact, allowing students to present to the presenter how a 3D printer works or a bit about the design process. A medal my kindergarten class helped design for our school secretary in honor of Administrative Professionals Day. Duration of Lesson Elementary: 2-3 sessions Middle and High School: 5-10 sessions Preparation No prior design skill is needed. References Looking for more information on teaching design in middle and high school? Check out this piece by designer Jamin Hegeman. Rubric & Assessment Since this lesson is primarily about introducing students to design and 3D printing, I encourage assessment be limited to participation and teamwork, and avoid grading on design or finished product. However, a reflective writing component could follow the lesson to check to understanding. Handouts & Assets For those working in elementary and looking to set the stage a little, here are 19 picture books on gratitude. The Tinkercad file for the four part jigsaw can be found here.
With this file you will be able to print Thank You Thing with your 3D printer. Click on the button and save the file on your computer to work, edit or customize your design. You can also find more 3D designs for printers on Thank You Thing.