The 3 L's added again as its somehow invisible in my designs
thingiverse
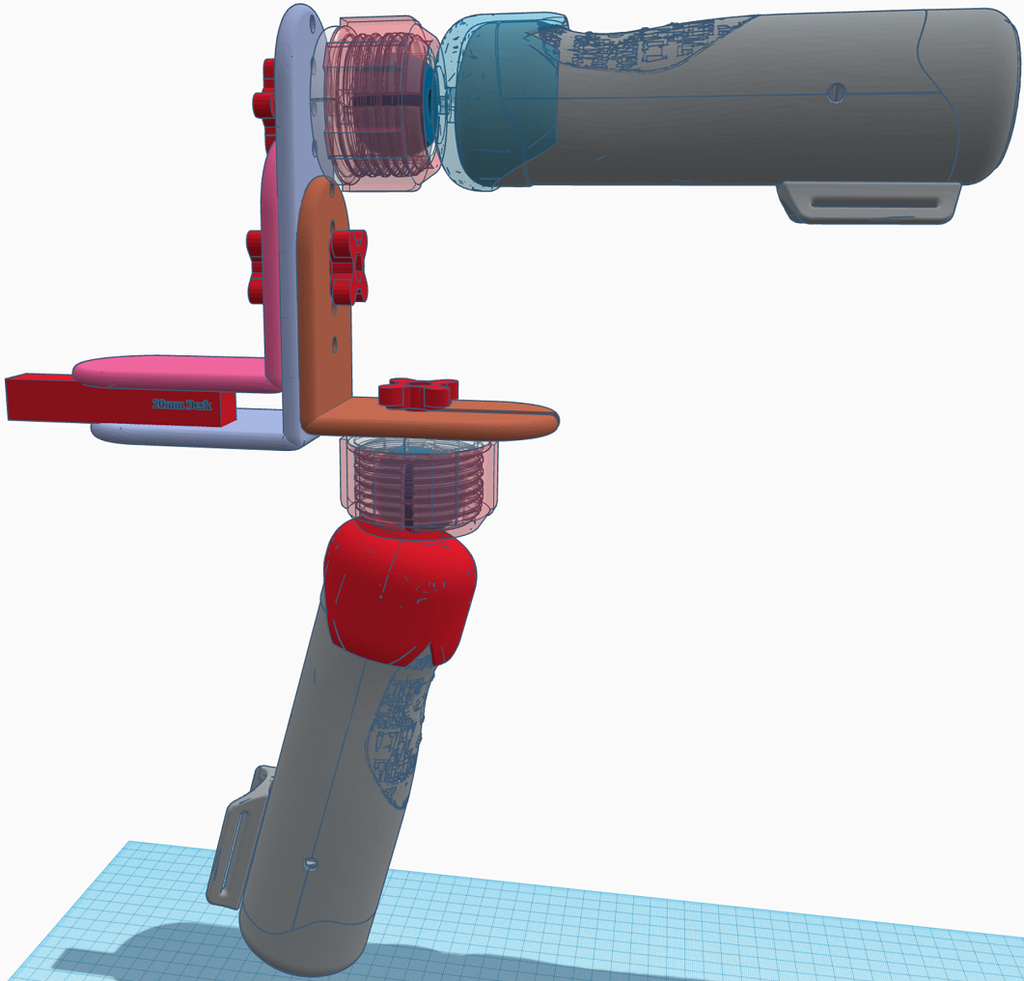
The 3 L's added again as its somehow invisible in my designs and only accessible from link i dropped in discord. So, the name for this design is "The 3 L's" It's a bit like in Demolition man - 'The 3 shells' ... Leaves all wondering how to use them? Lucky for us all, there are illustrations for the 3 Ls! I went back to my Handy arm mount madness from a few months ago and re-architected it back to its simplest form. I do still wonder if I could go further and simplify by making it more of a slot in panels design where shorter print periods would be required and panels could simply slot into one another ... but for know hopefully if printed correctly, it will be more than strong enough. I choose this design form as there was some info around rebranding in the Handy Discord. I simply placed the small bar of the logo in front of the bigger bar - space saving huh... I used this big small logo style on the M8 screw and nut handle knobs too. The method to use for the M8 nut handle is the place a M8 screw through one so its head it held by the printed handle nut. Then on the threaded end of the screw, put the handle through and add 2 nuts to the thread as 2 nuts can lock the nut closer to the centre as the thread is blocked by the 2nd nut. In addition to printing these parts, you will need: 3x M8 screws 40mm+ (1 for attaching the big L and and small L together; 2 more for attaching 2 cup mounts at the same time, if desired). 8x M8 Nuts for 4 M8 Nut handles (if planning to print 2 mounts and leave them in position - i.e. Vertical and Horizontal). After parts are printed, it should be fairly straightforward to set up just like in the illustrations. Please note, these are Tinkercad draft designs I will re-do in Fusion360 as soon as I can get better equipped computer. I have not test printed these so the quality maybe function but poor/ in need of resolution refinement. However, if you have these printed in pa12 by mjf 3d printing, I am sure the shotpeening graining effect would eliminate any surface oddities that can occur from Tinkercad designs. I have 2 prints of the cup done this way and feel assured enough that it will be if if I get it printed in this specific way - However it is more of an expensive print option but does feel more prototype exclusive. Back to the design, so usually the clamped method employs a vice grip to hold the mount to a table. I wanted this design to be as light weight and uncomplicated as possible...no needing to adjust or readjust etc. Here you just tighten together the big L and the small L to your desk thickness and slide it in place. The depth to slide in around 100mm. If there is a gap between the Ls and the desk, a layer of material like a silicon trivet mat for example, would be a perfect gap filler and will add grip. the point of this light weight design is to let the Handy anchor it down to the desk table, with grip or without, though gripped would probably be better. But its not really meant to be left alone - The user is to sandwich the Handy between themselves and the 2/3 Ls. The slotted small L is for vertical fun. Hopefully this works out like I imagine, but again, this is theoretical as I have not test printed anything - Hopefully you know better and perhaps can test print. Please do comment and let us all know :-) As its all just simple basic parts, that are non-mechanical, they should be fine in function (fingers crossed). Enjoy! Petg 15% infill or as you feel best - Please share here what works for you. Another possible way of adding grip and gap filling, is to stick on rubber feet/tape/silicone etc to the big and small L where there is contact to the desk table. 20.12.21 - new files added, one less hole to look better - form wins over function here ... also a Short L with holes on both panels. I've been advised these will print best on a side orientation - best as in strongest. They can be reinforced with corner brackets that can coincidently come is a similar shape/design - search for rounded metal brackets.
With this file you will be able to print The 3 L's added again as its somehow invisible in my designs with your 3D printer. Click on the button and save the file on your computer to work, edit or customize your design. You can also find more 3D designs for printers on The 3 L's added again as its somehow invisible in my designs.