The 5 Ws Who What Where When Why
prusaprinters
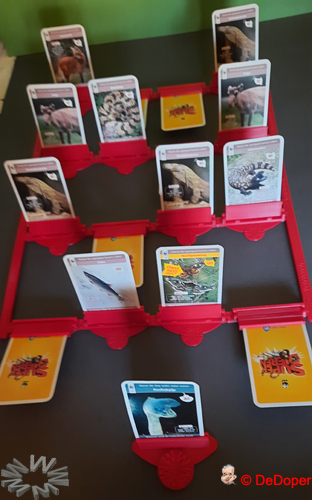
<p><strong>Background and development:</strong><br>My wife is a teacher, she works at a special educations school, teaching children with a lot of special educational needs, mostly combined with a low IQ.</p><p>She frequently adapts materials and resources that are not readily available. To do so she develops and collects materials for her pupils to try and stimulate them individually or in small groups to gain information and knowledge. The most popular way is through playing boardgames.</p><p>By playing games her children learn not just basic skills and general knowledge about certain subjects, but they also develop better social skills like asking for information, taking turns, applying game rules and coping with losing and/or winning.</p><p>She asked me if I could make a game based on “ Who am I?” that would be adjustable for her pupils to be used with more educational possibilities. The well known games like “Who am I?” are limited and less educational.</p><p>Together we sat down for a brainstorm after which we came up with this end result.</p><p>There were several criteria that had to be met;</p><ul><li>All pupils had to be able to play the game, no matter what age.</li><li>The number of cards had to be adjustable, some children can cope with no more than 10 cards, other are easily ready for 20.</li><li>It had to have educational value, for instance the cards should be easily changed depending on what theme or part of the curriculum is being taught at a certain moment.<br>Thankfully there are many opportunities to collect cards in various themes at different supermarkets ( for instance animal cards from the World Wildlife Fund). <br>Because I think the game should be attractive to a big range of children I also thought of baseball, Pokémon or Disney cards.<br>There is even the possibility to use playing cards, photographs, drawings, anything really, the sky is the limit. Lots of opportunities to educate, learn and have fun whilst playing games.</li></ul><p>Usually the game is played by 2 players, I adjusted the game so it can be played in various ways with a varying number of players, including a game leader.</p><p>I recommend making and using different colours of cardholders and master cardholders so the game leader has an easy way of checking what card belongs to what player.</p><p><strong>Technical information:</strong><br>Printing the parts can be done with any filament one likes to use, that is totally up to each personal preferences, but flexible filament is less appropriate.</p><p>I myself used PLA filament with a 0.15 mm quality and 20 % filling for a good result.<br>Most parts can be printed without support.<br>By making the axes of the cardholders I print it with supports, but they can be made without them. <br>In that case one has to do more post-processing.</p><p>On the master cardholder I placed a star on the back, the star is made up out of 5 w’s. To print those a little support is necessary. The star is purely esthetical and has no other function.<br>If so desired the master cardholder can be printed without the star on the back. For you to be able to do so I added a master cardholder without the star on the back (Mastercardholder-Little).</p><p>After having printed all parts for the wished for setup the parts can be clicked into place.</p><p>The cardholders with the axes only have to be clicked into the cardholder base once.<br>After all this is done, the setups can be adjusted to ones personal requirements by clicking several <br>Cardholder base parts together and into de StripLeft pars, the StripRight parts, and corners as can ben seen in the examples below at the step-by-step plan at the end of this description.</p><p><strong>Purpose of the game:</strong><br>The purpose of the game is to eliminate cards by asking the opponent questions about the card that he/she has in the master cardholder (for instance do I have wings, 4 legs, scales, a beak etc).<br>Each player asks one question at a time, after receiving the answer the player flips over the cards that are eliminated by the answer. (like in afore mentioned example, player 1 asks if he has wings, the answer is NO, so player 1 can flip down the cards that hold birds and insects with wings)</p><p><strong>Preparation:</strong><br>Clicking together the cardholders and the setup that fits the game best, depending on the number of cards used and the personal preferences of the players.</p><p>To be able to play the game one has to build the setup with the linkable cardholders. All rows should consist of the same amount of cardholders, but the number of cardholders in a row is free to determine thus resulting in a square or rectangle shaped setup.</p><p>To make sure the right amount of space in between the rows that is necessary to play the game easily and well there are side-strips available that can be linked together.</p><p>The front row is linked to the side-strips by a little corner piece on the front corners left and right and to complete the whole setup there are 2 end pieces placed on the tops of the side-strips.</p><figure class="image image-style-align-left image_resized" style="width:25.38%;"><img src="https://media.prusaprinters.org/media/prints/72376/rich_content/9f11f0ed-f21a-4604-8087-c11a4229022f/20210721_132402.jpg#%7B%22uuid%22%3A%22ab2927cc-03c5-4ae9-a340-f71130427b5d%22%2C%22w%22%3A421%2C%22h%22%3A500%7D"></figure><p> </p><p> </p><p> </p><figure class="image image-style-align-left image_resized" style="width:25.21%;"><img src="https://media.prusaprinters.org/media/prints/72376/rich_content/fa4a9357-cb81-47f3-909f-145fdc346201/20210721_132857.jpg#%7B%22uuid%22%3A%222900337c-eadb-4058-b663-840ea32b1bba%22%2C%22w%22%3A568%2C%22h%22%3A700%7D"></figure><p> </p><p> </p><p> </p><p> </p><p> </p><p> </p><p> </p><p> </p><p> </p><p> </p><p> </p><p>The master cardholders are placed in front of the setup of the players. </p><figure class="image image-style-align-left image_resized" style="width:25.43%;"><img src="https://media.prusaprinters.org/media/prints/72376/rich_content/ea139e2e-eadc-43ae-aef0-9967a685b8f8/20210721_132936.jpg#%7B%22uuid%22%3A%22c4bb102d-4aa8-4680-ac60-15549acead57%22%2C%22w%22%3A337%2C%22h%22%3A500%7D"></figure><p> </p><p> </p><p> </p><p> </p><p> </p><p> </p><p> </p><p> </p><p> </p><p>Once these steps have been completed the cards with pictures can be stuck into the cardholders.<br>The choice of cards is free, for instance the collections that were mentioned before or self-made cards containing pictures and/or words that fit into the theme that one is teaching at that moment.<br>The amount of cards that is needed depends on the game that players have agreed upon.</p><p><strong>Game options:</strong></p><ul><li><strong>Option with 2 players using matching sets of cards:</strong><br>You will need 3 sets of matching cards, both players receive a complete set to place into their cardholders, the third set is being used to each draw a blind card and place into the master cardholders without the opponent being able to see what card it is.</li><li><strong>Option with 2 players using different sets of cards:</strong><br>In this option you will need 2 sets of each set, for instance player one is playing with animal cards, player 2 is playing with Disney cards, they will both need a complete set of the category they are playing with and to draw the blind card they will need another set of both categories to draw one card to place into the master cardholder.<br>That means it is not necessary to play the game with both players having exactly the same cards or category.</li><li><strong>Option with more than 2 players including a game-master:</strong><br>For each player 2 sets of cards are needed unless all players play with the same category, in that case you will need the same number of sets as there are players plus one extra set to draw the blind cards out of.<br>I recommend using different colours of master cardholders when playing this variety, so the game-master can easily see what card belongs to each player.</li></ul><p>Once all cards are placed the game can begin.<br>To determine who starts the players can agree beforehand by rolling a die, the youngest player, the oldest, the player who last celebrated his or her birthday, the tallest, the smallest, who last visited Antarctica or <strong>who has eaten the last gummy bear ;) </strong>….</p><p>The player whose turn it is asks the opponent or the game-master a question about his or her cards that enables the player to eliminate cards that do not correspond with the mastercard that is in front of the opponent or the game-master.<br><br><strong>Example:</strong> Player 1 plays with cards out of the category animals by WWF, the opponent has the anteope in the master cardholder in front of him.<br>Player 1 starts with the question “Do I have a beak?” Because an antelope does not have a beak, player 2 answers “No”, after which player 1 flips over all cards that hold birds.<br>Than the turn is for player 2 who asks a similar question that fits the category he/she is playing with.<br>By asking smart questions more and more cards can be eliminated thus resulting in one remaining card matching the card standing in the master cardholder in front of the opponent.<br>Once a player has determined the right card the opponent gets one last turn to guess his or her card.</p><p><strong>Step 1:</strong><br>Click the card holder with the axes on the sides into the cut outs of the Cardholderbase.<br> </p><figure class="image image-style-align-left image_resized" style="width:34.72%;"><img src="https://media.prusaprinters.org/media/prints/72376/rich_content/b6b592b6-9734-4b05-a8fa-508fac8e1156/20210721_132114.jpg#%7B%22uuid%22%3A%22af94d2cc-e5fb-4744-966b-1fdf0cbc2e3f%22%2C%22w%22%3A836%2C%22h%22%3A500%7D"></figure><p> </p><p> </p><p> </p><p> </p><p> </p><p>+</p><figure class="image image-style-align-left image_resized" style="width:34.64%;"><img src="https://media.prusaprinters.org/media/prints/72376/rich_content/c9bdc606-6fdb-40d5-9211-2bbb62932008/20210721_132057.jpg#%7B%22uuid%22%3A%22be6ff567-a05f-4ef0-ab09-01997956603b%22%2C%22w%22%3A1108%2C%22h%22%3A500%7D"></figure><p> </p><p> </p><p> </p><p> </p><p>=</p><figure class="image image-style-align-left image_resized" style="width:34.1%;"><img src="https://media.prusaprinters.org/media/prints/72376/rich_content/35590458-e4d0-4d50-9db0-c9dad8a9f9f1/20210721_132129.jpg#%7B%22uuid%22%3A%22a7459fe5-10f4-4b08-8d78-2aa14b26502f%22%2C%22w%22%3A500%2C%22h%22%3A327%7D"></figure><p> </p><p> </p><p> </p><p> </p><p> </p><p> </p><p><strong>Step 2:</strong><br>Click the necessary amount of basic elements together as is shown in the next photographs.</p><figure class="image image-style-align-left image_resized" style="width:33.13%;"><img src="https://media.prusaprinters.org/media/prints/72376/rich_content/c972b1f8-3cdc-4bd0-a751-de692cda7ae3/20210721_132219.jpg#%7B%22uuid%22%3A%221f853eea-bdc8-458d-84e6-cff214218cc0%22%2C%22w%22%3A700%2C%22h%22%3A257%7D"></figure><p> </p><p> </p><p> </p><p> </p><figure class="image image-style-align-left image_resized" style="width:59.74%;"><img src="https://media.prusaprinters.org/media/prints/72376/rich_content/a07a6f53-c696-4ad7-ba58-6e742d205a38/20210721_132237.jpg#%7B%22uuid%22%3A%229cdf1971-2b8c-45e1-852d-7f011e88968e%22%2C%22w%22%3A700%2C%22h%22%3A169%7D"></figure><p> </p><p> </p><p> </p><p> </p><p><strong>Step 3:</strong><br>Put together the right amount of rows consisting of the same number of basic elements and place them within a certain distance of eachother.</p><figure class="image image-style-align-left image_resized" style="width:25.38%;"><img src="https://media.prusaprinters.org/media/prints/72376/rich_content/9f11f0ed-f21a-4604-8087-c11a4229022f/20210721_132402.jpg#%7B%22uuid%22%3A%22ab2927cc-03c5-4ae9-a340-f71130427b5d%22%2C%22w%22%3A421%2C%22h%22%3A500%7D"></figure><p> </p><p> </p><p> </p><p> </p><p> </p><p> </p><p> </p><p><strong>Step 4:</strong><br>Now click the rows of basic elements into the right side strips (Stripright) as depicted in the pictures below. You will need a side strip for each row except for the front row.<br><i>Note:</i> If the chosen set up consists of 4 rows of basic elements you will need 3 side strips for the right hand side. <br>You can choose to assemble the side strips before clicking the rows of basic elements into them.</p><figure class="image image-style-align-left image_resized" style="width:25.18%;"><img src="https://media.prusaprinters.org/media/prints/72376/rich_content/f3b79785-cb3e-4979-9e4f-b51fa1683894/20210721_132457.jpg#%7B%22uuid%22%3A%220efff784-9934-4fd9-9c57-9d22b892ecc5%22%2C%22w%22%3A343%2C%22h%22%3A700%7D"></figure><p> </p><p> </p><p> </p><p> </p><p> </p><p> </p><p> </p><p> </p><p> </p><p> </p><p> </p><figure class="image image-style-align-left image_resized" style="width:24.83%;"><img src="https://media.prusaprinters.org/media/prints/72376/rich_content/b3f7eae1-6a57-4a98-a490-e402a62c54a3/20210721_132530.jpg#%7B%22uuid%22%3A%22df08e751-2d97-4e58-a1ac-b727a58fbcf0%22%2C%22w%22%3A275%2C%22h%22%3A700%7D"></figure><p> </p><p> </p><p> </p><p> </p><p> </p><p> </p><p> </p><p> </p><p> </p><p> </p><p> </p><p> </p><p> </p><p><br><strong>Step 5:</strong><br>The front row will be connected to the side strips with a corner (FrontRightCorner) as shown on pictures below.<br> </p><figure class="image image-style-align-left image_resized" style="width:25.06%;"><img src="https://media.prusaprinters.org/media/prints/72376/rich_content/2f0c2fa4-1fe4-4fbb-a3b1-4b028bdc2dce/20210721_132630.jpg#%7B%22uuid%22%3A%22fcf7a012-7737-4626-9f99-2397f5f92f4d%22%2C%22w%22%3A331%2C%22h%22%3A700%7D"></figure><p> </p><p> </p><p> </p><p> </p><p> </p><p> </p><p> </p><p> </p><p> </p><p> </p><p> </p><figure class="image image-style-align-left image_resized" style="width:25.2%;"><img src="https://media.prusaprinters.org/media/prints/72376/rich_content/d9ad63e9-b26d-4b08-bdf7-f665dc07c28c/20210721_132649.jpg#%7B%22uuid%22%3A%226ccfc28a-cb68-4d38-8e41-d78b58101571%22%2C%22w%22%3A338%2C%22h%22%3A700%7D"></figure><p> </p><p> </p><p> </p><p> </p><p> </p><p> </p><p> </p><p> </p><p> </p><p> </p><p> </p><p><strong>Step 6:</strong><br>Click an end corner piece at the end of the first side strip (BackCorner) see pictures below.<br> </p><figure class="image image-style-align-left image_resized" style="width:25.36%;"><img src="https://media.prusaprinters.org/media/prints/72376/rich_content/738c3d27-1deb-4584-b23d-498c62f63b01/20210721_132700.jpg#%7B%22uuid%22%3A%2268d019a0-27ae-4533-9067-523f8af9c76f%22%2C%22w%22%3A309%2C%22h%22%3A700%7D"></figure><p> </p><p> </p><p> </p><p> </p><p> </p><p> </p><p> </p><p> </p><p> </p><p> </p><p> </p><p> </p><figure class="image image-style-align-left image_resized" style="width:25.35%;"><img src="https://media.prusaprinters.org/media/prints/72376/rich_content/600f2000-4d7c-4113-98f4-7c90b93041c4/20210721_132717.jpg#%7B%22uuid%22%3A%222017ffe1-9199-4d41-af4f-98fa26609435%22%2C%22w%22%3A441%2C%22h%22%3A700%7D"></figure><p> </p><p> </p><p> </p><p> </p><p> </p><p> </p><p> </p><p> </p><p> </p><p><strong>Step 7:</strong><br>Repeat step 4 till 6 on the left hand side with the StripLeft and FrontLeftCorner pieces.<br> </p><figure class="image image-style-align-left image_resized" style="width:11.44%;"><img src="https://media.prusaprinters.org/media/prints/72376/rich_content/2817e8dd-20f0-4645-8f23-4ec226dfed0a/20210721_132753.jpg#%7B%22uuid%22%3A%22bae5289c-6e70-4635-af77-54b59865b33f%22%2C%22w%22%3A143%2C%22h%22%3A700%7D"></figure><p> </p><p> </p><p> </p><p> </p><p> </p><p> </p><p> </p><p> </p><p> </p><p> </p><p> </p><p> </p><figure class="image image-style-align-left image_resized" style="width:25.63%;"><img src="https://media.prusaprinters.org/media/prints/72376/rich_content/e4a700d2-0e17-40e3-83f9-c2dccb7671c9/20210721_132857-b.jpg#%7B%22uuid%22%3A%22e351bfba-dcd4-48af-93d0-7d939c30cfe3%22%2C%22w%22%3A568%2C%22h%22%3A700%7D"></figure><p> </p><p> </p><p> </p><p> </p><p> </p><p> </p><p> </p><p><strong>Step 8:</strong><br>Place the master cardholder in front of the setup.</p><figure class="image image-style-align-left image_resized" style="width:19.01%;"><img src="https://media.prusaprinters.org/media/prints/72376/rich_content/dd865534-04cd-4407-97e7-b86c0e23da17/20210721_132924.jpg#%7B%22uuid%22%3A%2239023c02-f39b-473d-a034-d2f8193412a5%22%2C%22w%22%3A241%2C%22h%22%3A300%7D"></figure><p> </p><p> </p><p> </p><p> </p><p> </p><p> </p><figure class="image image-style-align-left image_resized" style="width:19.52%;"><img src="https://media.prusaprinters.org/media/prints/72376/rich_content/e34bf50d-2248-4197-a59f-b7cb69cd49aa/20210721_132936.jpg#%7B%22uuid%22%3A%22af1f50ba-13ef-4cc6-994e-813f551b9fd6%22%2C%22w%22%3A337%2C%22h%22%3A500%7D"></figure><p> </p><p> </p><p> </p><p> </p><p> </p><p> </p><p> </p><p><strong>Step 9:</strong><br>Place the cards into the cardholders.</p><figure class="image image-style-align-left image_resized" style="width:25.25%;"><img src="https://media.prusaprinters.org/media/prints/72376/rich_content/b3818753-8323-4730-a6a4-b318cf8e412d/20210721_133623.jpg#%7B%22uuid%22%3A%225e19ee7d-5b7d-46ad-992f-c8e48702d8ff%22%2C%22w%22%3A304%2C%22h%22%3A500%7D"></figure><p> </p><p> </p><p> </p><p> </p><p> </p><p> </p><p> </p><p> </p><p> </p><p><strong>Repeat step 1 till 9 for each player</strong></p><p><strong>Examples of various setups:</strong><br> </p><figure class="image image-style-align-left image_resized" style="width:50%;"><img src="https://media.prusaprinters.org/media/prints/72376/rich_content/f23013d9-0641-4c5e-bba9-eebb40b90c91/20210721_134857.jpg#%7B%22uuid%22%3A%2236cdd21e-ec08-4150-a828-058d954ab2f3%22%2C%22w%22%3A698%2C%22h%22%3A500%7D"></figure><p> </p><p> </p><p> </p><p> </p><p> </p><p> </p><p> </p><p> </p><p>3 X 5</p><figure class="image image-style-align-left image_resized" style="width:50%;"><img src="https://media.prusaprinters.org/media/prints/72376/rich_content/8feba96f-25eb-40e2-ae39-5a2d67721af9/20210721_152233.jpg#%7B%22uuid%22%3A%224da29df7-eab9-4618-93cd-503912ad8d9c%22%2C%22w%22%3A331%2C%22h%22%3A500%7D"></figure><p> </p><p> </p><p> </p><p> </p><p> </p><p> </p><p> </p><p> </p><p> </p><p> </p><p> </p><p> </p><p> </p><p> </p><p> </p><p> </p><p>5 X 3</p><figure class="image image-style-align-left image_resized" style="width:50%;"><img src="https://media.prusaprinters.org/media/prints/72376/rich_content/fceaaf74-f49c-4158-874a-b6ae2fad18b1/20210721_185533.jpg#%7B%22uuid%22%3A%22255880ed-daed-4b76-8d49-287a34b322fd%22%2C%22w%22%3A600%2C%22h%22%3A278%7D"></figure><p> </p><p> </p><p> </p><p> </p><p> </p><p><br>2 X 8</p><p><strong>During the game:</strong><br> </p><figure class="image image-style-align-left image_resized" style="width:50%;"><img src="https://media.prusaprinters.org/media/prints/72376/rich_content/33843012-f177-413c-9c27-8dfd8ea13173/20210721_133806.jpg#%7B%22uuid%22%3A%227332d830-511b-442d-a834-e8e233ada9d7%22%2C%22w%22%3A312%2C%22h%22%3A500%7D"></figure><p> </p><p> </p><p> </p><p> </p><p> </p><p> </p><p> </p><p> </p><p> </p><p> </p><p> </p><p> </p><p> </p><p> </p><p> </p><p> </p><p> </p><figure class="image image-style-align-left image_resized" style="width:50%;"><img src="https://media.prusaprinters.org/media/prints/72376/rich_content/a61162e9-2c9c-45c5-a6a2-db2c24f0e727/20210721_133839.jpg#%7B%22uuid%22%3A%2278ebccd2-a020-4e1e-af87-82cc229656f9%22%2C%22w%22%3A321%2C%22h%22%3A500%7D"></figure><p> </p><p> </p><p> </p><p> </p><p> </p><p> </p><p> </p><p> </p><p> </p><p> </p><p> </p><p> </p><p> </p><p> </p><p> </p><p> </p><p> </p>
With this file you will be able to print The 5 Ws Who What Where When Why with your 3D printer. Click on the button and save the file on your computer to work, edit or customize your design. You can also find more 3D designs for printers on The 5 Ws Who What Where When Why.