The Bicycle Bubble Machine
prusaprinters
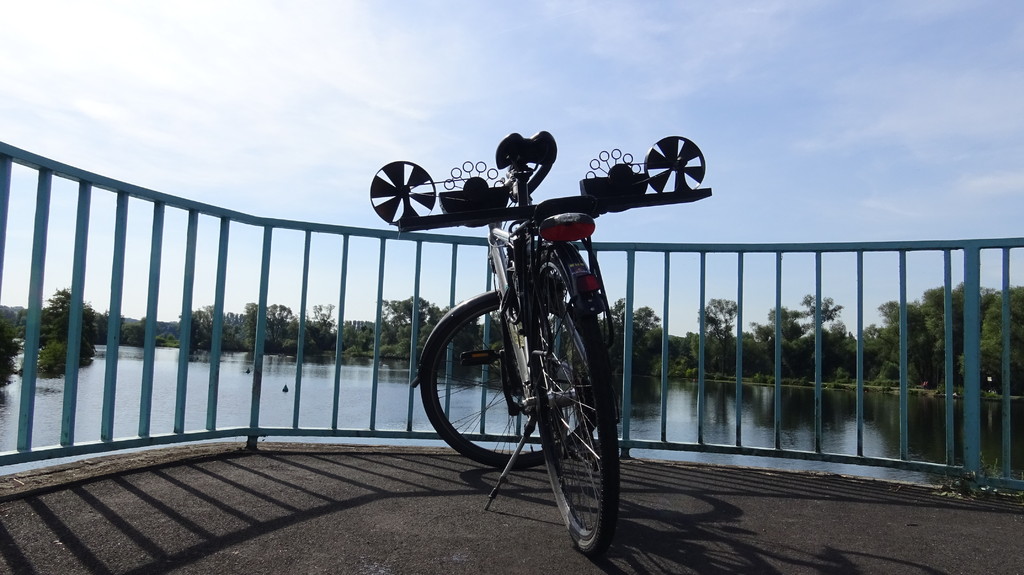
<p>Full video: <a href="http://youtu.be/-RRaYNLv_Zs">http://youtu.be/-RRaYNLv_Zs</a></p> <p>Finally, be the star of commuter traffic! Make all the kids in the neighbourhood happy! Or just jealous! Engage in inspiring discussions with chemtrail believers! With the wind-driven Bicycle Bubble Machine drawing a dense stream of soap bubbles behind you, you too can bring peace and happiness back to the streets!</p> <p>The Bicycle Bubble Machine is a bubble machine attached to the luggage rack of your bike. I actually found bicycle-mounted bubble machines on the net, but they all run on batteries, neglecting the fact that on our bikes we have a source of energy which is much more sustainable and fun: relative wind. The Bicycle Bubble Machine only uses the relative wind created by riding your bicycle: a wind wheel will turn a wheel with bubble wands, which are blown directly by the relative wind. It works surprisingly well at a comfortable range of speeds, and with the funny, jet-engine look the machines have, when one is attached to every side of your bike, it's an eyecatcher. Well, at least it gave me a lot of strange looks when using it on the street.</p> <p>This is my first real project constructing something which moves. While I'm not an engineer (so please be kind!) I did put a lot of work in this (and printed lots of prototypes ...): for example the tank was supposed to be printable in one piece, store enough liquid, not store too much liquid in 'dead' places, and not spill all the time while cycling. The design now for example has bulkhead walls to reduce sloshing effects. That said:<em>it will still get messy</em>, but that's part of the fun :)</p> <p>While I thought about a gear system, I discarded this idea, because everything I could come up with led to a) a smaller tank, b) larger dead spaces of fluid, c) too many wind turbulences in the bubble path etc. If you're interested, I've written about the process of designing this <a href="https://heinzdrei.wordpress.com/2015/05/18/bicycle-bubble-machine/">here</a></p> <p>This thing is not difficult to build. I tried to give detailed instructions.</p> <p>Future improvements might be: a lever to temporarily block the bubble wheel, so you can turn off the machine when it is not needed; and modifications to the bubble wheel like combining two bubble rings to a long one for larger bubbles, or improving the topography of the bubble rings to store more fluid.</p> <p>For the pulleys, I used <a href="https://www.thingiverse.com/thing:16627">Parametric Pulley</a> by droftarts. I kept them although I dropped using tooth belts (replacing it with elastic ribbon), because they give good friction.</p> <p><strong>Please take a look at these remixes:</strong></p> <p><a href="https://www.thingiverse.com/thing:976106">http://www.thingiverse.com/thing:976106</a>, <a href="https://www.thingiverse.com/thing:973210">http://www.thingiverse.com/thing:973210</a> and <a href="https://www.thingiverse.com/thing:1656828">http://www.thingiverse.com/thing:1656828</a>. They definitely make this design better; miroks tank prints easier and without difficult removing of support (his bubble wheel makes more bubbles and might print better on printers with problematic bed adhesion, but for you it might also lead to many connected bubbles which don't fly as good, as someone reported); 3dMODler's remix will help those with friction problems on the pulleys. The third one by jkf123 is a clever idea to reduce spilling even further, by collecting spilled liquid and leading it back to the tank again.</p> <p>reparator's remix <a href="https://www.thingiverse.com/thing:3808090/">https://www.thingiverse.com/thing:3808090/</a> is a very impressive redesign of the whole thing, improving on many aspects at once!</p> <h3>Print Settings</h3> <p><strong>Rafts:</strong></p> <p>Yes</p> <p><strong>Supports:</strong></p> <p>Yes</p> <p><strong>Notes:</strong></p> <p>For the tank support "from printbed" not "from everywhere"!</p> <h3>Instructions</h3> <p>Don't be scared by the long instructions. It's easy, I just want to be precise. If there are questions, please ask in the comments. <strong>If you want detailed instructions with pictures, please see my instructable on <a href="http://www.instructables.com/id/The-Bicycle-Bubble-Machine/">http://www.instructables.com/id/The-Bicycle-Bubble-Machine/</a></strong></p> <p>Apart from printed parts, you will need:</p> <ul> <li>a piece of wood to mount the machine on, which will then be put onto your luggage rack; I used 10cm x 70cm to have one bubble machine on each side (the wind wheel mount protruding a little over the edge of the wood); you should take less than 10cm width, however, as some bubbles that move down are less likely to pop then</li> <li>small self-tapping screws (so your plastic doesn't break), optionally also small wood screws</li> <li>sewing accessories: elastic ribbon (the stuff that makes your knickers hold, I used 8mm wide black), needle and thread, fixing pins</li> <li>something to make the axles for the two wheels: I used 2mm welding wire (straight sticks); toothpicks will work, too, but they will break easily</li> <li>small drills (like 2.5mm) to drill open the holes for the axis, as many 3D printers will not make the holes dimensionally correct; screwdriver and the like</li> </ul> <p>Print one of every part, two of each clip (measure the diameter of the tubes your luggage rack is made of and tell me, if you need different clips). Print either two 3mm spacers or one 6mm. As for the slicer settings:</p> <ul> <li>it is very likely that you'll need a raft to print at least the wind wheel; on my (probably badly calibrated) printer I also needed a raft to print the tank</li> <li>the tank should be as solid as possible so it doesn't leak bubble fluid. My first tank with 20 % infill, two perimeters and two top/bottom layers leaked -- it didn't render it unusable, but it got soapy on the outside and if you left the tank full at evening, there wasn't much fluid left the next morning. I then did three perimeters and four top/bottom layers, which made it better. You might also consider a coating</li> <li>for the tank you should enable support<em>from printbed</em> only, not elsewhere! This is because, inside the tank, there are bulkhead walls to prevent sloshing effects, which act as support also, but having additional support inside the tank will make it store less fluid, keep fluid in dead places and will be a mess to remove; but you will need support for the mount, so enable<em>from printbed</em></li> <li>the tank will need a lot of bridging (roughly 10mm) in the slanted that begins at a Z-height of about 40mm; give this good layer cooling</li> <li>while I use the clips in PLA right now, I will replace them by ABS ones, which will last longer</li> </ul> <p>Remove supports; for the support from printbed that it generated inside the tank above the refilling hole you best take a needle-nose plier. Take care to remove as much support as possible from the part of the tank where the wheel will be mounted - it should move freely.</p> <p>Screw the clips to the down side of the wood -- mark their positions using the luggage rack you'll use later and attach them so that you will later first clip on from the side the clips with the opening on the side, then push down the other side of the wood to clip in the others -- see the beginning of the video and you'll understand.</p> <p>Mount the tank on the<em>inside</em>, i.e. nearer to the luggage rack, with the screws. Put one axis into the large pulley, fixing it with a self-tapping screw through the hole in the pulley base. There are holes to do this with "trapped nuts" and corresponding screws, but this really isn't necessary, simple self-tapping screws suffice. Use a 2 to 3mm drill to make the holes right if they're too small.</p> <p>Put the 10mm spacer on the axis. Now push the axis through the first axis hole in the tank. Inside, put the axis through the 6mm spacer or two 3mm spacers, then the wind wheel (with the screw hole on the other side), then through the second hole of the tank. Now, also fix the bubble wheel on the axis with a screw. Check the axis turns easily and both bubble wheel and pulley are fixed, moving with the axis.</p> <p>Mount the wind wheel on the wind wheel mount, putting the small pulley on the back side of the mount, with the pulley base towards the mount. Fix both the wind wheel and the pulley on the axis using self-tapping screws. Now, mount the wind wheel on your piece of wood, with two screws in the long hole on the mount. Don't screw them tight on just jet.</p> <p>Prepare the belt: cut a piece approximately 48cm long and put it around the pulleys so that it loosely fits. Fix it temporarily with a fixing pin or similar. Now test: the belt should be<strong>very loose</strong>: it has to be just tight enough that the friction will move the other pulley if you turn one (fill fluid into the tank for this test, as it gives resistance), but it must not be so tight that it skews your axis so they don't turn anymore. An even slightly too tight belt will result in no or fewer bubbles. When you're sure you have a reasonable diameter, sew the ends together, remove the fixing pins and cut off any overlapping piece of ribbon.</p> <p>If you keep having problems with belt tensioning (i.e. getting the right friction), you might try this interesting remix, which adds spikes to the pulleys: <a href="https://www.thingiverse.com/thing:976106">http://www.thingiverse.com/thing:976106</a></p> <p>Put the belt over both pulleys. Adjust the wind wheel mount with the long hole so that belt tension is just perfect; then tighten the screws.</p> <p>I placed the whole machine just on the luggage rack like you can see on the photos and the video. You can easily make this more secure with a couple of zip-ties. I plan on adding clips soon so it can easily be attached by clipping it on the luggage rack.</p> <p>Now have fun! Use good bubble fluid, there are great differences in quality.</p> Category: Mechanical Toys
With this file you will be able to print The Bicycle Bubble Machine with your 3D printer. Click on the button and save the file on your computer to work, edit or customize your design. You can also find more 3D designs for printers on The Bicycle Bubble Machine.