The Cloclès - A Ring Gasket Mount Case for the Hexgears GK707
prusaprinters
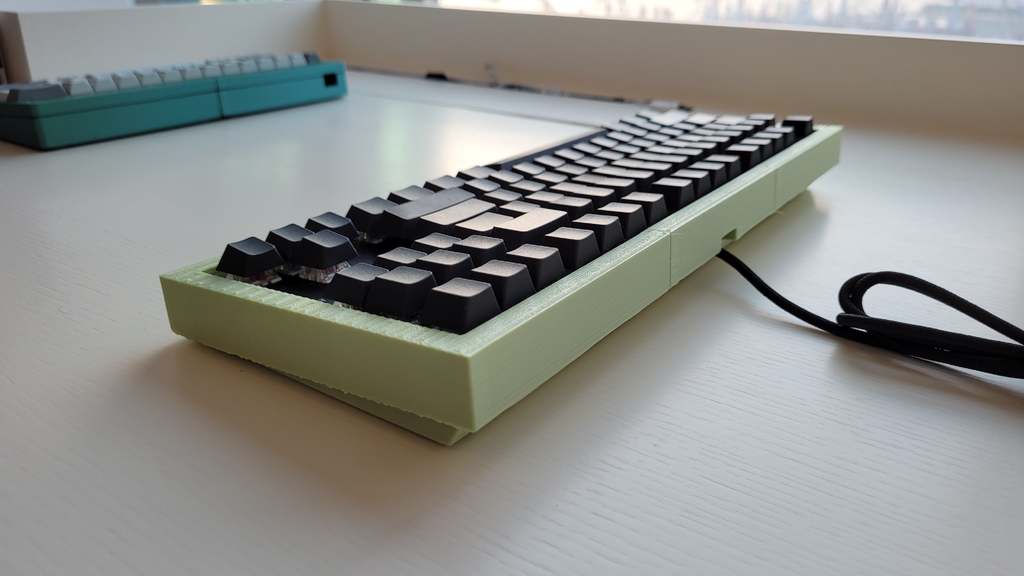
<p>INTRODUCTION:</p> <p>This is a ring gasket mount case for the Hexgears GK707 keyboard.</p> <p>INGREDIENTS:</p> <ul> <li>Hexgears GK707 plate and PCB</li> <li>5mm diameter gasket material (e.g., silicone) for the top part of the case. A length of about 350mm should be sufficient. If you want to place gasket material at the sides as well, you will need an additional length of 250mm or so.</li> <li>4.5mm diameter gasket material (e.g., silicone) for the bottom part of the case. A length of about 240mm should be sufficient.</li> </ul> <p>Different sized gasket material is needed for the top/sides and bottom because the plate overhang is different at the top/sides and bottom.</p> <p>ASSEMBLY INSTRUCTIONS:</p> <p>(1) Disassemble the Hexgears GK707 keyboard. You will only need the plate and PCB. There are some Youtube videos illustrating how to do this.</p> <p>(a) Remove the center sticker from the bottom of the case. The sticker is part of what holds the cable to the bottom of the case. (This will make sense later.)</p> <p>(b) Remove the top plastic piece from the bottom part of the case. (The top plastic piece is the part that makes the case high-profile.) You will need a credit card, spudger, or some other plastic wedge to work around the perimeter to prise the top piece from the bottom part of the case.</p> <p>(c) Once the top piece is removed, you will need to remove the 12 screws that affix the plate to the bottom of the case. You will need to remove certain of the keycaps to expose the screws.</p> <p>(d) Once the screws are removed, lift the plate/pcb by a few inches--only enough to access the cable, which is still stuck to the bottom of the case. At this point, you should have already removed the bottom sticker, but the cable is still clipped into the bottom of the case.</p> <p>(e) Unclip the cable from the bottom of the case. It is held in place by two clips. You can use a screwdriver or pliers to pry away the clips. The clips are easy to damage, though, so take care when removing.</p> <p>(f) Remove the plate and PCB assembly from the case.</p> <p>(2) Print out the Clocles case. If your build volume is large enough, you can print out the entire case in one go. I have also divided the case into thirds in the event your print volume is smaller (i.e., 150x150x150mm or smaller).</p> <p>(3) Place the 4.5mm gasket material between the plate and PCB at the top of the case. You can either run the gasket along the entire top length, or at discrete segments, as you prefer.</p> <p>(4) Place the 5mm gasket material between the plate and PCB at the bottom of the case, on either side of the space bar.</p> <p>(5) (OPTIONAL) Place 4.5mm gasket material between the plate and PCB at the two sides of the case. This is purely optional. In my own build, I omitted the side gaskets.</p> <p>(6) Feed the USB cable through the port in the back of the case. You will need to feed the USB A part of the cable from the inside to the outside. Place the box into the holder in the center of the case. (Apart from the box, the interior cable guide is not yet optimized, so the cord doesn't really follow the guide. This doesn't affect the assembly of the board, however.)</p> <p>(7) Lower the plate/PCB assembly into the case. The gasket material will rest on the ledges inside the case.</p> <p>TO DO:</p> <ul> <li>Fix interior cable guide.</li> <li>Implement replaceable cable mod.</li> </ul> <h3>Print Settings</h3> <p><strong>Printer Brand:</strong></p> <p>XYZprinting</p> <p class="detail-setting printer"><strong>Printer: </strong> <div><p>da Vinci miniMaker</p></div> <p><strong>Rafts:</strong></p> <p>No</p> <p class="detail-setting supports"><strong>Supports: </strong> <div><p>Yes</p></div> <p><strong>Resolution:</strong></p> <p>300</p> <p class="detail-setting infill"><strong>Infill: </strong> <div><p>10</p></div> <p><strong>Filament:</strong> Boxai PLA Jade</p> <p><br/> <p class="detail-setting notes"><strong>Notes: </strong></p> </p><div><p>You will need supports for the cutouts at the side of the case.</p></div> </p></p></p> Category: Electronics
With this file you will be able to print The Cloclès - A Ring Gasket Mount Case for the Hexgears GK707 with your 3D printer. Click on the button and save the file on your computer to work, edit or customize your design. You can also find more 3D designs for printers on The Cloclès - A Ring Gasket Mount Case for the Hexgears GK707.