The FoxTrot Mk III
thingiverse
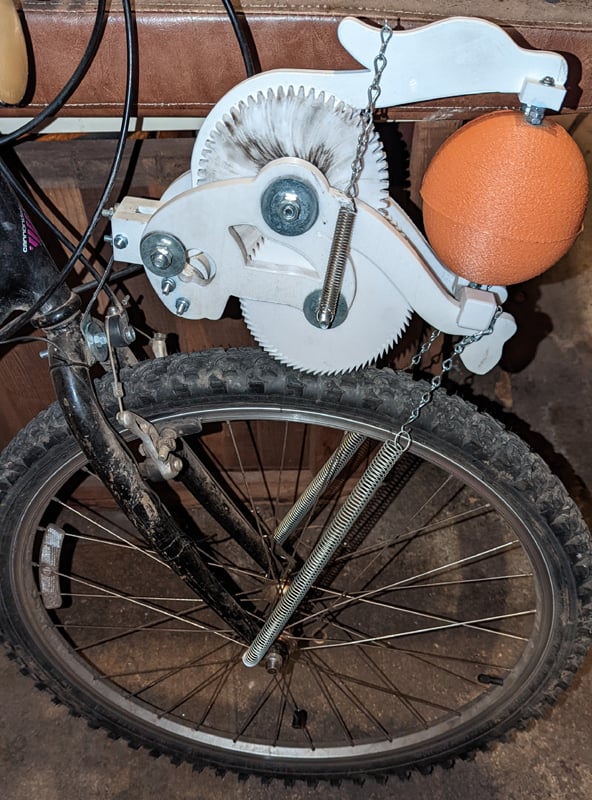
An even better version of the FoxTrot MK II (https://www.thingiverse.com/thing:5357578), featuring - A bearing for the armature that fixes the problem of wear against the cam - A reinforced mount (print on its side, and use a bolt to strengthen the vertical axis) - Screws instead of plastic to hold the mount block in place against the main frame - A thickened mount point on the bottom "coconut" half to address failure of the thin shell These improvements allow for the installation of metal springs to supply the downforce of the upper armature, which results in a VERY loud clopping noise (it can be heard from inside vehicles and residences). Install the bottom "coconut" loosely to avoid muting and to allow it to rotate so you get a slightly varying noise each time. I recommend using jam nuts AND blue Loctite on all nuts and bolts used in mounting the "coconut" halves to their respective mount points, unless you like them falling off mid-ride (ask me how I know). It is also necessary to attach each side of the main frame to the ends of your front fork using some kind of spring tension (now you know what those little holes at the end of your fork are for! XD). See pictures for details. I have omitted all mounts but the legacy mount, because honestly those new crappy plastic ring mounts aren't going to cut it. You need to be using a legacy metal front reflector mount piece, and you will probably have to bend it a lot to get it just right (I did). You are HIGHLY encouraged to print the test fit models prior to printing the entire thing. They will possibly save you a ton of frustration spending hours printing parts that don't fit. Hardware (BOM): - 3 5/16 or 3 M8 bolts - 6 5/16 or M8 jam nuts - 6 5/16 or M8 fender washers (optional but recommended) - 4 5/16 or M8 standard washers (optional but recommended) - 8 M4 bolts and nuts - Four springs of decent springiness (I know that is a bogus specification. I just used springs I found around the shop.) - Legacy metal reflector mount (may require re-bending to ensure proper mounting). I used https://www.ebay.com/itm/283526537801 - Some cheap, flimsy chain (string/rope/whatever) to attach the springs. It should be flimsy enough that if something goes wrong, it will just fail instead of binding up your bike and causing a crash. As far as the springs go, if you get up around/above 20kph and the clopping noise is not still a distinct 3/4 beat, or very loud, then the upper springs should be tighter. If you are regularly destroying the bearing mount on the upper armature or cracking the upper armature, the upper springs should be looser. If the whole mechanism is bouncing off the tyre and skipping beats, then the lower springs should be tighter. If the gears are binding with the frame due to tension deflection, then the lower springs should be looser. UPDATE: After breaking a couple metal mounts (after about 100 miles on each), I would recommend removing the two screws that prevent the frame from rotating around the mount. I had initially thought that the metal mount would help with downforce against the tyre (and previous versions relied upon the downforce provided by the metal mount only), but with the addition of the lower springs, there is no need for the metal mounting bracket to provide downforce against the tyre. In fact, keeping it bound to the bouncing of the main frame only serves to shorten the life of the metal bracket due to constant metal fatigue. TL;DR don't use those two bolts that hold the mounting block to the frame.
With this file you will be able to print The FoxTrot Mk III with your 3D printer. Click on the button and save the file on your computer to work, edit or customize your design. You can also find more 3D designs for printers on The FoxTrot Mk III.