The little bolt hobbit
thingiverse
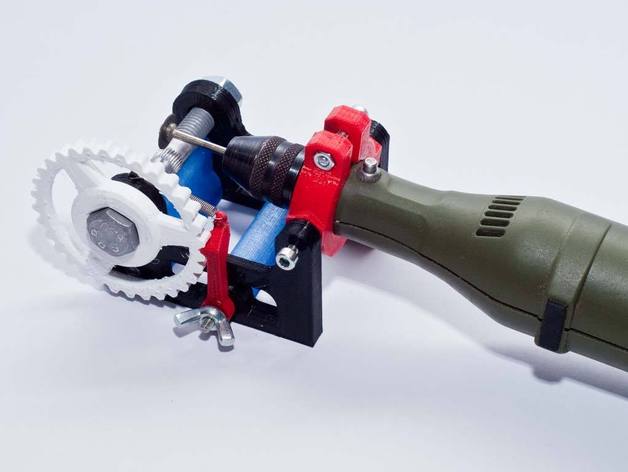
If you use different extruders, is a hassle to recalibrate your reprap each time you change the extruder. Therefore I decided to make my hobbet bolts much more precisely and reproducible. To gain better hobbet bolts, you need the little bolt hobbit and a proxxon micromot 50 (with some adjustment you might also be able to use any other kind of dremel-like tool). With the bolt hobbit, you can make a hobbet bolt with 32 teeth that are perfectly parallel, sharp and have the same dimensions. Furthermore it is easy to reproduce some identical bolts (that feed the exact same amount of filament per revolution to the hot end) so it is no longer necessary to recalibrate your firmware each time you change the extruder. This thing is slightly inspired by the KNRLR found here: http://www.thingiverse.com/thing:21782 but made much more rigid and handyer to rotate the bolt (can probably be used for mass-production of hobbed bolts :) ) edit 1: Added IGES design file edit 2: I just made the first >6hour print with the new bolt (it was a print with a large number of retractions - the worst situation for the filament feeding system) and it worked absolutely flawless! Printing speed was up to 70mm/s in this print (40mm/s average). edit 3: people who print another machine-holder (as found in derivates for example) can now download the standalone lever-only stl file in order to not have to print the proxxon-holder too. edit 4: I just added a 30tooth gear for those of you who prefer less teeth on the hobbed bolt... Instructions Materials used: â¢M3 threaded rod â¢M3 nuts (7pcs & 1x wing nut) â¢M3 Screws (3pcs, about 20 - 25mm long each... longer ones work fine...) â¢Two short pieces of plastic filament (ø 3mm) â¢Washers (if you have... works without too...) â¢Tensioner spring (out of an old ink jet or tape recorder... :) ) â¢All the printed parts enclosed with this thing... (zzz-lever_only.stl is optional, see edit 3!) â¢Micromot50 with cutting disc tool Assembly Depending on the length of the bolt you dare to hobb, you might want to slightly shorten the two spacer elements (blue on my photos) by a simple hacksaw... Prepare pieces of M3 threaded rod (one longer and one shorter piece - mind the lever to block the gear) Screw the frame togehter (use two short pieces of filament to block the higher spacer from rotating!) Press the 3 Nuts into the machine flange Screw the flange to the frame Mount the spring to the little hooks (you can warm the hooks by a lighter and close them to prevent the spring to get lost...) Press a bolt inside the gear Mount gear and machine on the bolt hobbit Hobbing a bolt: Centre the cutting disc tool to hit the screw at the correct place. Switch your micromot50 on and use highest available speed Make sure, the gear is well centered and cut the first slot (not too deep, you can re-cut later if it is not deep enough) Turn by one tooth and cut again (make sure the slot has the same lenght - then it will be exactly the same) Repeat turning & cutting until you have one full resolution Check result and re-cut if necessary until happy :) Hint: Do not mount the cutting disc until your micromot is fixed inside the flange and remove the cutting disc BEFORE you unmount the micromot from the flange. I lost some discs due to breaking them while mounting... :P
With this file you will be able to print The little bolt hobbit with your 3D printer. Click on the button and save the file on your computer to work, edit or customize your design. You can also find more 3D designs for printers on The little bolt hobbit.