The Mustang BMG E3D-V6 Direct Drive Geeetech
thingiverse
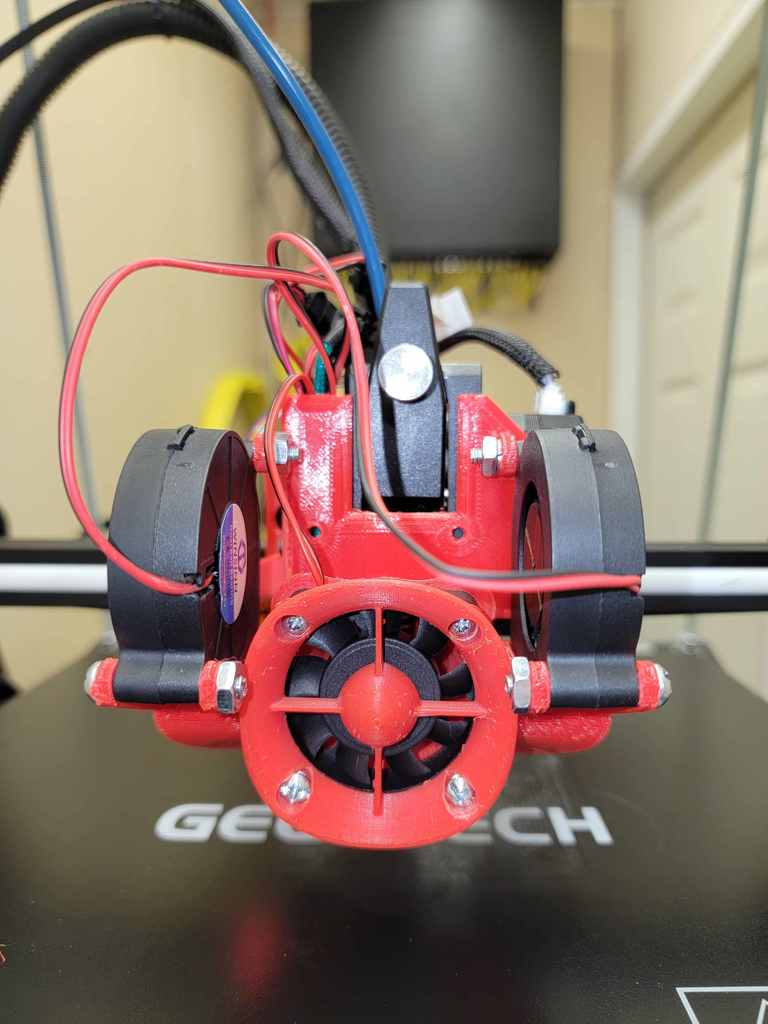
This is a direct drive system for the Geeetech A series 3D printers. This will allow you to swap out to a BFG Extruder and E3D V6 Hotend or clones. This is the direct connect direct drive system. No need for the small bowden tube connection between extruder and hotend, using the PTFE Tube Quick Couplers. (Still need the small tube inside hotend however). installation skill needed is intermediate due to it has to be inserted all at one time. Parts Needed: 40mm Fan 4x 8-32 x 1 4x M3*16 6x M3*12 3x M3*8 5x M3 Nuts 1x M3 Washer "All Nuts and Bolts may be substituted for what you have on hand, and if it will fit." Specs: BL Touch Probe Offset Y=18 X=-39 INSTRUCTIONS: 1. Print all parts 2. Remove X Carriage from rail, and remove old hotend setup. 3. Pre thread M3 bolts into front of main housing, and into fan reducer housing. 4. Mount main housing to X Carriage. You will need 2x M3*8 and 2x M3 Nuts for the bottom holes. 5. Install X Carriage back onto 3D printer. 6. Assemble BMG and E3D V6 Hotend per video. https://www.youtube.com/watch?v=dTUppEUFXVE NOTE: Tube length is 37 mm long total. 7. IMPORTANT install nut inside main housing for auto leveling device before continuing. 1x M3 NUT 8. Install Assembled BMG and E3D V6 into Main housing from the top. **You WILL have to remove the heater cartridge from the hotend before doing this step, do not try to force it. Be very carful not to strip the head of the screw holding in the heater cartridge if it has already been in use before, it will be tight. If you are installing a new hotend then you do not have to worry about as it should not be installed yet.** **I am not responsible if you break your heater cartridge trying to force it in from the top as it is a tight fit, or if you strip the screw holding the heater cartridge in.** 9. Secure Assembled BMG and E3D V6 to stepper motor. 10. Install heater cartridge back in hotend, and route the wires up through wire hole on bottom of housing along with the thermostat wires. 11. Install the Fan reducer. 4x M3*12 12. Attach cooling ducts to fan reducer. once installed, the fan ducts should be around 1.5 to 2mm above the bottom of the hotend nozzle. 2x M3*12 and 2x M3 Nuts 13. Install 5015 Fans using 8-32 x 1 bolts and nuts. or bots and nuts of your choosing. 14. Install BL Touch onto BL Touch holder, and attach to side of housing. You may run wire up through the bottom as well, your choice. 1x M3*8 and 1x M3 Washer 15. Install 5015 Fan and Fan Grill. 4x M3*16 16. Connect all cables **Disclaimer:** __I am not responsible for any damages you may cause while installing this.__ Added a cable holder that will hold the corrugated hose from the Geeetech series if you have removed the expansion board. The Mustang Geeetech Direct Drive E3D V6 v4 = No major changes from v3, added cable route on the bottom to route the heater cartridge and thermostat inside. Added a nut housing holder for the touch leveling device. Added graphics The Mustang Cooling Ducts Left v4 = Eyelet was .5 mm too far in, should not be an issue if you have V2, but fixed it in V3 to be more accurate. The Mustang Intake v3 = Added .5 to the inside ring to get cura to stop creating gaps.
With this file you will be able to print The Mustang BMG E3D-V6 Direct Drive Geeetech with your 3D printer. Click on the button and save the file on your computer to work, edit or customize your design. You can also find more 3D designs for printers on The Mustang BMG E3D-V6 Direct Drive Geeetech.