The Original 3D Printed Coaxial Mount for Gun Rifle Rest
thingiverse
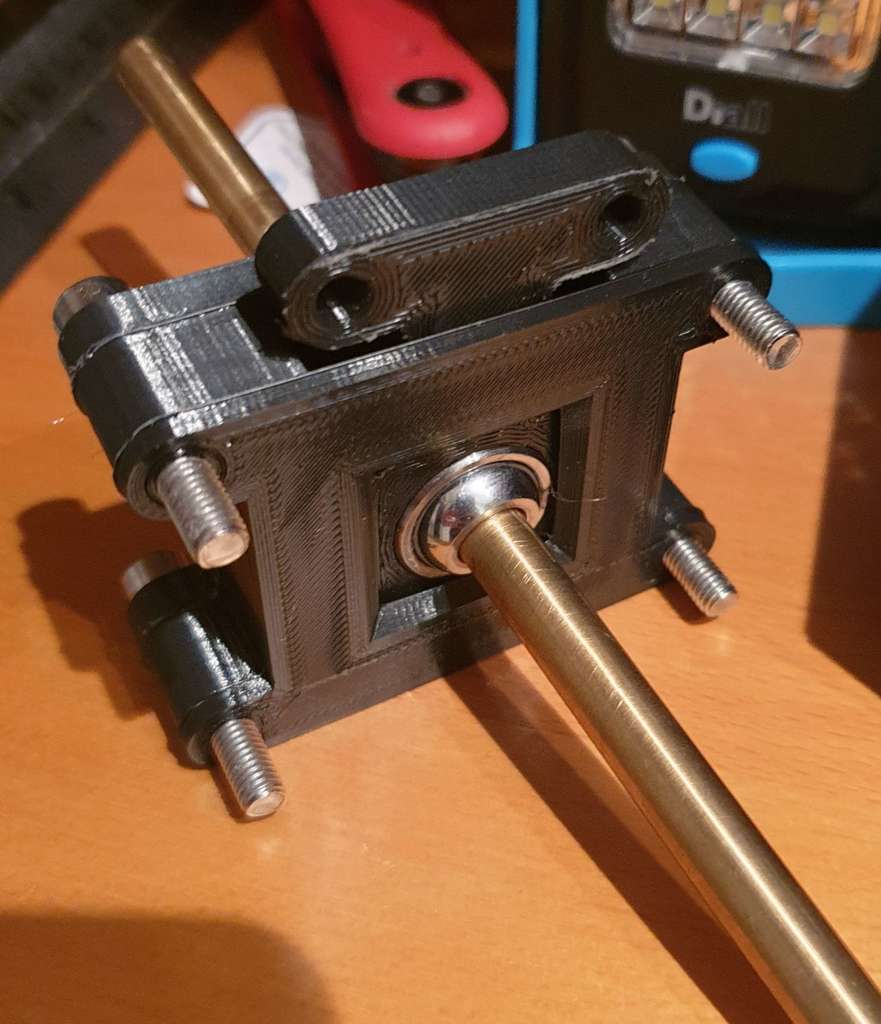
Most will skip past this request but you may be one of the few .... If you find this useful please consider providing a tip. Your support will help me to produce more items that are useful. https://www.paypal.com/paypalme/OwenDrew25 for tips. They are very much appreciated - Thank you! Coaxial Mount Unit for Air Rifle Rest. This unit provides a significant reduction in your hand movements to enable more accurate targeting when used as part of a rifle rest on a bench or ground. No supports are required for printing except for the X-Axis part. All parts are in the correct orientation for printing. Materials required - All parts printed + - 4 x M5x30 Allen Headed Bolt - 4 x M5 Nuts - 8mm diameter brass bar(or other suitable metal) - length to suit application - Some fine grade sand paper This is intended as a building block and you will need to have some kind of rest attached to the top of this unit to suit your rifle. You will also need some kind of Rifle Rest to attach the completed unit to to enable larger X and Z movement and provide a degree of stability. Print all parts then assemble in this order... 1. Install GE8FW bearing into L1 part. It's a push fit! 2. Insert 4 M5 Bolts / 1 through each mounting hole - These will pull all the layers together once fully assembled. 3. Assemble Layer 2 (The X and Z axes housing) with the notch to the top (See pictures). 4. Insert the Z Axis part. You may need to use a 600 grade sand paper to smooth the vertical outside edges of this part and also the vertical inside edges of the previous part to ensure it slides up and down smoothly but without any play left and right. 5. Install GE8FW bearing in the X axis part. 6. Install the axis part inside the Z Axis part. You may need to use a 600 grade sandpaper to smooth the top and bottom edges of this part where it mates with the Z Axis Layer (You may also need to smooth the top and bottom inside edges of this part where it mates with the X Axis layer). As previous - This needs to be smooth but without any play up or down within the Z Axis part. 7. Install the cover plate 8. Install 4 M5 Nuts and tighten to pull the 3 layers together. 9. Polish an 8mm piece of Brass Rod (or any other material you think is suitable) So that it smoothly slides through the two bearings. Some method of fixing the rod needs to be implemented to prevent it from accidentally sliding out. Some interference fit PLA bushes will probably do the trick. A balance weight usually is placed on the opposite end of the bar to the end that you steer the mount with. This is required to offset the weight of the rifle and balance the mount whilst in use. Please note: Dependent upon the accuracy of your 3D printer, you may need to adjust the sizes of the X and/or/ Z Axis parts. If they are too loose when assembled then you need to either insert some thin shims or add a small (0.1mm or so?) to the design of parts to pack it out a little more. You can always then sand it back down to suit. Please post any pictures of your makes - It works out significantly cheaper than most of the Coaxial Rests you can buy even if you include the cost of an entry level 3D Printer!!
With this file you will be able to print The Original 3D Printed Coaxial Mount for Gun Rifle Rest with your 3D printer. Click on the button and save the file on your computer to work, edit or customize your design. You can also find more 3D designs for printers on The Original 3D Printed Coaxial Mount for Gun Rifle Rest.