The Original 3d Printed Trombone!
thingiverse
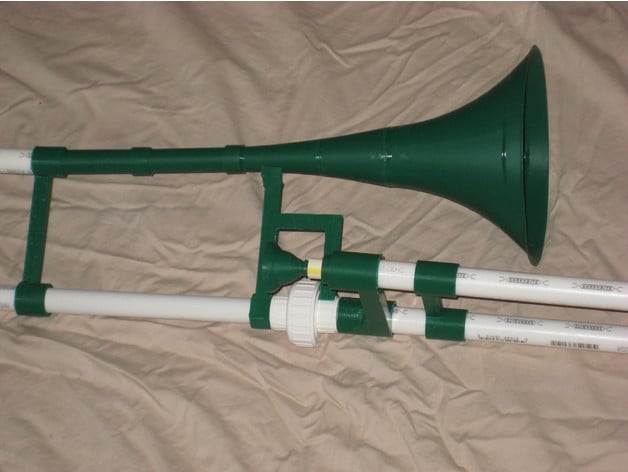
Way back in March of 2014, Lulzbot sponsored a 3d printed musical instrument contest in Reddit (https://www.reddit.com/r/3Dprinting/comments/1zceg7/lulzbot_march_3d_printing_challenge_make_some/) . For that contest I created this trombone, which at the time was the first 3d printed trombone on the planet. It used to be hosted on the now defunct site Bld3r (Old link http://www.bld3r.com/obj/5848589574078464 - does not go anywhere now) . There are certainly better looking and more functional variants available now, but here is the first one for historical / hysterical purposes. A video of me playing it. Badly. (most of that is me out of practice, not the trombone's fault. )https://www.youtube.com/watch?v=JO9q6boe0AY Trombone! The Trombone! project is an attempt to create a fully operational, full size, playable trombone using pieces printed on a standard sized 3D printer, using as many 3d printed parts as are feasible. With the exception of the slides and the backbone, all the green parts in the picture are 3D printed, may be printed without support, and can be printed on a 200mm x 200m x 160mm Lulzbot Ao-100 or equivalent printer. This trombone was created to ensure that band members in sub artic locations can safely play their instruments outdoors without fear of having a trombone permanently stuck to their face. Also there might have been something about a Lulzbot sponsored March 3D printing challenge contest in the reddit /r/3dprinting 3DPrinting forum. Happy Tromboning! Post-Printing Instructions 3d printed trombone Instructions --- Bill of Materials 1 Mcmaster Carr plastic heat set inserts Tapered, M3-.5 Internal Thread, 3.8mm Length (Part number 94180A331) 1 M3 cap screw, at least 5mm long 1 M3 rubber washer 62 inches Sdr9 PEX 5106 tubing (16.25mm inner diameter, 22.2mm outer diameter) 59 inches Flowguard Gold CPBC 1 ½” CTS Genova CPVC 4120 10 inches standard ½” schedule 40 PVC pipe 1 standard ½” PVC Union fitting ABS glue, ABS to PVC glue, and Plastic Epoxy --- Tools required 3d Printer, Tube cutter, Soldering iron (to set heat set insert), Flush cut or hobby razor saw --- Assembly Main slide Print the following components (3-5mm brim is recommended for taller pieces, support is not necessary): 1 Lower slide round (tbone_slide_round_2a.stl) 1 Slide hand grip (tbone_slide_Handle_1a.stl) 1 inner slide mounting block (tbone_slide_Inner_mount_3b.stl) Cut two 27 inch long pieces of Sdr9 PEX 5106 tubing (16.25mm inner diameter, 22.2mm outer diameter) for slide outer tubes. You will want to use a rotary tube cutter for all the white PVC and pex tubing parts in this project. Cut two 25.5 inch long sections of Flowguard Gold CPBC 1 ½” CTS Genova CPVC 4120 or equivalent tube for inner slides (15.95 mm outer diameter 12.25mm inner) the inner slide tube should move freely inside the outer slide tube Cut a third 1 inch long piece of the flowguard gold inner slide material, and install it into the smaller opening on the back of the inner slide mounting block. This piece will take the wear from removing mouthpieces over time. Fit the two inner slide pieces into the inner slide mounting block. Approximately 10-15 mm. Make sure the far ends of the tubes are the same length, and perfectly parallel to each other. Do not glue the components yet until you test fit the outer slide portions. Fit the two outer slide tubes into the lower slide round until they bottom out in the cups. Make sure they are the same length. Now add the Slide hand grip, placing it roughly 40-50MM down from the end of the tubes. This can be adjusted for personal preference and hand size later. Install the M3 heat set insert into the hole in the end of the slide lower round using a soldering iron. Once it is cooled, screw the m3 cap screw and rubber washer tight into the lower slide. Now test fit the entire assembly together with the inner and outer slide. The outer slide should move freely over the inner slide. Next cut a 1 inch long section of schedule 40 ½” PVC pipe(21.5mm OD x 15mm ID) and install in the back of the inner slide mounting block. Insure that one half of the ½” PVC union fitting (AKA our slide disconnect fitting) fits on this piece of PVC. At this point if you are happy with the fit of all your parts, you may glue them in place. Please ensure you do not glue your outer slide to your inner slide, or else you will be very unhappy and printing new slide pieces. Bell This is the most difficult print of the project. Print it with a brim, make sure you have a dialed in printer, and use your best filliament. Some cracking is likely, small cracks may be glued without issue. Print the large section of the bell. Allow bed to cool completely before attempting to remove it.. Trim the edge brim and set aside. Print the upper cone and extension pieces on their integrated print raft. Once vanished, use a plastic model razer saw or a flush cut saw to cut the parts away from their rafts as close to the raft as possible. This should leave you with a mounting flange. Glue the bell sections together using standard model airplane glue or specialized ABS glue. Set aside. Tuning slide and main frame Print the upper tuning slide round, the lower tuning slide inner slide mount block and the bell support brace. None of these parts will need brim or support Cut two 101mm long pieces of the same Sdr9 PEX 5106 tubing you used for the outer slide and install them both in the cups in the upper tuning slide round until they bottom out. The ends should be parallel and identical lengths. Cut two identical 95mm long pieces of the same flowguard gold material you used for the inner slide and install them into the tuning slide inner slide mount. The ends should be the same length and parallel. We want the tuning slide to move, but not with anywhere near the same level of motion the main slide will need. Wrap plastic packing tape or electrical tape or whatever you have on hand around the ends of the inner tuning slide until the inner tuning slide can still move, but stays where you place it when you move it in or out on the tuning slide. Pull the tuning slide out to lower the pitch of the trombone, push it in to raise it. Assuming I did my math right you will generally want to start with about 40-50mm of exposed inner slide and tune from there. Now cut a 16” long piece3 of the same ½” schedule 40 PVC pipe and fit it into one side of the tuning slide inner mount. Fit the bell support brace over the end of this piece of pipe, then Install the other half of the slide disconnect union fitting onto the end of this tube. At this point, you can if you want install the bell. I would recommend test fitting, adjusting, and gluing everything else that you can before adding the bell, as the bell is the most fragile piece. Once everything is ready, glue in the bell. Mouthpiece In order to have the correct profile, the mouthpiece is printed with the mouth portion split from the shaft. Cut both pieces away from the build raft with a razor saw or flush cut saw, then glue the shaft of the mouthpiece into the upper cup of the mouthpiece. The mouthpiece is designed to be removable, so do not glue it into the trombone. This trombone will also accept standard trombone mouthpieces. The printed mouthpiece is loosely modeled on the standard Bach 6 ½ AL tenor trombone mouthpiece. Adjustment Depending on the fit of your slide, you may need to add width to the inner slide to minimize air leak. This can be done with careful application of moisture resistant tape, or by carefully applying heat shrink tubing and trimming the excess. You want as smooth a surface as possible down there. Once your trombone is finished, you will want to apply trombone slide oil (or other food and plastic safe oil) to the slide surface. Cold cream and spray water also works well, but takes some practice to get right. To start making music, pull the tuning slide out approximately 50mm. Play a note in first position, If the trombone sounds flat, push the tuning slide in. if it sounds sharp, pull more slide out. The trombone may be played with a standard metal mouthpiece if you prefer that over the included plastic design.
With this file you will be able to print The Original 3d Printed Trombone! with your 3D printer. Click on the button and save the file on your computer to work, edit or customize your design. You can also find more 3D designs for printers on The Original 3d Printed Trombone!.