The Rocket - Side Spool Mount - Creality / Ender 3 (Pro/V2)
thingiverse
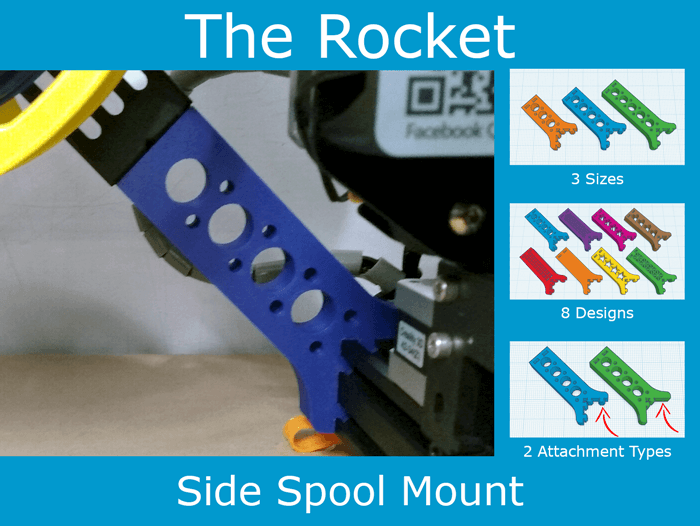
# The Rocket My new design for the Side Spool Mount, which I call: **The Rocket** The mount slides on to the bottom bar of the rack of your printer. It should fit on any printer using the standard X-frame. So that includes: - Creality Ender 3 - Creality Ender 3 Pro - Creality Ender 3 V2 - Creality CR-10 ### 3 SIZES There are 3 sizes to choose from: - **M** - Medium - **L** - Long - **XL** - Extra Long I personally use the **Long** version, which gives more than enough clearance for standard 1KG filament rolls. If you use 2.5KG roles, you might need the **Extra Long** version. The **Medium** version should also give just enough clearance, but it is tight. So I only recommend that if you are short on space on the side. ### 8 DESIGNS There are currently 8 different design to choose from - **Circles** - **Dots** - **Flowers** - **Hearts** - **Squares** - **Solid** * - **Stars** - **Triangles** *Note: The **Solid** design is overkill and uses a lot of filament, of course. I included it as a basis for if you want to create your own design (remix)* ### 2 ATTACHMENT TYPES There are 2 attachment types for each design: - **Tabs** > This has 4 tabs that slide snuggly onto the X-frame. No screws needed. Just slide it onto the rack and you are done. This is also the version I use. - **Holes** > This one has 2 tabs and 2 screw holes. This is the easiest to slide on to the rail and will offer the most sturdy fit. The M58 screws included with your printer are long enough. But I recommend using M510 screws. ### TIPS #### Printing I recommend 3 walls and a minimum of 50% infill. You do not need any supports. The holes for the screws should print fine without them. You can print with any material. PLA and PETG are great for this. ABS should work too, but it is a headache (both literally and figuratively) to print with. I would love to see a print using TPE (flexible) too. Of course, totally useless. But that's beside the point. #### Finishing If you have set your printer up to have the first layer very tight to the bed, you can get 'elephants feet'. Meaning the first layer will be a bit squashed and therefor a bit wider than the rest. This can mean that it will be hard to slide the mount on to the rack. In that case, fie down those little edges of that first layer, and you should be golden! #### Assembly I recommend you attach the original spool mount so that the bottom of the print (the first printed layer) will point forwards. 1. That side usually looks nicer and smoother 2. The holes for the screws will be at the back Then remove the plastic cap on the back of the X-frame, slide it on, place the cap back. It might be a really tight fit depending on your printer settings and filament. In that case you might need the help of a hammer or something to get it on the first time.
With this file you will be able to print The Rocket - Side Spool Mount - Creality / Ender 3 (Pro/V2) with your 3D printer. Click on the button and save the file on your computer to work, edit or customize your design. You can also find more 3D designs for printers on The Rocket - Side Spool Mount - Creality / Ender 3 (Pro/V2).