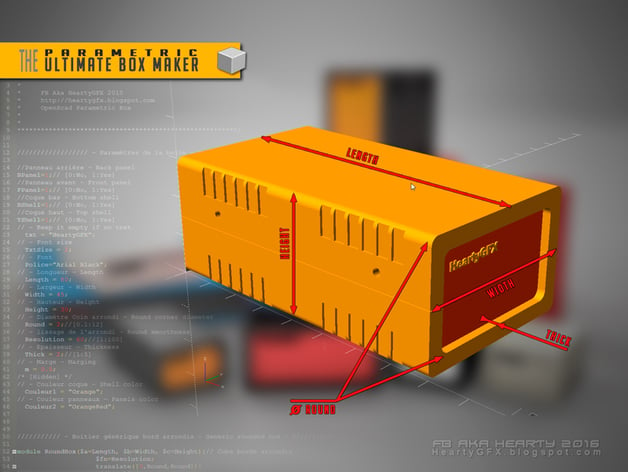
The Ultimate box maker
thingiverse
The file include now the Panel Maker. Check below in the Experimental area to download it. this project... My first try with OpenScad, the box is fully customizable. I hope you will enjoy with it, and will show us many boxes made with. If you play with the Fillet value you will go from the sharp to the round sides box If you want a chanfered box, set Resolution to 1. To export each single piece, just set the other elements to No value. The Top and Bottom Shells are the same, so it's not necessary to export them two times, except if you use the PCB feet option. Check the animation below to see how to design your own box. You can change the text shape with any font listed here . Have fun ;) Feb 12 2016 Minor bug fixed on unaligned hole when using more than 2mm thickness. March 01 2016 Added the decoration/holes options. (Thanks Ettie for your contribution) March 09 2016 Added PCB feet support, fixed the shell artefact on export mode. March 01 2018It Seems, since few month the online customizer doesn't works, some lib missing. it's not under my hands, ask to makerbot/thingiverse staff. THE solution is, downloading the newest - Development Snapshot - release of Openscad software and activate in the Edit>preference>features menu and check the "Enable customizer" option. link:OpenScad-Customizer Please, read as well. The PCB feet dimensions are all starting from the foot axis center. it's not the circuit board size, holes center only(!) Check below, some animated pictures showing how to use the Ultimate Box maker online. Print Settings Printer Brand: RepRap Printer: Home made Rafts: Doesn't Matter Supports: Doesn't Matter Resolution: 0.2mm Infill: 30% Notes: I printed some boxes horizontally or vertically, both without support. How I Designed This Overview & Background: The technology called, Stereolithography exists since the 80s. It allow you to design anything with a monomer polymerization, by deposition of successive layers. It's at the origin of our FDM printers, developed it's been 20 years. The STL file format was developed for stereolithography. Why are we fascinated by this technology? Because we are witnesses and participants of an industrial revolution. A total change in the economic paradigm that has developed during the 19 and 20 th century. We become craftsmen, designers, and take in hand our evolution. Why am I talking about that? I think it's a good introduction to show you a perfect demonstration of what we expect from this technology. Design and answer to their own needs. The proposed application lets you quickly create a case whose use will be defined by the user, the shape and dimensions will be those you have identified and not that the industry proposes / imposes. Objective: The student will have two objectives with a project like this one: Create an application that will be used for future projects , and definitively avoid buying boxes not always appropriate to the needs . Learn programming by a quasi - recreational way , since entirely graphic and visual . Many other knowledge can be transmitted based on the desire of the teacher to deepen a particular aspect of the design . Audience I'm not familiar with the foreign school grades, in France, it's around 10/12 years old they begin to learn programming. So, it can be a nice starting way and support project to learn visually to code. The presented project was made in two times, I did the box in the first time, then I dug more, for the Panel Maker. Like I said in the begining, I was, myself, learning how OpenScad works, that will be the same for the students, learning and creating something more complex lesson after lesson. A perfect way to evaluate the level reached. As an assessment Skill learned Programmation 3D design 3D printing Duration: A project like this can be the string to follow throughout all the school year. Show me how it works... Here is a small demonstration how to use the Customizer to have separate pieces box. The top and bottom shells are the same, so it's not necessary to make 2 differents stl files. If the front Panel is without text, then the back and front panels are the same, so again, just export one. right click on the animated pic, and choose "view image" to watch it in full size PCB feet right click on the pic, and choose "view image" to watch it in full size Enjoy guys, and show us your printed boxes... ;) Experimental Area With Panel Maker This release include a panel maker. fully working, just for the moment, I didn't find the good way to present it within the online customizer. Not easy to make something easy to use... Anyway, it stay easy to use, through Openscad. with few option, you will be able to create the panel that you need without limitation, or almost... To build your own panel, you have 4 tools: Cutting shapes Square Circle Text label Linear text Circular text SquareHole (1,20,20,15,10,1); //(On/Off, Xpos,Ypos,Length,Width,Fillet) CylinderHole(1,27,40,8); //(On/Off, Xpos, Ypos, Diameter) LText(1,20,83,"Arial Black",4,"Digital Screen"); //(On/Off, Xpos, Ypos, "Font", Size, "Text") CText(1,93,29,"Arial",4,10,180,0,"ABCD"); //(On/Off, Xpos, Ypos, "Font", Size, Diameter, Arc(Deg), Starting Angle(Deg),"Text") right click on the animated pic, and choose "view image" to watch it in full size You can download the animation and read it with the excellent Gifviewer open source freeware, to pause the animation when needed. Here you can download The Ultimate BOX & PANEL maker. I hope you will enjoy with.
With this file you will be able to print The Ultimate box maker with your 3D printer. Click on the button and save the file on your computer to work, edit or customize your design. You can also find more 3D designs for printers on The Ultimate box maker.